
 |
 CUTTING AND
HANGING PAPER CUTTING AND
HANGING PAPER
- Cut the first strip of paper 6" to 8" longer than the floor-to-ceiling height
of the room.
- Unroll the next strip and match the pattern before cutting the second strip. Some
patterns of paper have joining marks along the edge of the paper to guide you in matching
the designs. Watch for these marks and align them if they are present. Without such marks,
study the pattern carefully and match it before cutting.
- It is usually wise to cut no more than two or three strips of paper before applying
them.
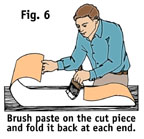
- Unroll the strip of wallpaper on the cutting table with the pattern side down. Brush the
paste on the cut piece, covering half the length of the strip (Fig. 6). Brush the
paste out evenly and not too thickly.
- You may want to add a few drops of food coloring to the paste to tint it slightly. This
makes it easy to judge the thickness of the paste and to detect any missed spots.
- Fold the pasted end of the paper back toward the center. Put the pasted side to the
pasted side, avoiding any creases.
- Slide the paper forward on the table and paste the other half strip, folding it back in
the same manner.
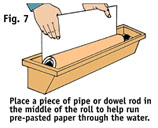
- You can run pre-pasted paper through clear water (Fig. 7). Plastic and metal dip
troughs for pre-pasted paper are available. Cut a piece of pipe or dowel rod one inch
shorter than the trough. Lay it in the bottom of the trough over the paper. It will hold
the paper under water as you pull it out.
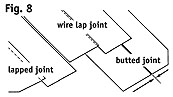
- Pre-plan to determine the type of joint you will use. Most manufacturers now recommend
the butt joint (Fig. 8). It leaves no ridge at all, but it is the most difficult
joint to make. The edge of one strip is butted tightly against the edge of the adjoining
strip. If you force the two edges together too tightly it will form a ridge. If not
tightly enough you will leave a gap between the two edges.
- In the wire lap joint, the edges of the paper are lapped over about 1/16". This
requires more skill in matching but leaves less of a ridge.
- The lapped joint is easiest to use. Simply lap one edge of the paper over the edge of
the previous strip and roll it out. You can get a perfect pattern match, but the lap
leaves a ridge. Check the manufacturer's recommendation for the type of joint to use with
the paper you will be using.
- Whichever type of joint you use, use it throughout the entire job.
- Use extreme care when placing the first strip of paper on the wall, since all other
strips of paper will be aligned to this first strip.
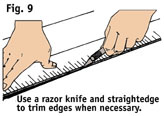
- It may be necessary to trim the edge of the paper to assure a proper fit. You can trim
the paper with a sharp wheel trimmer knife or a razor knife and a straightedge (Fig. 9).
- Use extreme care when carrying long strips of pasted wallpaper. Drape the folded paper
over your arm like a coat (Fig. 10). Never open the paper until it is in position
to hang.
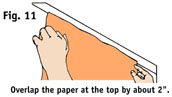
- When the paper is in position for hanging, unfold the top half of the pasted sheet.
Overlap the top edge of the pasted paper (Fig. 11), at the top by about 2".
You'll cut away this overlap in the trimming process.
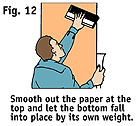
- Hold the edge of the paper with one hand and pull the pasted fold apart (Fig. 12).
The pasted side of the paper should be held firmly against the wall.
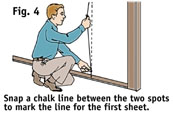
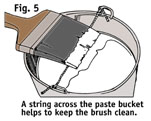
- Line up the right edge of the paper with the chalk mark you have previously made (Fig.
4). Use a smoothing brush to smooth out at the top and bottom, allowing the bottom of
the paper to fall into place of its own weight. Brush it out evenly.
- Continue to apply each sheet of paper in this same manner. Use care to align the design
in each succeeding sheet.
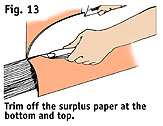
- Trim off the surplus paper at the bottom and top of each strip. Use a metal paint edger
and a razor knife to get a clean edge (Fig. 13).
- Use clean water to rinse all baseboards, casings, etc., with a damp sponge before the
paste dries.
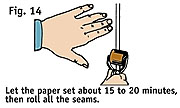
- Let the paper dry about 15 to 20 minutes, then roll out all seams (Fig. 14). Use
a regular wallpaper roller and roll thoroughly for a neat job.
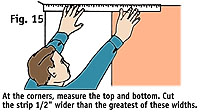
- At the corners, measure at the top and bottom, then cut a strip 1/2" wider than the
greatest of these widths (Fig. 15).
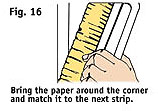
- Bring the paper around the corner to match the next strip. This gives a neat joint in
the corner (Fig. 16).
- Be especially careful when trimming paper along the edges around fireplaces, windows,
mantel-pieces, etc. Sometimes the weight of the paper causes it to tear at its narrowest
point.
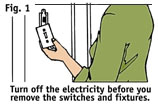
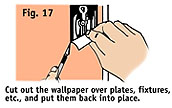
- Since all switch plates, outlet plates, etc. were removed before papering, you can apply
the wallpaper right over these openings. The wallpaper can then be cut out over these
electrical outlets when it is dry (Fig. 17). Replace the fixture plates for a
finished job.
- Use special care with flocked wallpaper. For example, do not roll it at the seams, since
this often leaves marks that cannot be erased.
- Brush flocked papers with a natural-bristle smoothing brush. You can also use a sponge
or a mohair paint roller.
- Take special care to keep paste off the surface of flocked wallpaper.
|