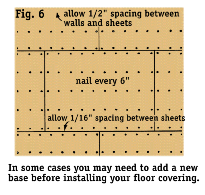
|
Create New Account
Millard Lumber Newsletter
Register to receive newsletters and notices by email. Register Now
|
Laying Sheet Vinyl Floor Covering
Carefully review these tips and suggestions on how to lay roll goods floor covering
before beginning the job. Following these directions can save you time, money and effort.

|
PREPARING
THE FLOOR SURFACE
- There are basically two ways to install sheet vinyl flooring. The first is to apply
adhesive to the entire floor area. The second is to use staples and adhesives around the
outside edges and at seams. The first method is usually used for flooring with a lesser
quality material. It can also be used if you are sure you will not need to take the
flooring material up in the future.
- The edge or perimeter method is used with better quality floor coverings. It is the
recommended method if you want to change your flooring when you remodel in the future.
- The first step in laying any type of roll goods floor covering is preparing the base
floor. It must be smooth and even before the roll covering is applied. All high or low
spots must be removed.
- You can check for high and low points in a floor by using a straightedge and a
flashlight (Fig. 1). Hold the straightedge flat against the floor, as illustrated. Play
the beam of light along the straightedge from the rear. Light filtering under the
straightedge indicates high or low points in the floor.
- If you're installing the floor covering over a wood floor, plane down all high spots. On
a masonry floor, you may need to patch or seal certain sections before laying the floor
covering.
- Regardless of the type, the floor base should be clean. Vacuuming and thoroughly
scrubbing the floor will help the adhesive to hold (Fig. 2). It will also reduce the
chances of ruining your new floor.
- Always allow the floor to dry completely before laying any roll goods floor covering.
- Check all the moldings in the room where you will be putting down flooring. Wherever
possible, your new flooring should slide under these moldings. If not, you can either trim
them or remove and replace the moldings. If neither of these are possible, you will need
to trim your flooring to fit around them.
- To trim the bottom of moldings, such as door trim, lay a piece of cardboard on the floor
next to the trim. Place a fine-toothed saw on top of the cardboard. Carefully cut the
bottom of the molding (Fig. 3).
- To remove trim, such as quarter-round, use a small pry bar or screwdriver and a putty
knife. Quarter-round is usually nailed to the baseboard and not to the floor. Carefully
slide your putty knife between the trim and the baseboard. Next, place your pry bar or
screwdriver between the trim and the putty knife blade and pry the trim loose. The putty
knife blade protects the baseboard.
- Carefully remove any nails that were left in the baseboard. Remove any nails that were
left in the trim with a pair of pliers or vice-grips. Do not drive them back through the
trim. Instead, pull the nail the rest of the way through the trim (Fig. 5). The painted or
stained surface of your trim will not be damaged as much.
- You may need to install a new base as an overlay to provide a good base for the floor
covering (Fig. 6). Sheets of plywood or hardboard make good overlays.
- Always allow about 1/16" space between sheets used as an underflooring to allow for
expansion and contraction.
- Secure this underlayer sheeting to the floor with cement, or use nails spaced about
6" apart over the entire floor surface.
- Sand off all edges where the sheets join to eliminate any rough spots.
|
|
MAKING
A PAPER PATTERN
- Perhaps the easiest way to lay sheet vinyl is by using a paper pattern of the floor.
Installation kits are available that contain paper, guides and instructions. You can make
a pattern with brown kraft paper, a pair of scissors, straightedge, utility knife and some
masking tape.
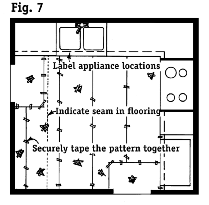
- Begin by laying the paper down along the longest wall with the fewest obstructions. If
you cut your flooring the exact size of the room, it is likely to roll up or buckle. Allow
about an eight of an inch between the pattern and the wall (Fig. 7).
- Keep adding paper until you reach the opposite wall. Use masking tape to tape the paper
together. Cut small diamond shapes about every two to four feet in all directions on your
pattern. Place masking tape over these cutouts to hold the pattern in place.
- Keep the paper as smooth as possible. Use plenty of tape along the edges of the paper to
hold the pattern together. Use small sheets of paper to fit around pipes, toilets,
cabinets, appliances and heating vents. Cut and fold these smaller pieces to fit. Then
tape them to the pattern (Fig. 8). If you make an opening too large, use tape and paper to
correct the size.
- After you have completed the pattern, use a felt marker to mark the side of the pattern.
- Carefully roll or fold the pattern. Take it to a large clean floor area. A garage floor
that has been thoroughly swept works well.
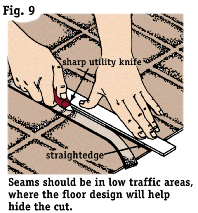
- Most sheet flooring today is sold in 12 foot widths. If you have a room that is larger
than 12 feet in length and width, you will need to make a seam. Plan for seams to be in
low traffic areas if possible. Use the pattern of your flooring to help hide the seam. For
example, if your pattern has heavy lines, such as sides of boards or grout lines, make
your seam along these lines.
- To make the seam, lay the larger piece of flooring down first, right side up. Then place
the smaller piece, right side up also, so the two pieces overlap by at least an inch. Most
importantly, lay them so the pattern on both pieces match (Fig. 9). Tape the two pieces
together.
- Use a straightedge and sharp utility knife to cut through both layers of flooring.
Depending on where you are working, you may want to lay pieces of cardboard under the
flooring so you don't damage the floor. Remove the two trimmed edges. Carefully put the
seam together again and retape the seam.
- After the seam is made, you are ready to cut the flooring. Place the pattern, right side
up, on top of the flooring. If you haven't already done so, remove the tape covering the
small diamonds and replace it with new tape. Be sure the pattern is laying so that the
seam is where you planned and that it is laying flat.
- To cut the flooring you have two options. You can trace the pattern onto the flooring
using a straightedge and a marker. And then cut it with heavy shears or snips. Or you can
use a utility knife and straightedge and cut around the pattern. Either way, be very
careful.
- After you have finished cutting the flooring, carefully roll it. The way you roll it can
make the job easier. For example, rolling it toward an edge that goes next to a cabinet
makes fitting it under the toe plate easier. Also, remember the length. If you have to go
around any sharp corners, roll it so it is as short as possible.
|
 |
LAYING ROLL GOODS
- You may need a felt lining or base coat. However, you can lay most roll goods directly
on any solid and even surface.
- Begin laying the floor with the edge with the most obstructions. Position it carefully
so you do not tear the floor covering. Unroll the flooring a little at a time. You may
need to keep the roll higher at the opposite end to make installation easier.
- After the flooring is in place, glue any seams. Pull one edge of the seam back and tape
it with masking tape. Using the other edge as a straightedge, place a pencil mark on the
floor. Pull back the second edge of the flooring and tape it back also (Fig. 10).
- Using the recommended adhesive, spread it along the pencil line. The adhesive should
extend no less than two inches on each side of the line. The full width of your notched
trowel is probably the easiest measure. Do not spread the adhesive all the way to the
wall. Leave about twelve inches between the end of the adhesive and the wall (Fig. 10).
- Remove the tape from one edge of the flooring and press it down into the adhesive.
Release the other edge and carefully align it with the edge that is already down. Press it
down firmly into the adhesive. Remove any excess adhesive that might have come up through
the seam. Seal the seam with the recommended seam sealer.
- If you are going to use molding, you can use a staple gun to secure the edges. Start at
the seam and be sure the staples are close enough to the wall so the quarter round will
cover them. For areas such as doors where the staple will show, use adhesive or metal
molding strips. If you are not using quarter round, you will probably want to use adhesive
around the edges.
- If you decide to use adhesive on the entire floor, follow the same directions for
cutting the flooring. Follow the manufacturer's direction for applying the adhesive. Make
the seams as described before.
|
DOING TRIM AND FINISH WORK
- Finish your flooring installation by checking it over carefully. Remove any excess
adhesive from the flooring surface with the recommended cleaner.
- Install the quarter round. It should be nailed to the baseboard trim or wall, not
through the floor. Do not force the quarter round down tight against the flooring. Using
colored finish nails will reduce the need for puttying nail holes and refinishing.
- Reinstall any thresholds that you may have removed. Any flooring edge that is in a
doorway and is not covered by a threshold needs to be protected. Use a metal molding strip
designed for this purpose. They are available for going from roll flooring to roll
flooring or tile, roll flooring to carpet or roll flooring to wood flooring.
- You should not move any heavy furniture or appliances onto the new flooring for at least
24 to 48 hours. This will allow the adhesive used on seams to dry. It will also allow the
new floor time to shape itself to the floor.
Tools And Material Checklist
| Yardstick |
Hammer |
Flashlight |
Scrub Brush |
Roll Goods Material |
Scissors |
| Notched Adhesive Spreader |
Masking Tape |
Plywood/Hardboard |
Plane |
Straightedge |
| Chalk or Carpenter's Pencil |
Utility Knife |
Adhesive |
Seam Sealer Kit |
Broom |
| Floor Cleaning Materials |
Sandpaper |
Installation Kit |
Staple Gun/Staples |
Tin Snips or Heavy Shears |
Check your state and local codes before starting any project. Follow
all safety precautions. Information in this brochure has been furnished by the National
Retail Hardware Association. Every effort has been made to ensure accuracy and safety.
Neither the NRHA nor the retailer can be held responsible for damages or injuries from the
use of the information in this document.
|