|
Create New Account
Millard Lumber Newsletter
Register to receive newsletters and notices by email. Register Now
|
Repairing Faucets & Valves
Faucets are sold in many different makes and models, but the common ones fall into just
a few types. You'll find only two basic kinds of faucets; washer-type (or compression)
faucets and washerless faucets.
|
REPAIRING A LEAKY WASHER-TYPE FAUCET
- Washer-type faucets work with a rubber or composition washer that closes onto a metal
washer seat (Fig. 1). The washer can become hardened, worn or the seat wears, causing the
faucet to leak. You can close the faucet tighter to stop the leaking temporarily, but this
increases the internal damage to the faucet.
- To repair the leak, first turn off the water. If there's a shutoff valve beneath the
fixture, turn off the water at that point. Otherwise, turn it off at the main house
shutoff valve in the basement, utility room, or crawlspace. Turn off the hot water supply
at the water heater.
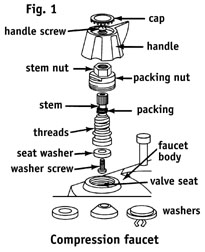
- Take the faucet apart by removing the handle (this may not be necessary on some older
faucets). Loosen the Phillips-head screw, which usually is beneath a decorative cap in the
center of the handle. The cap either unscrews or snaps off when you pry it with a knife
blade. If you must use pliers on decorative faucet parts, pad them with electrical tape or
cloth to protect the finish. And take special care with the plastic parts found on many
modern faucets. Next, lift or pry the handle off its broached stem. Unscrew the packing
nut beneath the handle, exposing the rest of the stem. Remove the stem by rotating it in
the "on" direction. It will thread out. Reinstall the handle if you have
difficulty turning it (Fig. 1). Clean chips from the faucet cavity, but do not use harsh
abrasives or a file.
- Examine the stem. If the threads are badly corroded or worn, take it to your retailer
and get a new stem to match. Clean the stem if it's dirty.
- Now look at the washer, which is located on the lower end of the stem and held in place
by a brass screw. If the washer is squeezed flat or has a groove worn in it, replace it -
this should stop any dripping. Take the washer with you to your dealer to ensure an exact
match in size and style. If the brass screw is damaged, too, replace it with a new brass
screw.
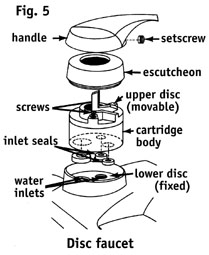
- The washer seat is located inside the faucet body. You probably can't determine if the
washer seat is causing the leak just by looking at it. Any faucet that needs frequent
washer replacement obviously has a damaged seat. The seat should either be refaced with a
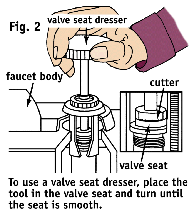
seat-dressing tool. A seat-dressing tool is not costly. Every home with washer-type
faucets needs one. Use the tool according to the manufacturer's directions, placing it in
the faucet along with the packing nut. Then rotate (Fig. 2) until the seat is smooth, and
blow out the chips.
- Some washer seats can be unthreaded and replaced. Check the faucet body with a
flashlight to see if it has a square or hexagonal hole through its center or is slotted
for a screwdriver; if so, it is replaceable. However, if the seat simply has a round hole
through its center and no slots, it is not replaceable. In this case, dress it with a
seat-dressing tool. To replace it, you'll need a faucet seat wrench, which comes with a
combination of square and hex heads to fit most faucet seats. Turn the washer seat
counterclockwise to loosen, clockwise to tighten (Fig. 3). Add a little silicone rubber
sealant (RTV) or pipe joint compound around the threads of the seat before you install it
to make it easier to remove during future repairs.
- It's important to install the correct type of faucet washer (Fig. 1, bottom). A
swiveling washer (C) is preferable to either A or B. To install washer style C, file the
shoulder off the end of the stem, drill out the threads of the screw hole. Instead of
rubbing against the seat as it closes, a swiveling washer closes with a straight-down,
frictionless action - this allows it to outlast fixed washers.
- Following this seat and washer service, your faucet should be like new. Put the parts
back together in the reverse order of taking them apart. Spread a bit of petroleum jelly
or silicone grease on the threads of the stem to lubricate the faucet's action.
- If the faucet leaks around the stem rather than from the spigot, install new packing.
You may want to install one of the newer nylon-covered or graphite-impregnated packings -
their lubrication allows the faucet handle to turn more freely. Wrap one turn of this
packing around the stem just beneath the packing nut (Fig. 1). Use three complete wraps if
you're applying string-type packing. Some stems use O-rings, rather than packing. For
these stems, replace the O-ring with a matching one to stop a leak. Hand tighten the
packing nut, then tighten it another half-turn.
|
REPAIRING A NOISY FAUCET
- A noisy washer-type faucet is usually caused by a loose seat washer. To stop the noise,
first turn off the water and take the faucet apart as described previously. If the washer
is loose, tighten it or replace it.
- After threading the stem back into the faucet body, try moving it up and down. If it
moves, the stem is worn and the entire faucet must be replaced.
- Some faucets are noisy due to poor design and construction. The only way to solve this
problem is to replace the faucet with a quality one.
REPAIRING WASHER-TYPE BATH AND SHOWER FAUCETS
- To take apart a bath/shower faucet for repair, first turn off the water. Then take the
faucet apart by removing its handle, escutcheon and packing nut. The packing nut may be
buried deeply in the wall, requiring a socket wrench for removal.
- Your bath and shower faucets may have a renewable seat that can be smoothed with a
seat-dressing tool or removed and replaced using a seat wrench. For replacing and
repacking the washer, follow the same instructions provided for a washer-type faucet. Some
faucets may need a complete replacement of the combination stem/seat unit.
WASHERLESS FAUCETS
- A leak in a washerless faucet usually indicates that the working parts need replacing.
Often, prepackaged repair kits are available. Kits may contain all the necessary parts, or
may include only the specific parts that need replacing. Follow the instructions for
installing the replacement parts. Washerless faucets on tubs and showers are repaired in
the same way as those on sink and washbasins.
DIAPHRAGM-TYPE FAUCETS
- The diaphragm faucet is washerless but is similar to washer-type faucets. A rubber
diaphragm between the stem and seat creates a straight-down, frictionless close. As with
washer-type faucets, diaphragm faucets have two handles.
- Remove the stem by following the steps outlined for washer-type faucets. Instead of a
washer on the end of the stem, you'll find a swiveling disc. If the rubber diaphragm
doesn't come out with the stem, it is still inside the faucet.
- If the diaphragm didn't come out with the stem, use pliers to peel it from inside the
faucet and pull it out. Install a new diaphragm around the swiveling disc, then replace
the stem in the faucet.
- If the faucet is leaking around the stem, replace the stem's O-ring before reinstalling
the stem.
|
DISC-TYPE FAUCETS
- Disc faucets may have one or two handles. The water is controlled by openings in the two
discs. When the discs are rotated to align, the water flows; when the discs are
misaligned, the water shuts off. If the discs wear, the worn discs cause the faucet to
leak. Simply turning the handles harder will not stop the leak.
- To repair a leak in a two-handle disc faucet, turn off the water and remove the
handle on the side that's leaking.
- Use pliers to pull the disc assembly out of the faucet (Fig. 5).
- Beneath the disc unit is the seat assembly, or seal. Replacing this special O-ring may
stop the leak.
- You may need to install a whole new disc assembly for faucets that have been used over a
long period of time. In this case, all moving parts of the faucet will have been replaced
and should last as long as the original discs did. The parts of some disc units snap apart
into a separate bonnet assembly and bottom cap.
- To repair a leaking single-handle disc, turn off both the hot and cold water and
remove the handle to expose the disc assembly. Take out the screws to lift the assembly
out of the faucet (Fig. 5).
- You'll notice that beneath the disc unit are three O-ring seals. Though unlikely, water
could be leaking between the unit and one of these seals. In this case, you may be able to
stop the leak by cleaning the disc assembly and faucet body and installing a new set of
seals. If that doesn't work, the entire disc unit must be replaced. This will renew all
moving parts.
- Replacing the unit is fairly simple. Place the three O-rings into their recesses in the
bottom of the disc unit. Then install the unit and tighten the screws. Finally, replace
the handle - and you're done!
|
|
BALL-TYPE SINGLE-LEVER FAUCETS
- The single-handle faucet with a ball inside to control both hot and cold water may
either leak at the spigot or at the handle. A handle leak is usually caused by improper
adjusting-ring tension. Simply adjust the tension to stop the leak. Leaks at the handle
can also result from a worn cam gasket. Dripping from the spigot is usually caused by worn
spring-loaded, soft rubber seat assemblies.
- Parts for ball-type faucets are available in kits. Get the spring/seats kit for spigot
leaks, or the complete kit for handle leaks. It may be advisable to use the complete kit
to replace all working parts of the faucet at the same time. In any case, you'll need a
kit containing the spanner/hex wrench for removing the handle (hex end) and turning the
adjusting ring (spanner end).
- Without turning the water off, loosen the handle set screw. Slide the handle from its
stem.
- For a handle leak, try using the spanner wrench to tighten the adjusting collar (Fig.
6). Tighten it by turning the wrench and collar clockwise until the faucet doesn't leak
when it is turned on and off. If the adjustment is too loose, the faucet will leak. If you
turn it too tight, the handle will be hard to move. When the adjusting ring cannot be
turned with the wrench, it is corroded. At this point, you will need to remove the cap to
free the adjusting ring. (See next step.) You must turn the water off before
removing the cap! Apply penetrating oil to the threads, remove the ring and clean all
parts before reassembling.
- Install the seats. For faucet leaks at the spigot, you must install new rubber
seats and springs. You must turn off the water to make this repair. Unscrew the
chrome cap by turning it counterclockwise. If it won't turn easily, wrap electrical tape
around the cap and turn it with pliers. The adjusting ring, which is threaded into the
cap's center, will come off with it. For a seats/springs replacement, pull the ball up and
out by its stem. The gasketed cam will come with it. Now you can locate the two rubber
seats and springs inside the faucet body. Remove them with pliers or yours fingers and
install the new ones. The springs go into the holes first, and the cupped sides of the
seats fit over the springs.
- Service the ball. If the ball is dirty or coated with scale, clean it or replace
it with a new one. Both plastic and brass balls are available, but use a plastic one if
your home has hard water.
- Reassembly. Put the ball and cam back into the faucet with the slot in the side
if the ball fitting over the pin in the faucet body. Then make sure the tab on the cam
slips down into the notch in the body. Not aligning the tab and notch is the number one
cause for a faucet leaking after it is repaired. Finally, screw on the cap and adjust the
ring as described in step 2. If a properly adjusted ball-type faucet leaks at the cap, the
cam and gasket must be replaced.
- Swing spouts. If a single-lever ball faucet leaks at the base, you should replace
the O-rings. Remove the spout-retaining parts, as well as the spout. Wrap the
spout-retaining nut with electrical tape to protect it, and remove the nut with a wrench
or pliers by turning counterclockwise. Remove the spout by pulling it up and side-to-side.
One or more O-rings should now be exposed (Fig. 6). Take the O-rings to your hardware or
home center store to get matching O-rings for replacement. Clean any scale that appears on
the spout base, faucet body, and the inside of the swinging spout. Install the new O-rings
and reverse the steps above to reassemble the faucet.
|
|
CARTRIDGE FAUCETS
- Cartridge faucets have only one moving part. The stem slides up and down to open and
close the faucet and rotates to regulate the flow of hot and cold water. Any leaking
requires replacement of the cartridge.
- First, turn off the water. To remove the cartridge, you'll need to remove the handle.
This project can be like working a puzzle. If you have the manufacturer's instruction
sheet for the faucet, you're ahead of the game. Without it, look for a retainer clip at
the rear of the faucet just below the handle. Or, you may have to remove a set screw or
snap-in "hot-cold" button and a handle pin or screw. On some faucets the swing
spout must come off first. The retainer clip may be hiding beneath the handle inside a
lift-out tube. Some cartridge faucets use two retainer clips - one by the handle and
another by the cartridge. Retainer clips can be pried out with a screwdriver.
- Once the retainer clip is removed, the cartridge simply pulls out. Use pliers, as shown
in Fig. 4. Install the new cartridge by pushing it into place with the flat arrow, or
other mark upward. If you use a lubricant on the cartridge, make sure it's silicone
grease.
|
TOOL AND MATERIAL CHECKLIST
| Smooth-jaw adjustable wrench |
Screwdrivers, standard and Phillips |
Pliers |
Electrical tape |
Pipe wrench |
Faucet washers |
| Brass screws |
Stem |
Silicone grease or petroleum jelly |
Seat dressing tool |
Seat |
Seat wrench |
| Silicone rubber sealant or pipe compound |
Socket wrench |
Packing |
O-rings |
Repair Kit |
Cartridges |
| Disc assembly |
Manufacturer's instruction sheet |
Penetrating oil |
Locking plier/wrench |
Cleaning cloths |
Hand cleaner |
Check your state and local codes before starting any project. Follow
all safety precautions. Information in this brochure has been furnished by the National
Retail Hardware Association. Every effort has been made to ensure accuracy and safety.
Neither the NRHA nor the retailer can be held responsible for damages or injuries from the
use of the information in this document.
|