|
Create New Account
Millard Lumber Newsletter
Register to receive newsletters and notices by email. Register Now
|
Replacing Toilets
Changing your toilet is an easy project that should take half a day or less. The most
common toilet has a separate tank that mounts on top of the bowl. These instructions apply
most specifically to this type of toilet. If you have an integral tank/bowl toilet, a
flush valve or a wall-mounted toilet, your procedure will vary somewhat.
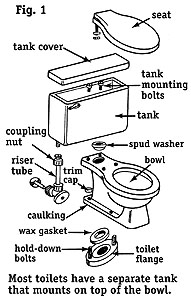
Whatever kind of toilet you use as a replacement, follow the manufacturer's
instructions. Fig. 1 shows the parts of the a typical toilet.
|
PREPARATION FOR THE REPLACEMENT
- Before purchasing your new toilet, measure the distance from the rearmost bowl holddown
bolts to the finished wall behind the toilet. This is called the toilet's rough-in
(Fig. 2). Most toilets are designed with a 12" rough-in. Ask your retailer for help
if your rough-in varies.
- The first step is to turn off the toilet's water supply. Then flush the toilet to empty
its tank, holding the trip-lever down to let all the water run out. Sop out any remaining
water in the tank and bowl with a sponge - make sure they're both empty.
|
|
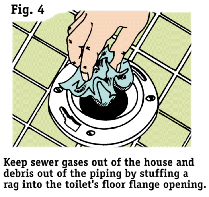
REMOVING THE OLD TOILET
- Use a large, adjustable open-end wrench to unthread the coupling nut between the toilet
tank and its water supply. You may need to hold the fill valve with pliers from inside the
tank to keep it from turning.
- Now you're ready to remove the original tank. Most are held to the bowl by two long
bolts. The nuts are located beneath the flange at the rear of the toilet bowl. Fig. 11
shows how to work with these.
- With the bolts out, you can lift the tank clear of the bowl.
- If your toilet tank mounts to the wall and feeds the bowl with a large, sweeping elbow,
first remove the elbow. Use a trap wrench or water pump pliers for the slip jam nuts. Or,
you can simply saw the elbow with a hacksaw.
- Now you can remove the tank from the wall. As you unscrew the tank from the wall,
support it so it doesn't fall.
- Next, take out the toilet bowl. Typically, the bowl is fastened to the floor with two
hold-down bolts and nuts beneath trim caps. Some toilet bowls have four hold-downs.
- Pry off each trim cap to expose the bolts and nuts (Fig. 3).
- Unscrew the nuts. If you have trouble, you can saw them off. A mini-hacksaw works best,
or you can use a regular hacksaw. To protect the bowl's finish from the saw teeth, use
masking tape.
- Now loosen the bowl/seat unit by rocking it to break its seal with the floor and toilet
flange. Once loosened, you can lift the bowl and carry it out of the house. Be sure to
hold the bowl level to avoid spilling any trap-sealing water. You may need help to lift
the tank and bowl together. Lift it properly with your back straight and put the weight on
your legs.
- Stuff rags in the toilet flange opening to keep sewer gases out of the house and debris
out of the soil pipe while you work (Fig 4).
|
|
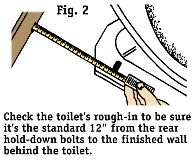
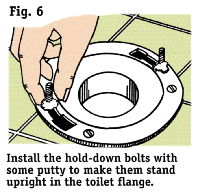
PREPARING TO INSTALL THE NEW TOILET
- To get ready for the new toilet, first due a complete cleanup. Remove any old putty and
wax from the floor and toilet flange. You can use a screwdriver or putty knife. Clean the
floor thoroughly in case the new toilet's footprint is different. Remove the old hold-down
bolts - don't reuse them. You may want to clean and paint the wall behind the toilet. If
you're going to replace the bathroom floorcovering, this is an excellent opportunity.
- At this point, install any new water supply plumbing you plan to add. A new fixture
supply valve and flexible riser tube is easy to install and offers shutoff convenience
later. The valve attaches to a short length of water supply pipe coming from the wall or
floor. Have the riser tube handy but out of the way of the new tank.
- Also, inspect the toilet flange for sound condition. It should stick up about 1/2"
from the finished bathroom floor.
- Temporarily set the toilet in position on the floor over the flange to check for
levelness. Check it front-to-back and side-to-side. If necessary, shim under the bowl with
nonrusting metal washers.
- Install a new pair of toilet hold-down bolts. If there are holes or slots for the bolts
in the toilet flange, they should be inserted in the openings (Fig. 6). In a cast iron
piping system, the hold-downs screw directly into the wood floor. Whatever the situation,
your retailer should have them. Don't try to use ordinary bolts. Install the bolts so they
are the same distance from the rear wall.
|
|
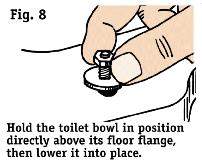
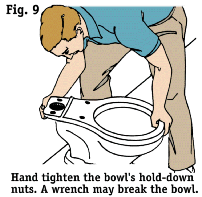
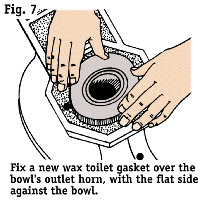
PUTTING IN THE NEW BOWL
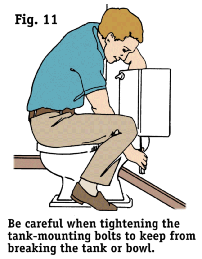
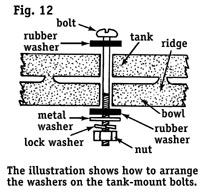
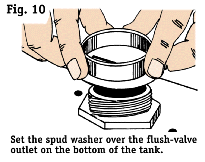
- Toilet installation goes pretty much the reverse of removal. Handle the bowl and tank
with care, since they can crack and chip easily.
- Start by inverting the new bowl (or bowl/tank unit) onto a thick, protective padding of
newspapers on the floor.
- Seal the toilet to its soil pipe flange at the floor by placing a ready-made wax toilet
ring gasket over the bowl's outlet horn (Fig. 7). The gasket should be room temperature,
and the flat face should go against the bowl. If the gasket has a sleeve, it should face
away from the bowl. Don't try to reuse the old gasket - install a new one.
- Two kinds of wax gaskets are available: those with plastic sleeves and those without.
- The bowl-to-floor joint must be sealed around the edge of the bowl's base, too. You can
lay a bead of plumber's putty so it will be squeezed between the toilet and floor. Or, use
about 2 lbs. of plaster. Another choice is to caulk the joint with bathtub caulk/sealant.
This is probably the easiest method. Ask your retailer to recommend a good caulk for this.
- Remove the rag from the toilet flange opening. Now you're ready to set the bowl.
- Hold the bowl upright several inches off the floor so its outlet horn is directly above
the toilet flange. Then lower it gently (Fig. 8). The hold-down bolts should pass through
their openings in the bowl base, and the wax gasket and toilet flange should meet.
- To set the bowl onto the floor as well as onto its gasket, rock it carefully from front
to back and side to side while pushing down hard. You can rotate it a few degrees each
way, too. This forces out the excess wax. As the bowl meets the floor, make sure it is
level and square with the rear wall. Don't raise the bowl from the floor while making
adjustments, or you'll have to go through the setting process all over again and replace
the waxing.
- Drop washers over the hold-down bolts and thread on the brass nuts. Tighten the nuts
finger-tight only (Fig. 8). Using a wrench at this point can break the bowl. Re-check
boths for tightness after several days of use.
- If the bowl has front-mounting holes, install two toilet studs with washers and nuts
into the floor for the front two holes.
|
FINISHING UP
- Connect the tank's water supply to the inlet valve on the bottom left-hand side of the
tank (as you face it). You'll probably have a coupling nut for doing this. The nut threads
onto the inlet and works perfectly with a flat-ended riser tube. Don't use any pipe dope
on these threads.
- Turn on the water and observe the toilet tank as it fills. If there are any leaks,
further tightening should cure them. Check to see that the tank fills to the correct
level, about 3/4" below the top of the overflow tube.
- Tighten the bowl hold-down bolts one turn (no more) beyond handtight. Cut off the ends,
if necessary, and install the trim caps. You can fill their recesses with plumber's putty
(or bathtub caulk/sealant) and pressing them down over the bolts. Clean up any material
that oozes out.
- Then, smooth and clean up the excess sealant around the bowl's base.
- Now you can test-flush the toilet, checking for water leaks at the floor.
- Install the new toilet seat and tank cover, and your installation is complete.
TOOL AND MATERIAL CHECKLIST
| Toilet Bowl and Tank |
Toilet Seat |
Bowl Gasket |
Hold-Down Bolts, Washers, Nuts |
Trim Caps (if not with toilet) |
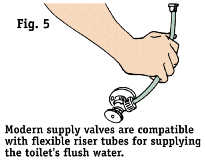
| Plumber's Putty |
Bathtub Caulk/Sealant |
Supply Valve |
Flat-Ended Riser Tube |
Adjustable Open-End Wrenches |
| Trap Wrench/Water Pump Pliers |
Large Screwdriver |
Mini-Hacksaw |
Sponge |
Rustproof Washers |
Check your state and local codes before starting any project. Follow all safety
precautions. Information in this on-line brochure has been furnished by the National
Retail Hardware Association. Every effort has been made to ensure accuracy and safety.
Neither the NRHA nor the retailer can be held responsible for damages or injuries
resulting from the use of the information in this document.
|