|
Create New Account
Millard Lumber Newsletter
Register to receive newsletters and notices by email. Register Now
|
Storage Areas
|
|
Read these tips and instructions carefully on how
to build additonal storage areas in your home. Following the procedures
outlined in this document will help you end up with a more satisfactory
job with less waste and effort. Inside this document you will find information
about:
- Storage Drawers for bed Linens and Blankets
- Constructing and Installing the Drawers
- Finishing the Job
- Building Handy Storage Closet for Area Under
Sloped Roof
- Construction Details on Inset Pieces for Storage
Closet
- Building a Linen Closet with Sliding Drawers
- Creating Closet Space with Folding Doors
|
|
|
 |
| FIG.
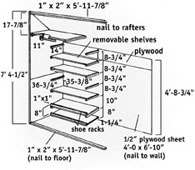
1 - Nail 2x6 plates on the rafters where the studs will connect. |
|
|
|
| FIG.
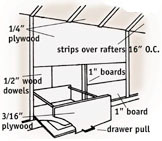
2 - Place 1" boards between two sections of drawers as dividers. |
| |
|
STORAGE DRAWERS FOR BED LINENS
AND BLANKETS
- Wasted attic space under the slope of the roof in many
homes can be converted to valuable storage space for linens, blankets,
pillows, etc. You can add as many drawers as needed or as space permits.
- To install drawers, first nail 2x6 plates on the rafters
at the locations where the studs will connect when mounted from the
floor to the ceiling (A, Fig. 1).
- Next, nail a 2x4 plate (B) on the floor at a position
exactly plumb below the plates (A) which you have nailed to the rafter
(Fig. 1).
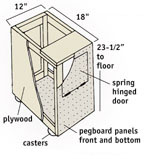
- Insert as many studs at the desired locations as required
to provide adequate support to create the number of drawers needed.
- Be sure the studs, both front and back, are exactly
plumb in all directions. The studs can be plumbed with either a long
level or a plumb bob. The level is probably easier to read and use.
- The front 2x4 studs are usually set at the position
where the floor-to-rafter height is approximately 4'. All space under
the slope beyond this point is usually wasted. When this space is framed
in, it makes an ideal storage area.
- Now place a 2x4 header (C) between the front studs
at the top edge of the top drawer. This header provides a nailing edge
for the base of the face panel between the top edge of the top drawer
and the ceiling. It also provides support for the entire structure.
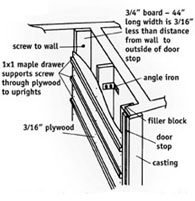
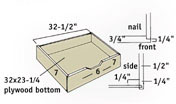
- Insert a 3/16" base just above the 2x4 floor plate
to provide a bottom for the lower drawer. Place 1" boards cut to
the proper length between two sections of drawers as dividers (Fig.
2).
- Finally, divide the area for the drawers into two equal
parts, and place a 3/16" piece of plywood as a dividing piece between
the two drawer spaces. Be sure the piece of plywood is exactly level
and square in all corners. This provides the base for the top drawer
in the finished storage area.
|
|
|
|
|
| FIG.
3 - You can build a handy storage closet for the area under a
sloped roof. |
|

CONSTRUCTING AND INSTALLINGTHE DRAWERS
- Make a framework for the bottom of each drawer from
a 1x4 (Fig. 2). Cut the 1x4 pieces to the proper length and fasten at
each corner.
- Cover the framework for the bottom of each drawer with
a piece of 3/16" plywood cut to proper size.
- Cut the front and back of each drawer from 1"
boards and attach the front and back to the base of the drawer as illustrated.
Nail these boards to the 1x4 frame with 6-penny box nails.
- Sand the top, bottom and edges of both the front and
back of the drawer for a neat finish. You may want to use a nail set
and wood putty to hide the nail heads. Attach a drawer pull to the board
that forms the face of each drawer.
- Insert a 1/2" wood dowel on each side of the drawer
from the back to the front. These can be glued into place. The dowels
provide extra support for heavily loaded drawers.
|
|
|
|

FINISHING THE JOB
- Place the drawers into position (Fig. 2). Finish the
ceiling, the area above the drawers, and the room area on each side
of the drawers with 1/4" plywood or paneling.
- If plywood is used, you can use stain, wallpaper, or
paint for a finished look.
- Place strips over the rafters 16" apart on the
center for the finishing touch.
|
|
 |
| FIG.
4 - Use this as a guide to construct the shelves and other basic
parts of the storage closet. |
|
 |
| FIG.
5 - you can add space for bulk storage at the rear. |
|
 |
| FIG.
6 - final construction details for the storage closet. |
| |
|

STORAGE CLOSET FOR AREA
UNDER SLOPED ROOF
- Fig. 3 illustrates a storage cabinet and built-in desk
that can easily be built under the sloped area of an attic in a story-and-a-half
home. The major part of the cabinet has shelves, drawers and a hanging
area. The rear section is used for bulk storage.
- Study Fig. 3 carefully and make any necessary changes
in dimensions to create a similar storage area to fit under the sloped
area in your home.
- Fig. 4 illustrates the basic parts of the storage area,
as well as the shelves and the overall dimensions of the major components
in the rear section of the cabinet. Again, you may need to make slight
adjustments in the dimensions shown to conform to the slope of your
roof and other variations in size or shape.
- Study the dimensions of each part of the structure
carefully, and cut and mount each shelf and support as illustrated.
- Fig. 5 shows how the front section of the storage cabinet
is fitted into place. Note the dimensions and the construction materials
used to create a bulk storage area at the rear of the closet. This space,
ordinarily lost, is now converted to valuable storage for bulky items.
- Fig. 6 shows the final overall construction details
for the entire unit when the front and back sections are placed together.
Carefully study the materials used and the dimension of each storage
area to construct a storage closet and desk of similar design with little
effort.
|
|
 |
| FIG.
7 - construction details for the drawers in the storage closet. |
| |
|

CONSTRUCTION DETAILS ON INSET PIECES FOR STORAGE CLOSE
- See Fig. 7 for construction details on the drawers
used in this storage closet. See Fig. 6 for the location of these drawers
in the finished storage closet.
- No. 3 drawers are used in the finished storage closet.
- Fig. 7 indicates using plywood and other framing materials
for constructing the drawers. You can follow these directions or use
different materials if you'd like.
- You can create your own pattern for the doors of the
closet as long as they are cut to the proper size.
- Fig. 8 lists the number and grade of plywood and framing
pieces needed to construct the storage closet. Other hardware items
are also listed. You will need to make adjustments in this list if you
vary the size and shape. Otherwise, the list provides all materials
required for the job.
|
|
| Fig.
8 - Plywood
Needed to Construct Closet |
| Number, Size |
Grade |
Where Used |
| 7 panels 4' x 8' x 3/4" |
Interior A-A |
Partitions,doors, front, sides, shelves,
drawer sides and back, desk front |
| 2 panels 4' x 8' x 1/2" |
Interior A-D |
Interior partitions, back, shelves |
| 1 piece 4' x 4' x 1/4" |
Interior A-D |
Drawer bottoms |
| Framing Pieces and Other Lumber |
| 1-1/2" diameter |
3 ft. |
Clothes pole |
| 1" x 2" |
90 ft. |
Alternate handles, trim shelf cleats, drawer
guides, miscellaneous |
| Hardware Items Needed |
| Item |
Qty. |
Where Used |
| 1-1/2" x 3" butt hinges |
12 pairs |
doors |
| bullet catches |
10 |
doors |
| pulls |
10 |
doors |
| metal chains |
2 |
drop shelf |
| 1/2" x 1-1/2" x 1-1/2"
angle irons |
3 |
to anchor unit |
|
 |
| FIG.
10 - Make the edge of the new closet flush with the outer edge
of the door casing. |
|
|
|
| FIG.
11 - Construction details for making drawers. |
|
|
|
| FIG.
12 - Details for constructing a rolling hamper. |
| |
|

BUILDING A LINEN CLOSET WITH SLIDING DRAWERS
- Fig. 9 shows how any closet can be converted to a linen
closet with sliding drawers. The dimensions must be adjusted to fit
the closet in your own home. Fig. 9 shows a typical closet arrangement,
so only minor adjustments in dimensions should be required.
- Details on mounting the drawer supports and lining
inside the closet are shown in Fig. 10. Remember, the edge of the new
closet must be flush with the outer edge of the door casing, so use
care in our measurements at this point.
- Fig. 11 provides construction details and dimensions
for drawers. Drawers at the bottom of the closet are normally 7"
high, while the two drawers at the top of the closet are normally 5"
high. Again, these heights must be adjusted to fit the closet space
you are filling.
- In Fig. 11, notches are cut out in the front of the
drawers instead of adding drawer pulls. Add drawer pulls, if you prefer.
- Fig. 12 shows the construction details and dimensions
for the rolling hamper in the bottom of the closet. Again, make adjustments
in the dimensions if the space you are using varies from the one shown.
|
|
|
|

CREATING CLOSET SPACE WITH FOLDING DOORS
- You can often create extra closet space in rooms by
simply adding folding doors that hang from the ceiling. These folding
doors are made of many materials and are available in different styles
and patterns.
- Using this method, you can create storage areas in
family rooms, mud rooms, garages and even bedrooms without any major
construction.
- The entire end of a room can be converted into a closet
area with folding doors.
- A small section of any wall can be converted into a
closet area. Use either curved overhead corners or straight overhead
corners for making these closets.
- Corners can be converted into storage areas by using
overhead tracks. Use either curved overhead track or straight overhead
track for constructing corner closets.
|
|
| Check your state
and local codes before starting any project. Follow all safety precautions.
Information in this document has been furnished by the National Retail Hardware
Association (NRHA) and associated contributors. Every effort has been made
to ensure accuracy and safety. Neither NRHA, any contributor nor the retailer
can be held responsible for damages or injuries resulting from the use of
the information in this document.
|
|
|