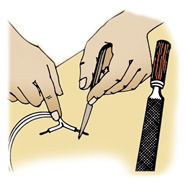
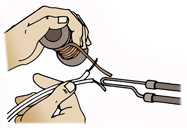
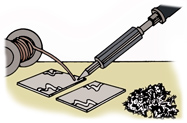
Follow these tips and instructions on how to work with solder to help you save time, money and effort. In this document you will find information about:


FIG. 1 - File any corrosion from the top of the soldering iron or gun.
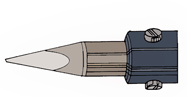
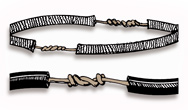


FIG. 2 - The shape of the tip on the soldering iron or gun is important.


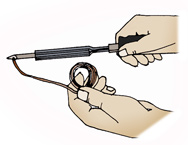
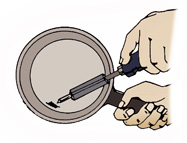
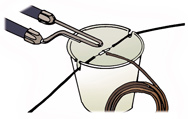
FIG. 3 - Apply a thin, even coat of solder to the tip of the soldering iron or gun. This is called "tinning."


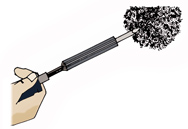
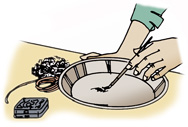
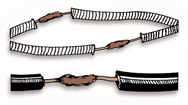
FIG. 4 - Keep a cleaning pad or piece of steel wool handy for cleaning the point during soldering.


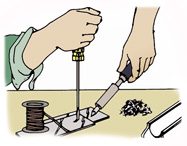
FIG. 5 - Crossed nails in a scrap wood block make a good soldering tool holder.


HOW TO PREPARE FOR A
SOLDERING JOB

  • There are many types of soldering pencils, guns and irons that are adequate for home use. Most home-use soldering tools are heated electrically. There are soldering tips that can be used with your propane torch. There is even a small refillable butane gas-powered soldering tool.

  • The proper soldering tool depends on your project. The propane torch is for jobs requiring a high heat source like sweating copper fittings. The gun is for soldering tasks requiring a little more control of the amount of heat and where it is going, such as joining wires, while the pencil is for intricate soldering jobs requiring even less heat but more control, like circuit-board repairs.

  • Before soldering with any pencil, gun or iron, be sure the tip is thoroughly cleaned. Use a light or medium file to remove any corrosion that is built up on the tip of the soldering point (Fig. 1). The tip of a soldering tool should be clean at all times.

  • Clean the tip after each use to eliminate much of the need for filing the tip.

  • The shape of the tip of a soldering tool is also important. The modified chisel tip as illustrated in Fig. 2 is ideal for most soldering jobs.

  • The tip of the soldering tool should be small enough to reach into tight places but blunt enough to ensure that heat is transmitted all the way down to the point.

  • Before beginning the soldering job, apply a thin, even coat of solder to all sides of the tip. This coating process is referred to as "tinning" (Fig. 3). Tinning should be done frequently while you are soldering.

  • To apply an even coat of solder on all sides of the tip of the pencil, gun or iron, hold a length of core-type solder against the hot tip. With the solder against the tip, rotate the soldering tool so all sides of the tip are covered evenly.

  • Always be sure your soldering tool is at maximum heat. You cannot get a proper soldering job with a pencil, gun or iron that does not melt the solder quickly.

  • Also, be sure the material you are soldering is completely clean. Dirt, grease or any foreign matter limits the holding power of solder. Any material to be soldered should be scraped, sanded or treated with a soldering flux before you apply the solder.

  • Always do your soldering on a flat, even surface. For safety, it is best to work on a fireproof surface.

  • A kitchen-type cleaning pad or a piece of steel wool is a handy cleaning device for the point of your soldering tool while you are soldering (Fig. 4). This pad or piece of steel wool can be stapled or tacked to the work surface where you are soldering. An occasional wipe across the cleaning pad keeps the point clean at all times.

  • Tack two crossed finish nails into a scrap piece of wood to make an ideal holder for your soldering pencil or iron (Fig. 5). These nails keep the pencil or iron off the flat surface, hold it in place and keep the point of the pencil or iron clean while you are doing the job.

  • Always apply heat with the point of the soldering tool held flat against the metal to be soldered. Do not try to transmit heat with only the tip–the tip is for shaping or forming.

  • Keep the soldering point hot at all times. If either the solder or the metal to which the solder is applied is not kept hot enough, you will get a poor soldering joint.

  • Although solder is also sold in a solid bar, core-type solder is most commonly used. One type of solder has a rosin core while the other has an acid core.

  • Always use a rosin-core solder (this has a rosin flux in the center) for soldering electrical wiring and metals like tin and copper.

  • Use an acid-core solder (this has an acid flux in the center) for soldering more difficult metals, such as galvanized iron. When you use an acid-core solder, the surface to which the solder is applied should be washed after each soldering to remove the corrosive effect of the acid.

  • A special type of solder is required for soldering stainless steel.


FIG. 6 - Thoroughly clean all metal to be soldered.


FIG. 7 - In some cases, you must apply extra flux.


FIG. 8 - When you solder a coated surface, the coating must first be chipped away.


FIG. 9 - Apply a thin layer of solder to wires that have been cleaned.


FIG. 10 - Offset splices to avoid danger of short-outs.


FIG. 11 - A paper cup makes a good holder when soldering wires.


FIG. 12 - Hold the iron or gun under the wires and feed the solder from the top.


FIG. 13 - Properly soldered joints are as strong as uncut wire.


HOW TO SOLDER VARIOUS METALS

  • It is important that all metal to be soldered is thoroughly clean. Solder simply will not adhere to dirty or oxidized metal surfaces.

  • Clean any flat surfaces which are to be soldered with steel wool, a file, emery cloth, etc. It's important to take time to clean the surface thoroughly.

  • Scrape any wire to be soldered with the back of a knife or any flat piece of metal (Fig. 6). If the wire is extremely dirty, dip it into a flux. Do not touch the wire with your hands after it has been cleaned. Natural oils in the skin may cause the solder not to stick.

  • Although the core of solder contains flux, additional flux may be required on extremely difficult soldering jobs.

  • Liquid flux can be brushed on the metal if required.

  • You will need flux if you are soldering with bar solder, which does not contain a core of flux.

  • If solder remains on the tip of the pencil, gun or iron for any period of time, the flux boils out and must be replaced.

  • If you find it difficult to get solder to stick on galvanized metal or any other hard-to-solder surface, add some flux (Fig. 7). This will normally improve the sticking capacity of the solder.

  • If you are attempting to solder any coated surface, such as enamelware, you must chip away the coated area before applying the solder (Fig. 8). Solder will not stick to coated surfaces.

  • When soldering electrical wire, separate the wires to be soldered and scrape them clean (Fig. 9).

  • Each section of the wire should then be "tinned" or coated with a thin layer of solder.

  • Apply this thin coating of solder by holding the wire on the hot tip of the soldering tool and feeding the rosin-core solder from the top (Fig. 9).

  • You will need a small bench vise or some other holding device to provide a "third hand" for soldering jobs of this type.

  • After the wires have been thoroughly tinned, twist them together (Fig. 10).

  • After the wires have been twisted together, apply a small amount of flux to the exposed wire to remove any oil that might have been left on the wiring during the twisting process.

  • A small paper cup makes an excellent holding device for soldering small pieces of wire (Fig. 11).

  • Make a slot in each side of the cup to hold the wire in a firm position. Also, fill the bottom of the cup with water. This will make the cup more stable and reduce the chances of a flame-up.

  • Note in Fig. 10 that the splices in the wire are located at different positions. This eliminates the danger of electrical shorts and lessens the amount of buildup when the soldered spots are taped for insulation.

  • When the wires have been twisted together and fluxed, they are ready for soldering (Fig. 12).

  • Hold the hot soldering tool under the joint to be soldered and feed the solder from the top.

  • Let the solder melt and run down until the joint is thoroughly covered.

  • Allow the soldered joint to cool completely before applying any pressure. After the solder cools and becomes hard, test it to make sure the soldered joint is secure.

  • Always use a rosin-core solder for soldering electrical wiring. NEVER use an acid-flux solder for soldering electrical wire.

  • Joints soldered properly should look somewhat like those illustrated in Fig. 13. A joint that is properly twisted and soldered is as strong as any uncut section of the wire.


FIG. 14 - For a good bond on two flat pieces of metal, apply a layer of solder along the edges.


FIG. 15 - Hold the joint securely to prevent warping from heat.


SOLDERING FLAT PIECES OF METAL

  • You should solder most flat metals, such as copper and tin, with a rosin-core solder. Use acid-core solder only on galvanized iron and other hard-to-solder metals.

  • To get a good bond on two pieces of flat metal, apply a thin layer of solder to both edges (Fig. 14).

  • After applying this thin layer of solder to the edges to be soldered together, place the tinned edges one over the other and press them firmly in place with the broad side of the hot soldering iron.

  • As you apply pressure with the soldering iron, feed additional solder into the joint from the side.

  • A little experience will enable you to "sweat" the edges and solder the two pieces of metal together easily, quickly and firmly.

  • Heat that is applied to flat pieces of metal can cause the metal to warp and bow up or down. This makes soldering difficult.

  • When soldering two pieces of metal, hold them firmly in position with a screwdriver or some other blunt object while soldering (Fig. 15).

  • If you do a lot of soldering, you may find a small C-clamp or some other permanent holding device helpful on jobs of this type.

  • Knowing how to solder is helpful for many home repair jobs. The soldering pencil, gun or iron and core-type soldering make it possible for you to repair gutters, electrical wiring, sheet metal or almost any other type of metal object.

  • Always be sure to clean the point of the soldering tool on the cleaning pad or steel wool before putting it away.

  • An empty tin can makes an ideal holder for a hot soldering pencil or iron.

  • If you do not use a tin can, be sure to lay the hot soldering pencil or iron in a safe position until it cools to prevent a fire hazard.


TOOL AND MATERIAL CHECKLIST
Soldering Pencil, Gun or Iron Propane Torch
Rosin-Core Solder Tin Snips
Steel Wool Knife
Vise Paper Cup
File Acid-Core Solder
Flux Work Gloves
Cleaning Pad Pliers
Vise-Type Pliers Small Brush

Check your state and local codes before starting any project. Follow all safety precautions. Information in this document has been furnished by the National Retail Hardware Association (NRHA) and associated contributors. Every effort has been made to ensure accuracy and safety. Neither NRHA, any contributor nor the retailer can be held responsible for damages or injuries resulting from the use of the information in this document.