Whether you're replacing a few damaged shingles or starting a complete reroofing job,
the following step-by-step instructions can make your project easier. Take a few minutes
to read the instructions carefully before starting, and you can save time, money and
effort while completing a better job.

IMPORTANT POINTS TO REMEMBER
- Working on any roof can be dangerous. You should take every safety precaution possible,
and always use extreme care while working on the roof.
- Use common sense while working on the roof. Let someone know you are up there - or
better yet, work with a helper.
- Use a ladder that is high enough and strong enough for the job you are doing. Secure the
ladder at the top and bottom before climbing it.
- Use extreme caution when working near power lines, conduits or TV antennas. Never touch
them or allow a metal ladder to come in contact with them.
- Never start a roofing job in cold or wet weather. Also, allow early morning dew to
disappear before beginning your work.
- Wear heavy, rubber-soled shoes with a non-skid tread to prevent slips, and avoid wearing
loose clothing.
- If the roof slopes more than a 6" rise for every 12" horizontally, use roof
brackets and boards to provide extra footing support. Place all tools and shingles within
easy reach and where they will not slide off the roof.
- Keep the roof surface clean and free from loose nails and shingles. These can cause you
to slip and fall.
- Keep people away from below the area where you will be working.

DETERMINE THE MATERIALS NEEDED
- Roofing shingles are sold in "squares." Most asphalt shingles are baled
together with three or four bundles per square.
- First, measure the length and width of each area of the roof. For each area of the roof,
multiply the length times the width. Then add the results for the total square feet of
shingles needed. Measure all dormers and extensions.
- Divide the total square footage by 100, and purchase that many squares of shingles.
- Purchase an additional 10% of the number of shingles for cutting, waste and starter
courses, and to save one bundle for future repairs.
- You'll also need about 2 1/2 pounds of roofing nails for each square of shingles. Use
hot galvanized roofing nails, either 11- or 12-gauge with a 3/8" diameter head, or
follow the shingle manufacturer's recommendation for the type of nails to be used.
- Use 1 1/4" or 1 1/2" nails for new roofs, or 1 3/4" nails for reroofing
or repairs.
- If you are starting a new roofing job, or a complete reroofing project, you'll also need
enough 15-lb. roofing felt to cover the entire roof area underneath the shingles.
- You'll need roofing cement for edges, flashings and ridges.

SELECT THE SHINGLES
- There are many types, styles and sizes of asphalt shingles.
- Your selection process should begin with the type and grade of asphalt shingle needed
for the type of building. Some factors to consider are the purpose of the building; the
slope of the roof; local weather conditions; and the design, style and size of the
structure.
- The exposure for each type of shingle is usually specified by the manufacturer. However,
for most common shingles, a 5" exposure is standard.

BEFORE YOU BEGIN
- You can successfully lay asphalt shingles over any existing roof. However, if there are
more than three layers of old roofing on the structure, they must be removed completely
before applying new shingles.
- Make any necessary repairs to the roof structure before beginning the reroofing project.
- Drive down or remove any loose or protruding nails.
- For reroofing jobs, renail any loose shingles and replace any missing shingles with new
ones. (See the upcoming repair section.)
- If you're applying new shingles over old wooden shingles, nail them securely and use
feathering strips for a smooth appearance.

HOW TO REPLACE DAMAGED SHINGLES
- Making repairs to an existing asphalt shingle roof is easy when you follow these
step-by-step instructions.
- Use a small pry bar to pull out the nails holding the damaged shingle. Remove both the
nails and the shingle.
- If you cannot reach the nails, use a sharp linoleum knife to cut away the damaged
shingle.
- Always try to replace the damaged shingle with one similar in weight, size and color.
- Apply asphalt roofing cement to the back of the replacement shingle before putting it
into place.
- After positioning the new shingle, nail it down with 1 3/4" roofing nails.
- Position the roofing nails so they are covered by the shingle above. For extra
protection against leaks, apply a small amount of roofing cement to the nail heads.
|

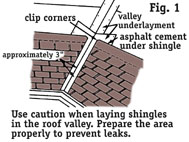
LAYING SHINGLES IN ROOF VALLEYS
- A roof valley is formed where two roofs join at an angle. You must be careful when
shingling in this area - an improperly laid roof valley can easily develop leaks.
- Valleys should be covered with a mineral-surfaced, roll roofing material (Fig. 1).
- First, place an 18" wide strip or metal flashing down the center of the valley,
from the eaves to the top of the ridge.
- Nail this material down on the outer edges only, making sure that it stays flat in the
valley.
- Place roofing cement along each edge.
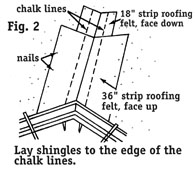
- Next, lay a 36" wide strip of the roofing material down on top of the previous
strip, and nail its outer edges.
- Snap two chalk lines down the edge of the valley. Start at the ridge, with the lines
centered in the valley and 6" apart. As you move down the roof, spread the lines
apart, about 1/8" per foot, down to the eaves.
- Now you're ready to apply shingles. Lay them down to the edge of the chalk lines, and
cut them to fit (Fig. 2).
- Place the end of each shingle in roofing cement to seal it before nailing it into
position.
- Do not nail shingles closer than 6" to the chalk lines.
|

APPLYING NEW ASPHALT SHINGLES
- Applying new asphalt shingles on a complete roofing job, or on new construction,
requires a layer of 15-lb. roofing felt over 5/8" plywood sheathing.
- Each course of the roofing felt should overlap the preceding course by at least 2"
to provide adequate weatherproofing protection.
- Staple the felt underlayment into position, starting at the edge of the eaves and
extending up to the roof ridge.

INSTALLING ADDITIONAL COURSES OF SHINGLES
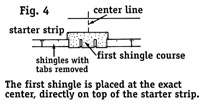
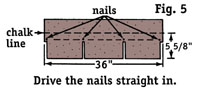
- After the first course of shingles has been laid on top of the starter strip, snap down
a chalk line at the manufacturer's specified exposure, usually 5", to aid in applying
shingles.
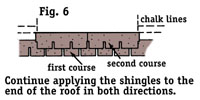
- Continue snapping down chalk lines until you reach the ridge of the roof. This
simplifies the job of laying each succeeding course of shingles in a straight line.
- Start the second course of shingles on top of the first course. Place the cut-out over
the center of the middle tab on the center shingle.
- Remember, a shingle cut-out must never fall directly over another cut-out in the row
immediately below it.
- Continue placing shingles in the second to the end of the roof in each direction.
- Start at the center of the roof for the third course of shingles. Again, place the
cut-out over the center tab on the preceding row, and continue to the end of the roof.
- Follow this procedure until you reach the ridge of the roof. Then start on the other
side of the roof in the same way you started the first side.
TOOL AND MATERIAL CHECKLIST
| Shingles |
Hammer |
Carpenter's Apron |
#15 Felt Roofing |
Ridge Shingles |
Asphalt Roofing Cement |
| Copper or Aluminum Flashing Material |
Soft Soled Shoes |
Level |
Clean-up Cloth |
Roofing Nails |
Chalk Line |
| #90 Mineral Surface Roofing |
Tin Snips |
Ladder |
Work Gloves |
Safety Rope |
Hand Cleaner |
Check your state and local codes before starting any project. Follow all safety
precautions. Information in this on-line brochure has been furnished by the National
Retail Hardware Association. Every effort has been made to ensure accuracy and safety.
Neither the NRHA nor the retailer can be held responsible for damages or injuries
resulting from the use of the information in this document.


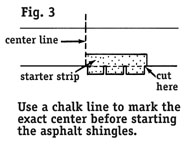
 STARTING THE
SHINGLES
STARTING THE
SHINGLES 
 SHINGLING VENT
PIPES
SHINGLING VENT
PIPES 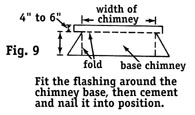
 SHINGLING AROUND
CHIMNEYS
SHINGLING AROUND
CHIMNEYS 
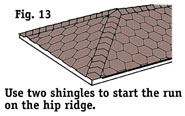
 SHINGLING HIP
ROOFS
SHINGLING HIP
ROOFS