Here are tips and suggestions on how to build attractive shelving that's also functional. Read them carefully to help save you time, money and effort. Inside this document you will find information about:


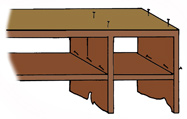
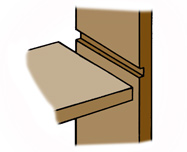
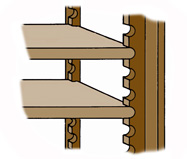
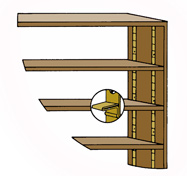
FIG. 1 - You can make basic, non-adjustable shelving from solid boards of many sizes and widths.


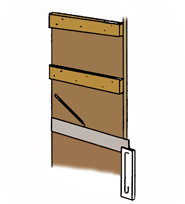
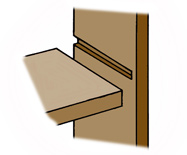
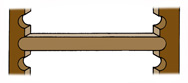
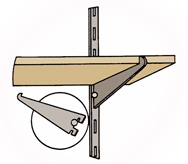
FIG. 2 - Small cleats make supports for non-adjustable shelves.


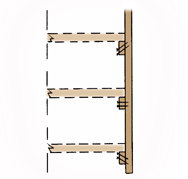
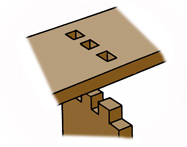
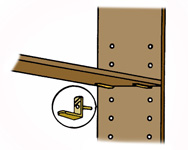
FIG. 3 - The way the nails are driven affects the strength of a shelf bracket.


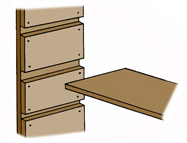
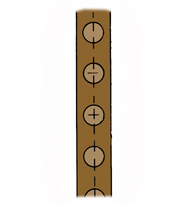
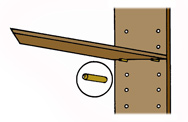
FIG. 4 - Larger cleats provide stronger supports for shelves that must carry heavy loads.


ADJUSTABLE AND NON-ADJUSTABLE
WOOD SHELVING

  • Additional shelving is useful in almost every home and can be added quickly and easily. And it need not be expensive.

  • Consider adding shelves in your basement, attic, kitchen and other areas to help keep stored materials much neater and to save time when looking for stored items.

  • You can make basic, non-adjustable shelving from solid boards of almost any size or width (Fig. 1). Such shelving is easy to make and provides adequate support for normal storage and shelving needs.

  • The disadvantage of non-adjustable shelving is that some stored objects may be too tall or short, thus wasting space on the shelving you construct.

  • You can overcome this problem by making shelves for tall objects and other shelves for short objects. Give a little thought to the materials you plan to store so you can design the shelves to minimize wasted space.

  • Non-adjustable shelving is normally used in closets, attics, basements, work areas, etc., where appearance and adjustability are not very important. These shelves can be nailed together with support pieces to provide the structural strength required.

  • Small cleats can provide the needed support for other types of non-adjustable shelves (Fig. 2). These shelves can be made as wide or as long as necessary.

  • Wood shelving of this type should have supports every 3'. If the shelving will hold extremely heavy loads, use supports as frequently as every 2-1/2'.

  • Use extreme care when nailing the cleats onto the side boards. Use a T-square or a level to make sure the shelves are in the proper position and are evenly spaced at all points.

  • The way in which you drive the nails will increase or decrease the ability of the shelves to carry heavy loads (Fig. 3).

  • For example, nails driven at an upward angle are likely to pull out when a heavy load is placed on them.

  • If the nails are driven straight into the supporting wall, the cleat has a fair supporting strength. However, nails driven at a downward angle greatly increase the ability of the cleat to carry a heavy load. Keep this in mind when nailing cleats for supporting shelves.

  • Wider cleats, as shown in Fig. 4, provide a great deal of structural strength. They also make it possible for the shelves to be moved in and out as necessary.

  • If you are designing shelves to carry extremely heavy loads, use wide cleats and nail them firmly into position.


FIG. 5 - Dado cuts can be inserted at any desired spacing.


FIG. 6 - A concealed dado cut makes a neater joint.


FIG. 7 - A pinned joint adds strength to a shelf support.


FIG. 8 - Cuts made at 90-degree and 45-degree angles provide a nice arrangement for simple adjustable shelves.


FIG. 9 - You can cut notches continuously to provide a shelf adjustment about every 1".


FIG. 10 - A 1x4 board can be bored and split to form a bracket for adjustable shelving.


FIG. 11 - A split 1x4 forms brackets that can be attached to the wall for shelf support.


FIG. 12 - You can use the same brackets for deep-set, sliding shelves in closets.


DESIGNING ADJUSTABLE
WOOD SHELVES

  • Use a simple dado cut in the side support for adjustable wood shelves. Dado cuts can be inserted at any desired spacing to provide as many adjustments as you need.

  • You can also use dado cuts for permanent non-adjustable shelving. For adjustable shelving, the dado cuts must be relatively deep. For permanent shelving, the cuts can be shallow.

  • The dado cut shown in Fig. 5 is visible from the front of the shelf. If this is objectionable, make a concealed dado cut for a neater, less conspicuous shelf joint (Fig. 6).

  • Again, use a dado cut for either adjustable or non-adjustable shelving. An adjustable shelf requires a deeper concealed dado cut. The shelf is notched in the front for concealing the dado cut.

  • A pinned joint provides structural strength for long lengths of shelving (Fig. 7). The supporting piece can be inserted or removed as required.

  • You can create another type of adjustable shelving by making cuts at 90-degree and 45-degree angles (Fig. 8). The shelf can then be cut to the same 45-degree angle and fitted into the sawed slots.

  • This type of shelving is not designed to carry extremely heavy loads. The 45-degree cut in the end of the shelf slightly weakens the supporting strength of the shelf.

  • Fig. 9 shows a modified version of the 90-degree and 45-degree angle cuts for adjustable shelving. Cut the notches continuously to provide a shelf adjustment about every 1".

  • If the shelving notches are carefully cut, they create quite a pleasing effect. You can insert box units to improve both the appearance and the function of the adjustable shelves.

  • Another design for adjustable shelves requires a 1x4 board of the desired length for the base (Fig. 10).

  • First, drill holes at the desired intervals. You can usually use holes of 3/4" bored at 3/4" intervals.

  • When all holes are drilled into the 1x4 piece of wood, split the wood down the middle and mount it to provide end supports for the shelves (Fig. 11).

  • Each 1x4, when drilled and split, makes two shelf supports or adequate supports for one end of the shelf.

  • You must drill two identical 1x4s to make supports for both ends of each shelf. Be sure to drill the holes in exactly the same positions and at the same spacing intervals so they match when affixed at each end of the shelf.

  • Once the 1x4 has been drilled and split, carefully sand and finish it for a neat appearance.

  • Use this same treatment for making deep, sliding shelves for linens or other storage in closets (Fig. 12). These shelves are inserted with the long measurement going into the closet rather than spanning the closet width.

  • The end of each shelf must be rounded and sanded to fit into the curved areas of the shelf supports.


FIG. 13 - Special brackets that fit into drilled holes make good supports for light shelves.


FIG. 14 - Dowels can also be used as light shelf supports.


FIG. 15 - A special flush-type shelf bracket fits into grooves to provide neatness and flexibility.


FIG. 16 - Shelf brackets and standards are the most widely used for wall shelves.


METAL AND WOOD BRACKETS FOR
ADJUSTABLE SHELVES

  • Most adjustable shelves are supported by metal brackets. These brackets are inexpensive and much easier to use than most wooden supports.

  • Special brackets that fit into drilled holes make good supports for light shelving (Fig. 13).

  • Drill holes into the supporting walls of the shelf at the desired spacing intervals. Then, slip the bracket into the hole and lay the shelf on the two supporting brackets.

  • These brackets can be adjusted upward or downward to make room for large or small items. Although easy to handle, use these brackets only for supporting light storage loads.

  • You can use simple dowel pins instead of metal brackets to make adjustable shelves (Fig. 14).
  • Insert the dowel pins in the drilled holes. They can be inserted or removed to adjust the shelving up or down quickly and easily.

  • Dowel pins are easy to use, but they do not support heavy loads and they tend to wear or give way under extended use. Metal shelf brackets are preferable.

  • A special flush-type shelf bracket is fitted into grooves for extreme neatness and flexibility (Fig. 15).

  • This shelving bracket provides more than sufficient structural strength for normal storage purposes. It is inexpensive, very effective and easy to use.

  • For mounting grooved shelving brackets of this type, use a dado cut for each bracket in the supporting end of the shelf.

  • The regular shelf bracket and standard is perhaps the most widely used shelf support (Fig. 16). Readily available from many sources, it is easy to install and neat in appearance.

  • The shelf standard and bracket makes it easy to build shelves quickly and to remove them when they are no longer needed.


TOOL AND MATERIAL CHECKLIST
Pre-cut Lumber T-Square
Marking Pencil Wood Chisels
Sandpaper Power Drill
Shelf Brackets Dowels
Floor-to-Ceiling Posts Nails
Screws Handsaw
Folding Rule Dado Head
Hammer Saber Saw
Power Sander Drill Bits
Shelf Standards  

Check your state and local codes before starting any project. Follow all safety precautions. Information in this document has been furnished by the National Retail Hardware Association (NRHA) and associated contributors. Every effort has been made to ensure accuracy and safety. Neither NRHA, any contributor nor the retailer can be held responsible for damages or injuries resulting from the use of the information in this document.