| About 54 percent of the energy used in homes goes into heating and cooling. Obviously, this is where you can make the biggest savings on energy costs.
Fortunately, there are many quick and inexpensive ways to save energy in your home. You don't have to be a master mechanic or even a skilled do-it-yourselfer.
All it takes is a small amount of time, a few tools that you probably already own–and some products from your hardware or home center retailer.
Inside this document you will find information about:
- Materials and Installation Techniques
- Insulation
- Storm Windows
- Cold Weather Energy Savers
- Hot Weather Energy Savers
- Year-Round Energy Savers
- Kitchen, Laundry and Bath
- Other Living Areas
|
|
|
|
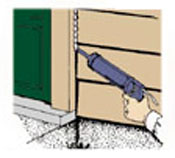
| FIG.
1 - Caulk around all window and door frames. |
|
|
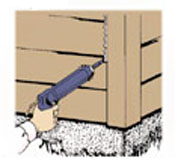
| FIG. 2 - Caulk wherever tow different parts of the house meet such as wall to wall or roof to wall.
|
|
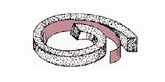
| FIG. 3 - Foam and felt strips are easy to install, but not very durable. |
|
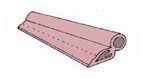
| FIG. 4 - Molded vinyl comes with a variety of backings for different applications. |
|
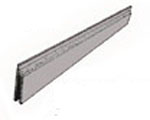
| FIG. 5 - Thin spring metal weather strips work between the door casing and the door. |
|
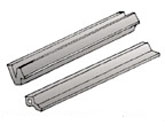
| FIG. 6 - Metal channels that interlock are expensive and difficult to install, but they are one of the most durable and effective forms of weather stripping. |
|

MATERIALS AND INSTALLATION TECHNIQUES
|
|
|
|

INSULATION
- Several kinds of insulation are available to homeowners. Kinds that are easily installed by the do-it-yourselfer are batts, blankets, and loose fill. Some batts and blankets now come with a thin plastic wrap to prevent some of the discomfort that comes with handling insulation. Foamed-in-plastic is usually installed by a contractor because special equipment is used. If your house has a flat roof or a mansard roof, or if your attic or basement area is otherwise restricted, installing will be difficult and you may need to hire a contractor.
Batt or Blanket
- This type of insulation is usually made of glass fiber or rock wool. Batts come in packs of several pieces cut to 4' or 8' lengths; blankets come in rolls of varying lengths. Both are sold in widths of 15" or 23" to fit conventional framing spaces and in thicknesses of 1 to 7". Batts and blankets are available with or without vapor barriers.
Loose Fill
- Loose fill insulation is made from glass fiber, rock wool, treated cellulose, vermiculite, or perlite, and does not come with a vapor barrier. Loose fill tends to settle in time. Rock wool should meet Federal Specification HH-I-1030A.
- Cellulose is made from recycled newspaper and has a high insulative value. Cellulose must be properly treated to be fire-resistant. Two specifications that certify that cellulose is fire-resistant are: Federal Specification HH-I-515C and Underwriters Laboratories Classification listing Type II 26 through 50.
Foam
- You can purchase cellular plastic products as either prefoamed sheets or batts, or they may be foamed in place by contractors using specialized equipment. The insulating efficiency varies for foams made of different materials (polystyrene, polyurethane, urea-formaldehyde, and others). Discuss these types with your retailer to determine which is the best for you.
- Foams possess other properties that may affect its long-term insulating value, such as moisture retention, shrinkage, spontaneous decomposition, and vermin resistance.
- Foams also burn, producing smoke and poisonous gases such as carbon monoxide. You can reduce these hazards by following the recommended installation procedures for each type of foam. Foam that is properly installed has a higher insulating value.
|
|
|
| FIG. 7 - To support insulation between floor joints, lace wire back and forth between insulation. |
|

INSTALLATION
Attics
- To insulate an attic floor where there is no existing insulation, lay batts or blankets or pour loose fill between the joists. So that moisture from the living areas of your home does not penetrate the insulation and reduce its effectiveness, you must place a vapor barrier between the heated or air-conditioned part of your house and your attic.
- Batts and blankets are available with a vapor barrier on one side. To install, place the vapor barrier face-down toward the heated or air-conditioned portion of your home. If you are using loose fill, you will have to install your own vapor barrier. Staple or tack a plastic sheet or polyethylene film under the area where you are planning to pour loose fill.
- If some new insulation already exists and you are adding a layer of new insulation on top of the old, it is important that there be no vapor barrier between the new and the old. If you must use insulation with a vapor barrier, remove the barrier before installation; you can use a knife to remove the barrier. Place the insulation with this side down. Before purchasing the additional insulation you need, measure the thickness that your attic will accommodate. Additional batts or blankets may not fit! If you try to squeeze insulation in, you'll reduce its effectiveness. Instead, add insulation with a higher R-value per inch.
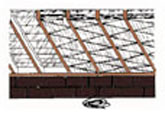
- Do not insulate on top of recessed lighting fixtures or heat-producing equipment. Keep the insulation at least 3" away from the sides of these types of fixtures. Also, do not cover the eave vents with insulation. Be sure that there is sufficient attic ventilation to allow moisture to escape. There are special foam and plastic inserts that fit between the roof rafters to help insure proper ventilation.
Floors
- To insulate the floor above your basement or crawl space, push batts or blankets between the floor joists from below with the vapor barrier facing up toward the heated or air conditioned part of your home. If there is no vapor barrier, install a plastic sheet against the underside of your floor (Fig. 7).
- To support the insulation, you can use insulation supports. These wire rods bend when you push them between the floor joists and they lock themselves into place. Another method is to lace wire back and forth under the insulation (Fig. 7). Provide adequate ventilation below the floor in the crawl space to allow moisture to escape.
|
|
|
|

STORM WINDOWS
|
|
|
|

COLD WEATHER ENERGY SAVERS
- Keep drapes and shades open in sunny windows; close them at night.
- An automatic garage door operator encourages you to shut the door quickly, thereby saving fuel–even in unheated garages–by preventing cold from reaching the inside walls.
- Electric heat tapes on water pipes that run through unheated areas prevent heat loss from cooling or freezing.
- Use a humidifier. Cooler indoor temperatures are more comfortable with the proper amount of humidity–about 40-50%.
- Change furnace filters regularly. A dirty filter impedes air flow and makes your furnace work longer and harder. Check the filter at least once a month.
- Be sure to keep the damper closed on your fireplace when it's not in use. Consider installing a glass-door fireplace to keep heat from escaping up the chimney.
- Use portable electric heaters for seldom-used rooms or to warm up part of a large, cold room.
|
|
|
|

HOT WEATHER ENERGY SAVERS
- Clean air conditioning filters regularly. Replace immediately when worn out. Keep coils or fins of air-conditioning units free of dust, lint, etc.
- Deflect daytime sun with awnings on windows or draw draperies and pull shades on sunny windows.
- Use an attic ventilating fan instead of air conditioning. They do a remarkably good job of keeping air circulating. A 1,400-square foot attic should have at least 5 square feet of ventilation.
- Install a turbine ventilator on the roof to pull hot air out of the attic.
- Run air conditioners only on really hot days.
- Are you using more light in certain situations than is needed? Each watt of lighting requires the expenditure of 1/2 watt of air-conditioning power.
- Combine circulating fans with room air conditioners for best air distribution throughout the house.
|
|
|
|

YEAR-ROUND ENERGY SAVERS
- Turn off furnace pilot lights during the summer, but check with the gas company first.
- Use fluorescent lights where possible. A 25-watt fluorescent will provide light equal to a 100-watt incandescent.
- Replace leaky faucets; repair all water-wasting fixtures. A dripping hot water faucet makes a hot water heater keep working.
- Utilize working shutters, interior or exterior, to control heat gain or loss.
- Close off unused rooms.
|
|
|
|

KITCHEN, LAUNDRY AND BATH
- Insulate your hot water storage tank and piping. Kits are available.
- Clean the heat reflector below the hot water heating element. It will reflect heat better.
- Install a flow-restrictor pipe to the shower head. This easy-to-install device can save a considerable amount of hot water. It's inexpensive, threads into the pipe and restricts the flow of water by several gallons of water per minute.
- Don't overload appliances that use hot water, such as clothes and dishwashers. The same rule applies to clothes dryers; use drying racks or clotheslines when possible.
- Use warm or cold water (rather than hot) whenever possible.
- Keep the thermostat on the hot water heater at the lowest setting possible to maintain a comfortable water temperature.
- Try to use high-energy appliances–washer, dryer, electric ovens-in nonpeak periods (early morning or late evening).
- Try energy-efficient cooking–flat-bottom pans, clean burner reflectors, pressure cooker, preparing several foods in the oven at the same time; use small appliances for small cooking jobs.
- Check energy efficient ratings (EER) of appliances and buy the most efficient–10 rating is excellent, 8 or 9 is good.
|
|
|
|

OTHER LIVING AREAS
- Install a timer to control the length of time outdoor lights are used, even for security lights.
- Remember to turn off shop lights, soldering irons and all bench heating devices as quickly as possible.
- Take advantage of color if reroofing. Darker colors that absorb more light should be used in cold climates; light colors that reflect light should be used in moderate and warm climates.
- Check windows and frames–if loose, install new window channels or complete new windows.
- Evaluate doors–are they weather-tight? If you don't have or want storm doors, are entrance doors insulated? Solid doors should have an insulated core; glass panels in doors should be insulated glass.
- Seal and insulate pipes and ductwork.
|
|
|
TOOL AND MATERIAL CHECKLIST
|
| Insulation |
Window Shades |
| Caulk/Sealants |
Weatherstrip |
| Gable Vents |
Light Dimmers |
| Heat Deflectors |
Fireplaces and Accessories |
| Awnings |
Fans |
| Storm Windows/Doors |
Attic Ventilators |
| Plastic Window Material |
Faucet Repairs |
| Humidifiers |
Wood Stoves |
| Clock Thermostats |
Water Savers |
| Thermometers |
Furnace Filters |
| Pipe Wrap/Heat Tapes |
|
| Check your state and local codes before starting any project. Follow all safety precautions. Information in this brochure has been furnished by the National Retail Hardware Association (NRHA) and associated contributors. Every effort has been made to ensure accuracy and safety. Neither NRHA, any contributor, nor the retailer can be held responsible for damages or injuries resulting from the use of the information in this document. |