|
Create New Account
Millard Lumber Newsletter
Register to receive newsletters and notices by email. Register Now
|
Repairing Toilets
Did you know that as much as 80,000 gallons of water can be wasted each year by an
undetected toilet tank leak? It makes economic and environmental sense to occasionally
check the toilets around your home. Even for older ballcock/flush ball toilet tank valves,
a full line of replacement parts is still widely available. Or, you can install modern
plastic devices instead of repairing the original parts.
Fig. 1 shows the basic working parts of the old-style ballcock/flush valve toilet tank
(a) and the modern tank with plastic valves (b).
|
CHECK FOR LEAKS
- Most toilet flush tanks work in the same way. The tank contains two valves - a flush
valve and a refill valve. One type of refill valve is commonly called a ballcock.
- When the flush valve fails to seat properly, water is leaked from the tank into the
bowl. The leaked tank water is replenished by the refill valve, causing a continuous flow
of wasted water.
- If the refill valve leaks, the tank overfills, and the excess water runs from the
overflow pipe into the toilet bowl. A waterlogged float causes overflowing, even if the
refill valve itself is functioning properly.
- You can check for a leaky flush valve very simply, as shown in Fig. 2. Shut off the
water supply to the toilet. The shutoff valve is located beneath the tank on the left side
as you face the toilet. Mark the water level, then check it again in 20 minutes. If the
water level has fallen below your mark, the flush valve is leaking. If not, the flush
valve did not leak, and you know that any leaks are being caused by the refill valve.
- To check both the flush valve and the refill valve for leaking, simply drop some
food coloring or laundry bluing into the toilet tank to color the water. Do this when the
tank is fully refilled after a flush. Don't flush the tank again until you have inspected
the toilet bowl - a few minutes later - for signs of color. If the bowl water has a hue,
there's a leak.
|
|
SIMPLE ADJUSTMENTS
- Your toilet tank may simply need a good "tune-up." Here are some adjustments
you can make.
- Refill valve. If your tank has a conventional ballcock refill valve, the water
level is adjusted by bending the float arm (Fig. 3). The level should be high enough for
complete flushes, but the water should not be to the top of the overflow pipe. Your tank
should have a colored or molded water level mark. It should never be set so low that the
bowl does not refill with trap sealing water. The rule of thumb is to set the water level
about 3/4" below the top of the overflow pipe.
- If the float rubs on other parts, simply adjust the float arm sideways. If the float
lacks buoyancy, unscrew then shake it to determine if it is waterlogged. A waterlogged
float should be replaced. The float arm can also be replaced, if needed.
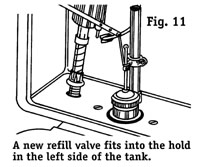
- In tanks using modern plastic refill valves, the tank water level is adjusted in other
ways. If your tank uses a hand nut, turn the nut clockwise to raise, or counterclockwise
to lower, the water level. Or, your tank may have a sliding pinch clamp on an adjustment
rod (Fig. 4).
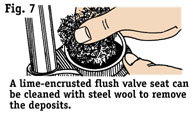
- Flush valve. Replacements for a flush ball and its actuating mechanism are
available, but it may be possible to stop a leak with minor adjustments. Check the
following mechanisms before purchasing replacements.
- See that the guide arm is centered directly over the seat. The guide arm should drop the
flush ball directly into its seat. If the flush ball is not seating properly, make the
adjustment shown in Fig. 5.
- The guide arm should allow the flush ball to rise enough for a complete flush. If not,
raise the arm. Be careful that it isn't too high - then it will prevent the ball from
closing completely.
- Check that the upper lift wire pulls the flush ball high enough. To adjust it, simply
bend the wire for a higher or lower lift.
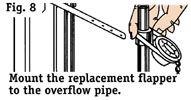
- The lifting hardware on a flapper-type flush valve should raise the rubber flapper to
start a flush, but should not hold the flapper up off its seat. If this is occurring, the
hardware is adjusted too short. Some types allow you to slide the flapper itself up or
down on the refill tube to ensure that the flapper meets the valve seat squarely. The
lifting hardware and flapper height adjustments are the first things to check when flapper
problems arise.
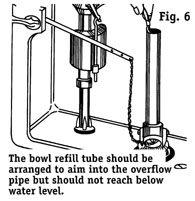
- Refill tube. If the bowl-refill tube is out of place, water is routed directly
into the tank, rather than replenishing water in the bowl. When this is the case, you will
likely hear splashing sounds during tank refill. The refill tube should aim directly into
the overflow pipe but should not reach below water level. If the tube extends too low, it
will siphon tank water silently away. Fix it by repositioning as shown in Fig. 6.
- Defective refill tubes on some valves can be replaced with new plastic ones. Simply
place one end of the plastic tube over the serrated plastic lug on the body of the valve,
and place the plastic holder in the top of the overflow pipe.
|
|
FIXING THE FLUSH VALVE
- Most toilet tank troubles can be traced to a faulty flush valve. You have three choices
in correcting this common problem: (1) repair the old flush valve; (2) replace the flush
ball with a more modern flapper or install a glued-in replacement flapper; (3) or install
a new flush valve.
- These repairs require a varying amount of work. The more simple adjustments were
discussed previously.
- Examine the old flush ball or flapper. If it is aged or encrusted with deposits, replace
it with a new one. Scale deposits on the seat can be removed with steel wool (Fig. 7) or
with No. 500 wet-or-dry abrasive paper. But if the valve still leaks, it must be replaced.
- You can install a new guide arm, if necessary. To remove the lift wire from a flush
ball, turn it counterclockwise with pliers. If you are replacing all parts, simply cut off
the old lift wire.
- Flapper. To replace a flapper, disconnect the lift hardware from the trip arm and
slide the flapper up and off the overflow pipe (Fig. 8). Install the new unit, reversing
directions, and connect the lift hardware back to the trip arm. Any excess lift chain can
be cut off or left dangling, if it doesn't interfere with toilet operation.
- A loose trip handle can be fixed by tightening. The nut has left-hand threads, and must
be turned counterclockwise to tighten (looking from inside the tank). Or, you can install
a replacement trip handle.
- Glue-in repair kit. Many replacement flush valves simply glue in place on top of
the old valve seat. While several brands are available, not every type of flush can be
replaced by these devices (Fig. 9).
- On single-piece toilet tanks - with a flush valve held in place with flanges that fit
inside the opening - the flapper-ball may bind and prevent a leak-proof seal. On more
common two-piece toilets, this problem does not occur.
- Using a glue-in repair kit is quick and easy, but you must follow the manufacturer's
instructions. To be sure you purchase the right kind of repair kit, take a rough drawing
of the bottom of your toilet tank and flush valve to your hardware or home center store.
|
|
INSTALLING A NEW FLUSH VALVE
- Flush valves are held to the tank by one large jam nut on the bottom of the tank.
Installing a new flush valve usually requires removing the toilet tank from the bowl,
which can be rather complicated. However, wall-mounted tanks may not need to be removed.
- If the toilet tank must be removed, turn the water off completely, flush the toilet and
hold the trip lever down to evacuate most of the tank water. Use a sponge to remove the
remaining water. Disconnect the tank's inlet fitting from the water supply. If the
flexible riser tube is damaged, replace it.
- Then, unscrew the two rubber-gasketed bolts flanking the flush valve. These bolts go
through the tank and bowl flange, with nuts beneath. Use caution - forcing the bolts may
cause you to break the tank, bowl or both. Use plenty of penetrating oil on the threads.
If they still won't budge without force, try wrapping masking tape around a hacksaw
blade and sawing with the teeth facing you, so the blade cuts on the "pull"
stroke. The layer of masking tape will protect the bowl's glazed surface from saw
scratches.
- The tank should now lift away from the bowl. Lay it upside-down on a throw rug or
newspaper padding to protect it, and unscrew the large nut holding the flush valve to the
tank. Use channel-locking pliers plus penetrating oil and extreme care to avoid
breakage. Clamp a well-padded locking plier/wrench around the flush valve to keep it from
rotating inside the tank.
- Install the new flush valve (Fig. 10) according to the directions. The rubber gasket
goes on the inside of the tank to prevent leakage. The flat washer fits on the outside to
prevent tank damage.
- Use new brass tank hold-down bolts, which will remain workable. Tighten the bolts just
enough to compress the tank's soft rubber gasket and keep it from leaking.
- Install the water supply riser to the tank and turn on the water.
|
|
FIXING THE REFILL VALVE
- Brass-style toilet refill valves can often be repaired. To take a valve apart, remove
the lever's screws. This allows you to lift out the float arm and valve plunger. Check the
flat rubber washer on the end of the plunger. If it's worn, you can pull it out with
pliers and either turn it around or replace it. This procedure usually corrects an
overfilling problem. Next, reassemble the valve. If the tank continues to overfill, check
to make sure the operating lever at the end of the float arm is functioning properly.
- New refill valve. To replace the entire refill valve assembly, first turn off the
water supply. The tank should then be flushed and sponged out, as detailed previously.
Remove the inlet nut and riser tube from the bottom of the refill valve beneath the tank.
Hold the refill valve inside the tank with a padded locking plier/wrench to keep it from
turning, and remove the nut beneath the tank. With the nut off, the refill valve assembly
can be lifted out and a new one inserted in its place (Fig. 11). Follow the exact
instructions included with the unit you purchase.
- Finally, reconnect the riser tube and turn the water on. The tank should fill, allowing
you to adjust the water level according to the instructions that were included with the
valve.
- Anti-siphon valves. The best refill valves offer anti-siphon protection. In fact,
this may be a requirement. This protection prevents back siphonage of toilet tank water
into your home's potable water supply system if a vacuum occurs in the toilet's water
supply system. Whether or not this is a code requirement, the anti-siphon valve is a good
idea to protect your family and public health.
|
TOOL AND MATERIAL CHECKLIST
| Adjustable Wrench |
Pliers |
Pipe Wrench |
Locking Plier/Wrench |
| Channel-Locking Pliers |
Screwdriver |
Refill Valve |
Flush Valve |
Ballcock Parts |
| Flush Ball |
Flapper |
Float |
Riser Tube |
Sponge |
| Penetrating Oil |
Hacksaw |
Masking Tape |
Hand Cleaner |
Wiping Cloths |
Check your state and local codes before starting any project. Follow
all safety precautions. Information in this on-line brochure has been furnished by the
National Retail Hardware Association. Every effort has been made to ensure accuracy and
safety. Neither the NRHA nor the retailer can be held responsible for damages or injuries
resulting from the use of the information in this document.
|