|
Create New Account
Millard Lumber Newsletter
Register to receive newsletters and notices by email. Register Now
|
Working With Plastic Pipe
Plastic piping and do-it-yourself plumbing go together like hammers and nails. Plastic pipe is easy to cut and join to its many fittings, and it is widely accepted by plumbing codes.
Inside this document you will find information about:
- Meet the Plastics
- Solvent Welding
- Mechanical Couplings
- Installing Plastic Piping
|
|

MEET THE PLASTICS
- Plastic (more correctly thermoplastic) for plumbing comes two ways: in
pipe sizes and in tubing sizes. While both are sized nominally according
to inside diameter, pipes go by iron-pipe sizes and tubes go by copper-tube
sizes. Pipes and tubes and their fittings, even in the same designated
sizes, should not be interchanged. With plastic piping, you choose from
a wide selection of materials. Table A shows the plastic plumbing materials
available and describes what each is used for.
- Rapid technological advances in plastic plumbing may leave local plumbing
codes outdated. So, before purchasing your materials, it's a good idea
to consult your city or county building officials.
- DWV stands for the drain-waste-vent system used to carry wastes away
from your home's fixtures and to vent the system above the roof. Sewer
pipes are made to carry household wastes below ground to a public sewer
or private disposal system. Drainage pipes are used below ground, too,
but are thinner-walled and lower in cost. They're usually used with
non-septic water, such as roof runoff. Tubular goods are the thin-walled
fixture drain and trap parts used beneath sinks and washbasins.
- Only two kinds of plastic tubes can withstand hot water under pressure:
rigid CPVC and flexible PB. The two may be used singly or together to
build corrosion-free, non-electrolytic household water supply systems.
Because plastic pipe is non-conducting, it cannot be used for electrical
grounding.
- PVC pressure pipe should be used only for cold water outdoors. It
is ideal for building lawn-watering and irrigation systems. PE pipe
serves a similar purpose but is flexible and cannot be solvent welded.
PE is especially useful as deep-well pipe.
- Riser tubes are the highly flexible, small-diameter tubes linking a water
supply system and faucets, making the faucets easier to connect. Riser
tubes often fit directly into an adapter on a fixture shutoff valve.
- Plastic pipes for most uses (except tubular products) are rated by the
American Society for Testing and Materials (ASTM). Look for the ASTM
designation on each pipe, tube and fitting that you buy, signifying
that it meets ASTM standards. Water supply piping should carry the National
Sanitation Foundation's "NSF-pw" approval, meaning the parts
are suited for carrying potable, or drinkable, water.
|
|
FIG. 1 - To join the
solvent welding plastic pipe to its fittings, first cut the pipe and then
deburr it with a knife.
FIG. 2 - Solvent weld
the joint with a cleaner/primer followed by a liberal application of solvent
cement to the pipe's end.
FIG. 3 - Next apply
solvent cement sparingly to the fitting socket. If the joint is to be
pressurized, give the pipe a second application of cement.
FIG. 4 - If you solvent
weld a fitting incorrectly, you can saw it out and install the correct
fitting. Use two couplings to join the new parts to the old.
|

SOLVENT WELDING
- The simple solvent-welding process used to join many plastic pipes must be done properly to prevent leaks.
Here's how.
- Use the two-step methodemploying cleaner/primer and solventexcept
with ABS and styrene, with which the one-step method (solvent only)
is usually enough.
1. Inspect the pipe end and fitting socket for cracks, gouges, dirt
and abrasion. If the pipe end is imperfect, it can be cut back to
expose good material. Discard a damaged fitting.
2. It's a good idea to purchase pipe and fittings made by the same manufacturer. If this isn't the case, test-fit them. The pipe should enter the fitting but meet resistance part-way in. Held upside down, the pipe should not fall off.
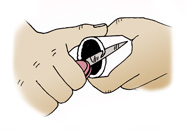
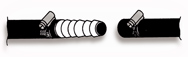
3. Cutting pipes. Cut the pipe off squarely to the proper length
using a fine-tooth saw or plastic pipe cutter (a hacksaw works well).
Flexible plastic pipes are more easily severed with a sharp knife,
but be careful not to cut yourself. If you have a large amount of
cutting to do, you can get a tubing cutter with a special wheel for
use on rigid plastics or a shear-type cutter for PVC. Then, using
a knife, remove any burrs and chamfer the outer end of the pipe slightly
(Fig. 1). Do not use sandpaper on plastic pipes. It may remove too
much material for successful joining.
4. Cleaning. Now, using a quality cleaner/primer, clean the pipe
end and fitting socket (omit this entire step with ABS and styrene).
Apply the cleaner/primer with a dauber, brush or clean cloth to remove
grease, oil and dirt, and to prepare the plastic mating surfaces for
solvent cement action. The surfaces to be joined should be clean and
free of dirt and grease. The pipe should be dry before applying cement.
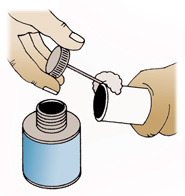
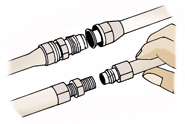
5. Solvent welding. Brush on a coat of an ASTM-rated solvent cement
that is matched to the type of pipe and fitting you are using. It
is important to use the right type of solvent cement. Table B shows
the various cements and the kinds of plastic they are suited to. Liberally
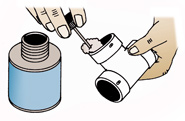
apply cement first to the pipe end (Fig. 2), then apply it sparingly
to the fitting socket (Fig. 3). Leave no bare spots. With chemical-resistant
PVC and CPVC pressurized piping, give the pipe two applications of
cementone before and one after coating the fitting socket. With
all solvent welding, use a dauber or brush that's at least one-third
to one-half the pipe's diameter to apply the cement.
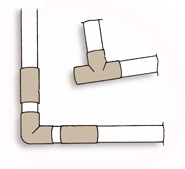
6. Immediately join the pipe and fitting full-depth with a slight
twist to bring it into correct alignment. The twist breaks up insertion
lines in the solvent cement. Hold the fitting on until the solvent
cement grabs tightly. A fillet of cement around the fitting indicates
that you used enough solvent cement to ensure a leak-free joint. With
PVC and CPVC, do not wipe off the fillet. On the other hand, the one-step
solvent-welding method for ABS and styrene calls for wiping off any
excess cement around the fitting. The joint should be ready for use
in an hour.
- Safety precaution. Avoid prolonged breathing of solvent cement
and cleaner/primer vapors. Work in a well-ventilated area, and cap the
cans after each use. Keep solvent and cleaner away from any open flame.
Read and follow the precautions that appear on the labels. Remove any
cement on your hands with hand cleaner.
- Correcting errors. Solvent welding is normally a one-way processyou
can install the fitting, but you cannot get it off again. When you accidentally
put the wrong fitting on a pipe, you must cut it out and replace it
with the correct fitting (Fig. 4).
|
|
FIG. 5 - PE pipe cannot
be solvent welded. Instead, it uses barbed fittings and stainless steel
worm-drive clamps.
FIG. 6 - PB tubing
is joined to its fittings with mechanical couplings shown here in the
form of tees.
FIG. 7 - Plastic water
tubes can be joined to metal using flare or compression adapters. To use
a flare adapter, the tube end must first be flared with a flaring tool.
FIG. 8 - Plastic tubular
drains and traps are joined with slip couplings that allow length and
angle adjustments before tightening the slip jam nuts.
FIG. 9 - Pressurized
joints between metal piping and plastic hot/cold water supply tubing,
such as at a shower valve, should be made with transition unions.
|

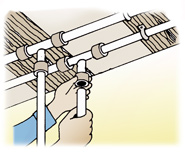
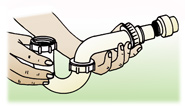
MECHANICAL COUPLINGS
- Some fittings are made for joining pipes and tubes that cannot be
solvent welded.
- PE pipe. Simple barb-type plastic or metal fittings are used
with flexible PE pipe. To make the connection, slide a correctly sized
worm-drive clamp over the pipe end and push the pipe all the way onto
the barbed fitting (Fig. 5). Position the clamp about 1/4" from
the end of the pipe and tighten it.
- With any flexible tube, be careful not to bend it in too tight a curve.
It can kink the tube and diminish or completely shut off the water flow.
- PB tubing. Flexible polybutylene tubing for hot and cold water
supply systems is joined by patented O-ring-sealed mechanical couplings.
Each system uses its own coupling, and they're often not interchangeable
with those of other systems. Follow the instructions for the kind you
are using (Fig. 6).
- Flaring plastic. Both CPVC and PB tubing can be joined to each
other or to metal piping with the use of flare or compression couplings
and adapters (Fig. 7). Flaring is done with a flaring tool. To prevent
cracking of a CPVC tube when flared, cut the end off squarely and smoothly
with a pipe or tubing cutter. Soak the rigid tube's end in boiling water
just before flaring.
- Slip-jam-nut couplings. Tubular drainage pipes are joined by
slip-jam-nut couplings. To make up such a coupling, first install the
nut facing its threads. Then install the correct-sized slip washer with
its flat face toward the nut. If you are sure that none of the parts
are made of ABS plastic, which is adversely affected, you may use plumber's
putty or silicone rubber sealant around the inside of the slip jam nut
to prevent leaks. Adjust the length and direction of the tubular parts,
then start the nut's threads with its fitting and tighten (Fig. 8).
- Most plastic tubular couplings will tighten leak-free by hand, but you
may want to give them an extra quarter-turn with a pair of channel-locking
pliers.
- Transition unions. For adapting plastic water supply tubing
to threaded metal parts, such as at water heaters and bathtub/shower
valves, use a fitting called a transition (Fig. 9). Transition unions
allow thermal movements between metal and plastic without leaks. Use
a male-threads adapter for non-pressurized connections at spots such
as shower risers and water heater relief valve tappings.
- Some mechanical couplings made for PB water supply tubing also work
with copper tubing since the two are the same size. These allow you
to joint plastic to copper without sweat-soldering. These fittings make
effective transition unions.
- Flexible fittings. Flexible replacement drain-waste-vent and
sewer/drain pipe fittings are made of soft vinyl. These come with large
worm-drive band clamps that enable them to be fastened securely to plastic
or metal pipes. A flexible fitting can be shoehorned into place, even
though the pipes it fits over are immovable.
|
|
FIG. 10 - Don't bind
plastic pipes in. They need room to expand and contract.
|

INSTALLING PLASTIC PIPING
- Plastic piping is the easiest to install, but there are special things
to look for.
- Securing. Mount plastic pipes so they can expand and contract
without damage. Larger DWV pipes are hung by perforated metal strapping
called "plumber's tape" spaced a maximum of 48" apart.
Smaller water supply tubes are attached to the framing by tubing hangers
that hold it tightly to the framing while permitting back-and-forth
movement. Use hangers a maximum of 32" apart (one hanger at every
other joist). Also, be sure not to bind rigid pipes in at the ends.
Leave about 1/4' for every 10' of pipe, as shown in Fig. 10.
- Provide protection from nails with pre-punched, nailed-on steel straps
from your dealer. The straps also help to brace over any notches made
in the framing for piping. Be sure to install air chambers or water
hammer arresters at every fixture and appliance except toilets.
- Joining to existing drain. To lead a new drain into an older
plastic drain, use slip couplings. First, mark the portion of the old
pipe to be cut out where the new pipe will join it. Next, saw out the
length of pipe between the marks. Slide a shoulderless slip coupling
onto both ends of the cut pipe, leaving about 1-1/2" exposed for
solvent welding. Position the new fitting ready for coupling onto the
old pipe. There will be pipe stubs on both sides of the joints for solvent
welding. Dope the pipe ends all around with a heavy coating of solvent
cement. Immediately slide the slip coupling into place, halfway astride
the joint. Give it a slight twist as you put it in place. Hold the alignment
for 10 seconds before working on the other end of the fitting in the
same way.
- Direct burial. When plastic sewer and drainage pipes are buried
in the ground, follow a few common-sense rules. First, lay the pipes
on unexcavated trench bottom, not on soft fill. Fill could settle unevenly,
making low spots in the pipeline. Dig out depressions for the couplings
so that lengths of pipe are fully bedded, not bridged between couplings.
Backfill around the pipes should be free from rocks that could damage
the pipe walls. Packed sand is a good initial backfill. Once the pipes
are well covered, use ordinary backfill the rest of the way.
| TABLE
B  
Choosing a Cement |
Type of
Cement |
Type of Pipe |
| |
ABS |
PVC |
CPV |
Styrene |
All-Purpose |
| ABS |
R |
R |
R |
R |
R |
| PVC |
NR |
R |
R |
NR |
R |
| CPVC |
NR |
NR |
R |
NR |
R |
| Styrene |
R |
R |
R |
R |
R |
| R-Recommended   NR-Not Recommended |
|
| TABLE
A  
Meet the Plastic Pipes |
| Plastic |
Characteristics |
Joins by |
Colors |
Uses |
| PVC (polyvinyl chloride) |
Rigid with high chemical resistance |
Solvent welding |
White, gray, beige, and many others |
DWV, sewer, and drain pipe; cold-water buried pressure pipe; tubular goods |
| ABS (acrylonitrile-butadiene-styrene) |
Rigid |
Solvent welding |
Black |
DWV, sewer, and drain pipe; tubular parts |
| CPVC (chlorinated polyvinyl chloride) |
Rigid, heat-resistant |
Solvent welding |
Beige |
Hot and cold water supply tubes, indoors and buried |
| PB (polybutylene) |
Flexible, heat-resistant |
Mechanical couplings |
Beige, gray |
Hot and cold water supply tubes, indoors and buried; riser tubes |
| PE (polyethylene) |
Flexible, low-cost |
Clamped couplings |
Black, milky |
Cold water only outdoor piping, buried |
| S or RS (styrene or rubber-styrene) |
Rigid, low-cost |
Solvent welding |
Black, milky, or white |
Drain pipe outdoors and buried |
| PP (polypropylene) |
Semi-rigid with high heat and chemical resistance |
Slip-jam-nut couplings |
Beige |
Tubular drainage products for fixtures |
Check your state and local codes before starting any project.
Follow all safety precautions. Information in this document has been furnished
by the National Retail Hardware Association (NRHA) and associated contributors.
Every effort has been made to ensure accuracy and safety. Neither NRHA, any contributor
nor the retailer can be held responsible for damages or injuries resulting from
the use of the information in this document.
|