Paneling is one of the easiest things you can do to change the look of a room. The 4 ft. x 8 ft. sheets come in many materials, textures, and colors–you may find that choosing the paneling is the toughest part of the job! Your retailer will be happy to help you.

The basics of panel installation are the same, even when the panel styles require a slightly different method.

Inside this document you will find information about:


ESTIMATE YOUR NEEDS

  • To figure how much paneling you'll need, measure in feet the total width of the walls you're covering, then divide by four. This will give you the number of 4' x 8' sheets required. For walls higher than 8', divide the additional height measured in feet into 8 feet to see how many upper pieces can be cut from a single 4' x 8' sheet. Deduct half a panel for each door, and a quarter panel for each window.

CONDITION THE PANELS

  • After you purchase the panels, they should be conditioned. You can either stand them up individually on their long edges around the room or stack them flat using plenty of wooden sticks between each panel to allow air to flow freely between them. The panels need 24 hours (above grade) to 48 hours (below grade) to become acclimated to the environment.

PREPARE THE WALLS

  • Paneling may be installed on three different types of walls (Fig. 1). Panels less than 1/4" thick need a solid backing–such as a level and flat plasterboard wall behind them for support. Panels 1/4" and thicker can be installed directly over even framing members–studs or furring strips (check building codes for your area). All paneling may be put up with nails or with a combination of panel adhesive and nails.


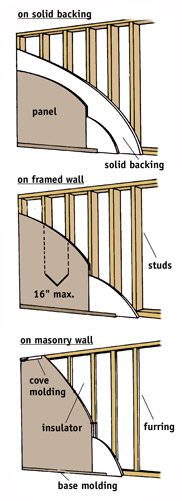
FIG. 1 - Paneling may be installed to solid-backed walls, over studs or over furring strips.

INSTALLING ON SOLID BACKING

  • First, locate the wall studs. Repair the old wall, ensuring that it is nailed tightly to its framing. The framing behind walls usually runs vertically on 16" centers or sometimes 24" centers. When you find one stud, you can usually locate the others easily by measuring. Or you can use a stud finder. Either way, mark the locations by snapping or drawing vertical lines along the studs. Then continue the lines (or use tape) several inches out onto both the ceiling and the floor as guides for when the panels cover the marks at the studs.

  • Remove all the trim. Take down all moldings in the room: ceiling, floor, and around all openings. Take off the electrical receptacle and light switch covers, after you turn off the electricity to them. (Use a neon test light to be sure it's off.) If the ceiling is to be paneled, too, remove all light fixtures by first turning off the electricity and disconnecting them from their wiring. For safety, reinstall the wirenuts or put tape around the exposed wires inside the junction box.

INSTALLING ON A FRAMED WALL

  • Check the studs to be sure they are vertical and on 16" or 24" spacing. Also make sure that backing is provided at all corners, at the top and bottom of the wall and around any openings. Outside walls should have a vapor barrier over the faces of the studs.

INSTALLING ON A MASONRY WALL

  • First check the masonry walls for excessive moisture. Walls with moisture must be completely waterproofed before they are paneled. Ask your retailer for a good waterproofing product. Moisture can sometimes be caused by condensation. If this is the case, add a waterproof vapor barrier over the wall (below grade, do this before furring it).


FIG. 2 - Furring strips should be placed 16" apart horizontally or vertically. Put blocking every 4 ft. between furring.

BEFORE PANEL INSTALLATION

  • Install 1" x 2" or 1/2" plywood furring strips–ripped 11" wide–horizontally or vertically, placing them on 16" centers (Fig. 2). They are best when fastened with masonry anchors drilled into the wall. Furring strips also can easily be glued on; your retailer can recommend the proper adhesive. Furring can also be used to make imperfectly framed walls even and flat.

  • Inspect your furring strips as you put them up to make sure they are creating an even, flat surface. Make any necessary adjustments by shimming behind the uneven strips with pieces of plywood or tapered wood shingles. Nail the shingles with brads to keep them in position.


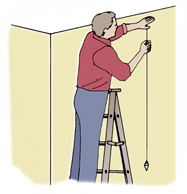
FIG. 3 - Snap plumb chalk lines at the center of all behind-the-wall framing.


FIG. 4 - To keep from getting ragged edges on the faces of panels, they should be hand-sawn from the finished side or saber-sawn from the backside.


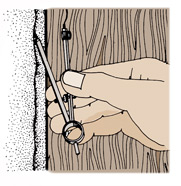
FIG. 5 - Use a pencil compass to scribe irregular corners onto panels. Cut with a coping saw for a perfect corner fit.


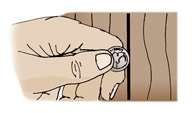
FIG. 6 - Space the panels apart about the thickness of a dime to allow for expansion.

MEASURING AND CUTTING THE PANELS
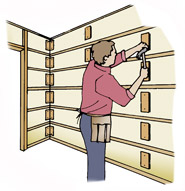
  • If the panels contain a variable pattern, such as woodgrains, stand them against the wall around the room. Then you can rearrange them or invert them for the most pleasing pattern.

  • Begin putting up the panels in the first corner you see as you enter the room. Trim each panel to 1/4" shorter than the ceiling height.

  • Get the first corner panel exactly plumb, using a level or chalked plumb line snapped onto the wall (Fig. 3). Its outer edge must be centered on a framing member. The edge against the corner may have to be trimmed to bring the outer edge over a stud or furring strip. Double-check all your measurements before sawing the panel. Cut with a fine-tooth saw–never use one with coarse teeth. Do the sawing with a table or hand crosscut saw (not rip), working from the finished side of the panel (Fig. 4). With a saber saw, circular saw or radial-arm saw, work from the back side.

  • If the corner of the wall is not plumb or is irregular, the edge of the panel against that corner can be scribed to fit, as shown in Fig. 5. To do this, plumb the panel 2" back from the corner. Then, holding the pencil compass horizontally, scribe a line onto the panel with the compass point following the irregularities. Once this uneven edge is marked and the panel is cut with a coping saw, it will fit into its corner perfectly.

  • When the first panel is readied, nail (or glue and nail) it to the wall. Move on with additional panels, avoiding a fit that's too tight between the panels. Leave the thickness of a dime between panels to avoid expansion problems (Fig. 6). The gaps will not show greatly if the area between panels is precolored with a marking pen or a stripe of paint the same color as the grooves.

PANELING WITH NAILS

  • Cover your hammer head with a rag to protect the face of your panels when nailing. Use the nails recommended by the manufacturer of the paneling you purchased. These will likely be 1" brands or 3-penny finishing nails. If you're nailing through an older wall, the nails need to be extra long (usually 1-5/8") to penetrate into the framing. Place nails every 4 to 6 inches along the panel edges and every 8 to 12 inches throughout the rest of the panel on studs. Always begin nailing at one edge and move across the panel to the other edge. Never nail opposite edges first, then the middle of a panel. Drive the nails about 1/32" below the surface with a nail set.

  • The countersunk holes may be filled later with a matching colored putty stick. If you use color-matched nails, countersinking and puttying will not be necessary.


FIG. 7 - Apply gapped 1/8" beads of panel adhesive, using a drop-in caulking gun and cartridges.


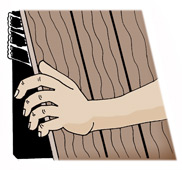
FIG. 8 - After contacting panel and adhesive, pull it away from the wall at the bottom. Wait for the adhesive to get tacky before recontacting.

INSTALLING WITH ADHESIVE

  • To hold the panels firmly to the wall, apply 3" long 1/8" beads of a solvent-based panel adhesive to the studs or solid-backed wall (Fig. 7). At the panel edges, apply a continuous zigzag bead. If the wall has been papered, the wallpaper must be removed before applying adhesive. (Consider simply nailing the paneling over the wallpaper.)

  • Place the panel in position on the adhesive and drive several nails loosely across the top to hinge it in the proper position.

  • Then pull the panel about 10" from the wall at the bottom, resting it on a block of wood. The adhesive will become tacky in 2 to 10 minutes (Fig. 8).

  • One 10-oz. cartridge of panel adhesive will adhere three or four panels. Use adhesives according to the directions on the cartridge. Avoid prolonged breathing of vapors, and remember that panel adhesive may be flammable.

  • Now press the panel firmly against the adhesive and tap all over it with a hammer and cloth-padded wood block or rubber mallet. The "hinge" nails at the top can be covered later with trim, or else countersunk and filled over.

  • Heavy panels need additional support, with nails 16 to 20 inches apart. In this case, you need not pull the panel away from the wall to allow the adhesive to become tacky.


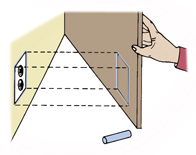
FIG. 9 - Marking cutouts for electrical boxes is easy if you chalk the box edges and make contact with the panel in position.


FIG. 10 - Drill four holes at the corners of the box, then make the cutout with a fine-toothed keyhole saw. Add 1/4-inch all around.

FITTING ELECTRICAL BOXES

  • Panel cutouts for switch and receptacle boxes can easily be made.

  • First, generously chalk the wall around the edges of box.

  • Then, hold the panel in position and tap it lightly against the chalked box. When the panel is taken away, the box outline will have been transferred to the back of the panel (Fig. 9). Remember that the outlet box itself should be adjusted outward to meet the surface of the paneling.

  • Simply drill four holes at the corners of the chalk outline, insert a keyhole saw, and make the cutout. Make it 1/4" larger than the cutline (Fig. 10).


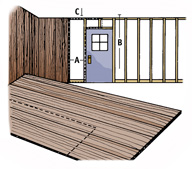
FIG. 11 - To make the waste cutout in a panel at an opening, measure a, b, c, then transfer these measurements to the face of the panel.

INSTALLING AROUND DOORWAYS

  • To make cutouts for windows and doors, measure horizontally from the last panel installed to the untrimmed opening where you want the edge of the panel to reach. Also measure from the floor to the top of the door. Transferring these measurements onto the face of the panel (Fig. 11), saw out the rectangle of waste material. Saw to leave a 1/4" gap between the edge of the panel and the opening. Paneling around a fireplace will have to be scribed (Fig. 5). Use trim to hide any rough edges.

  • Once your paneling is installed, you can finish the project with trim. Some plastic-finished panels use built-in metal or vinyl moldings that are installed at the same time as the paneling. Paneling in bathrooms is often done this way, using a troweled-on adhesive.

FINISHING TOUCHES

  • Most trim, however, is installed with nails after the paneling. Cut your wood or plastic moldings in a miter box using a fine-tooth saw. Nail it into position with small finishing nails, countersinking the nails and filling the holes with putty stick. If the moldings are prefinished, clean them with a dry cloth. Otherwise, apply paint or stain and a clear finish to complete your paneling project.

TOOL AND MATERIAL CHECKLIST
Hammer Eye Protection
Nails (several sizes) Fine-toothed Saw
Tape or Rule Level
Knife Plumb Line
Drill and Bit Keyhole Saw
Carpenter's Square Miter Box
Straightedged Rule Chalk or Crayon
Chalk Line Powdered Chalk
Pencil Compass Coping Saw
Panel Adhesive Plastic Film or Waterproof Paper
Masonry Waterproofing Drop-in Caulking Gun
Furring Strips Shingle Scraps
Masonry Bit and Anchors Furring Strip Adhesive
Moisture-Resistant Primer Moldings
Nail Set Color-Matched Putty Stick
Marking Pen Stain
Paintbrush Stud Finder
Saber Saw  
Check your state and local codes before starting any project. Follow all safety precautions. Information in this document has been furnished by the National Retail Hardware Association (NRHA) and associated contributors. Every effort has been made to ensure accuracy and safety. Neither NRHA, any contributor nor the retailer can be held responsible for damages or injuries resulting from the use of the information in this document.