|
||
 |
||
 |
|
||
|
||
|
|
 TYPES OF MOLDINGS TYPES OF MOLDINGS
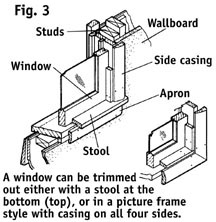
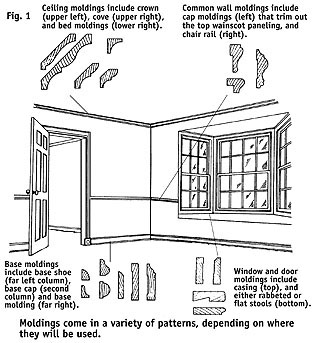
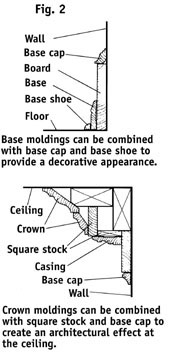
There are three common types of ceiling moldings (Fig. 1). Cove molding is the simplest and most common. Crown and bed molding are decorative profiles that can provide a traditional appearance. All come in various sizes, from 1/2" wide to over 5". Ceiling and other moldings can also be combined to create specific architectural treatments (Fig. 2). When choosing ceiling moldings, remember that wide moldings tend to make the ceiling look lower; unless your ceiling is exceptionally high, use narrower moldings to avoid a claustrophobic look. Base moldings also come in a variety of sizes and profiles (Fig. 1). Like ceiling moldings, they can be combined for a traditional look. Base moldings are often used in conjunction with a base cap, a small decorative profile that is applied on top of the base to finish the look. Again, wider moldings tend to make a room look smaller, so avoid wide base moldings unless your rooms are spacious. Casing is used around doors and windows (Fig. 1). Casing profiles often match base moldings, except casings are rounded on both front edges, while the lower edge of a base molding is square to keep dust out of the joint between the molding and the floor. Windows may be trimmed two different ways at the bottom. Casing may be used on all four sides to create a "picture frame" look, or a stool may be added, with an apron below it (Fig. 3). Casing is commonly mitered at the top of a door, but squared profiles may be butt-jointed (Fig. 4). |
|
 WORKING WITH
MOLDINGS WORKING WITH
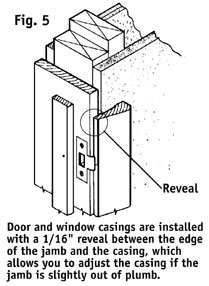
MOLDINGS When trimming out a room, start with what finish carpenters call the "standing trim" - the door and window casings. The first step is to check to see if the edge of the jamb is flush with the wall surface; if it projects beyond the surface, you'll have to plane it flush. If the jamb is recessed, nail and glue a thin strip of material over the edge to bring it flush with the wall. To trim a window, first cut the stool to length. The casings are set back from the face of the jamb about 1/16" on either side; this "reveal" is almost unnoticeable, but it allows you to adjust the casing slightly if the window is not quite plumb. The first step is installing the stool. Measure the distance between the side jambs, then add 1/8" for both sides of the reveal, then add twice the width of the casing, then add 2- 1/2" so the stool will project 1-1/4" on each side. For example, if the jamb-to-jamb measurement of the window is 36" and you're using 2-1/4" casing, you'd cut the stool to 43-1/8" (36" + 1/8" + 2-1/4" + 2-1/4" + 2-1/2" = 43-1/8"). Measure up each side of the window from the stool to the head jamb (on a door, measure from the floor to the head jamb). If the dimensions are not equal, use the longer dimension. Add 1/16" and miter-cut the side casings with the short side of the miter matching your measurement. Position the side casings with a 1/16" reveal all along the length of the side jamb (Fig. 5), and nail them in place with 6d finish nails 24" on center. Use two nails at each location; drive one into the jamb, and the other through the wall surface and into the stud. |
|
Position a piece of casing over the head of
the window, slightly longer than the outside edges of the side casings. Use the miter cut
on the side to mark your cut on the head casing. Cut the head casing to length. Apply wood
glue to the miters and set the head casing in place. Nail it to the jamb and wall as you
did the side casings, then drive a 4d finish nail through the side casing into the end of
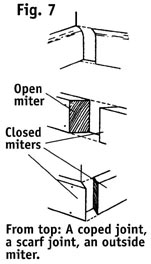
the head casing on each side. Once the door and windows are finished, you're ready to install the "running trim" - the ceiling and base moldings. The first step is to locate the wall studs and mark their location on the wall just above the height of the baseboard with a light pencil mark. When you buy ceiling and base molding, try and buy lengths that will allow you to make complete runs without joints; if you can't do so, add two feet to any lengths that will be joined, so you can cut the joint over a stud. To install base molding, start from any door. Measure from the door to the nearest wall. Cut the end of the first piece of base square, then measure the door-to-wall distance and cut the other end, also square. Nail the first piece in place with pairs of 6d finish nails driven into each stud and the floor plate it rests on. The second piece of base will be joined to the first with a coped cut at the inside corner (Fig. 6). To make a coped cut, first cut the end of the piece at a 45-degree angle with the short side of the miter toward the face of the piece. Finish the cut with a coping saw, carefully following the cut edge along the face of the piece. Measure from the bottom of the first piece of base to the next corner, then square-cut the second piece at the other end so it butts into the corner. Repeat the process for each inside corner. Use a miter cut at outside corners. Few outside corners are exactly 90 degrees, so you'll have to use a T-bevel to find the exact angle, then divide by two and cut each piece of base to that angle. If you need to join two pieces of molding in the middle of a run, set the first piece in place and mark the centerpoint of the stud nearest to the end of the piece. Subtract half the thickness of the molding, then cut the end using an open miter cut (Fig. 8). Install the first piece, but don't nail over the last stud where the piece is mitered. Cut a closed miter (Fig. 8) at the end of the second piece. Measure from the face of the first piece where the miter begins to the corner, then cut the second piece. Set it in place with the closed miter overlapping the open miter on the first piece. Apply glue to the joint and nail through both pieces into the stud (Fig. 8), then continue nailing to the corner. Ceiling molding is installed much like base molding, except that ceiling molding is not applied flat against the wall. Instead, it covers the joint at a 45-degree angle. If you have nothing but inside corners to deal with, the process is easy - simply install each piece with a square cut at one end and a coped cut at the other. If you have outside corners, they'll have to be mitered. Again the process is simple, as long as you clamp the molding in the miter saw at the same 45-degree angle at which it will be installed. To avoid damaging the surface of the moulding drive the nail to within an 1/8" of the surface. Use a nail set to finish driving the nail. Putty can be used to fill the nail hole. |
There are hundreds of different molding profiles available, from stock patterns to
custom cuts. Aside from those manufactured for special uses - door and window parts, or
handrail and closet rods, for example - most interior moldings can be divided into three
basic functions:
Naturally, there are many other uses for moldings as well, but this brochure will focus on those three. You'll find that if you master the techniques of installing these basic types of molding, you'll be able to handle just about any trim job you encounter.
Molding can be made out of a number of different materials - not all wood. Spruce and pine moldings are the most common, because both are relatively inexpensive, and are also soft, fine-grained woods that can be worked easily and with a minimum of splitting and splintering.
You'll be able to find pine and spruce moldings both in solid and fingerjointed (FJ) material. FJ moldings are made from short lengths of wood glued end to end. FJ material is not only less expensive than solid moldings, but it also tends to be more resistant to warp. If you're planning on painting the trim rather than staining, FJ molding is a good choice.
Moldings are also cut from oak, mahogany, birch, walnut, and other hardwoods. Reproductions of old profiles are often manufactured from high-density polyurethane, although these products are expensive and tricky to work with, and generally should be installed only by professionals.
Moldings may be purchased unfinished, prefinished with stain and varnish, or overlaid with a vinyl woodgrain print. Overlaid moldings are often made from an engineered product such as particleboard or fiberboard. They are definitely a time-saver, but are generally less resistant to moisture than wood moldings, and should be avoided in high-moisture areas such as kitchens and bathrooms.
TOOL AND MATERIAL CHECKLIST
| Molding | Steel Measuring Tape | Hammer | Level | Nail Set |
| Miter Box | Backsaw | Coping Saw | Nails | Putty Knife |
Check your state and local codes before starting any project. Follow all safety precautions. Information in this brochure has been furnished by the National Retail Hardware Association. Every effort has been made to ensure accuracy and safety. Neither the NRHA nor the retailer can be held responsible for damages or injuries from the use of the information in this document.