|
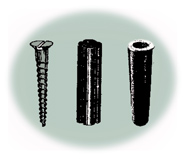
FIG. 5 - Plastic anchors
are used with standard wood screws.
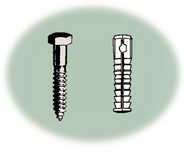
FIG. 6 - Lead lag
shields are designed to be used with standard lag screws.
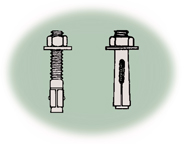
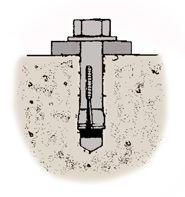
FIG. 7 - A wedge anchor
(left) and a sleeve anchor (right).
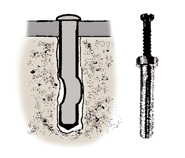
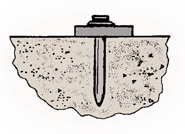
FIG. 8 - A nail-type
hammer anchor (left) and a sleeve-type hammer anchor (right).
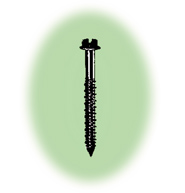
FIG. 9 - A concrete
screw cuts its own thread in the masonry.
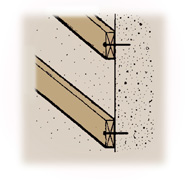
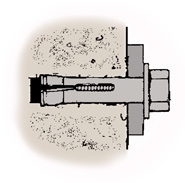
FIG. 10 - Hammer anchors
are a good choice for anchoring furring strips to a masonry wall.
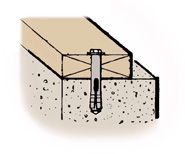
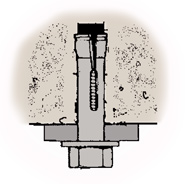
FIG. 11 - Use sleeve
or wedge anchors to fasten a sill plate to the foundation.
|

USING MASONRY ANCHORS
- When choosing anchors, remember that the total load should be divided
by the number of anchors that will carry it.
- Whatever type of anchor you decide to use, you'll probably want to
rent a hammer drill to drill the holes for it. Masonry drill bits work
by chipping concrete away (as opposed to wood bits, which cut wood away).
If you use a standard electric drill, you'll find that it not only drills
much more slowly, but you'll be much more likely to ream the sides of
the hole and wind up with a hole much larger than you intended.
- The holes have to be exact in diameter and sometimes even an exact
depth in order for the anchor to work properly. Some manufacturers'
anchors must be installed with special drill bits. For best results
with masonry anchors, it is important to "blow out" any excess
dust from the drilled holes. One of the easiest ways to do this is with
a kitchen blaster.
- This document covers four basic types of masonry anchors: 1) concrete
screws, 2) hammer anchors, 3) one-piece expansion anchors and 4) two-step
expansion anchors that are used with standard screws.
- They are called "two-step" because the holes must be spotted
before installation. In other words, the anchor is larger than the fastener
that will go into it (Fig. 5). As a result, you'll have to position
the material to be anchored and spot the locations of the holes, then
set the material aside so you can drill holes and insert the anchors.
Finally, you can place the material in position again and fasten it
down.
- One advantage to these anchors is that the screws can be removed and
reinserted. Also, they are relatively inexpensive.
- If you're using lag shields (Fig. 6), you'll have a choice between
short or long shields. Use the short shields in hard masonry (usually
older concrete) or the long shields in softer masonry. Long shields
are generally about 30 percent stronger than short shields, but drilling
through old, hard concrete is not an easy task.
- To install a two-step anchor, drill a hole the specified diameter
and depth (usually slightly deeper than the length of the anchor). You
can mark the depth on your drill bit by measuring the length of the
anchor, then wrapping a piece of tape around the bit at that point.
Insert the anchor, tapping it lightly with a hammer to seat it. Position
the material, then drive the screw into the anchor until it is snug.
Do not over-tighten the screw.
- One-Piece Expansion Anchors– Two-step anchors have become a thing
of the past with professional builders, however. One-piece expansion
anchors not only require no hole-spotting, but, since they are steel,
they provide a much stronger grip than plastic or lead anchors.
- Two types of one-piece anchors are popular (Fig. 7). Sleeve anchors
have a steel sleeve on the shank, split at the bottom so it can expand.
The bolt has a cone-shaped plug at the base, and a nut on the top. When
you place the anchor in the hole and tighten the nut, it draws the bolt
upward, pulling the plug into the sleeve and expanding it against the
hole.
- Once installed, sleeve anchors cannot be removed. They do come with
a variety of heads, however–a removable hex head, an acorn nut,
or either round- or flat-head screws.
- The shank of a wedge anchor is similar to a sleeve anchor–a solid
shank, threaded at the top and with a cone-shaped plug at the bottom.
But the shank of a wedge anchor is grooved on opposite sides. In each
groove is a rectangular shank with a spade-shaped wedge on the end.
As the nut on top is tightened, the washer pushes the rectangular shanks
down, which spreads the wedges over the plug.
- Like a sleeve anchor, a wedge anchor cannot be removed once it is
installed. Wedge anchors always have a hex head with a washer so the
material can be removed and reinstalled.
- To install wedge or sleeve anchors, first position the material you
want to anchor. Drill a hole in the masonry behind the bolt holes. Make
sure the hole is the specified diameter, at least 1/4" deeper than
the length of the anchor. Insert the anchor in the hole. Tighten a sleeve
anchor two to three turns to expand it. Tighten a wedge anchor three
to five turns. Manufacturers' instructions may specify that the anchor
is tightened with a torque wrench to a certain number of foot-pounds.
- As a rule, use sleeve anchors when you're working with soft concrete
or installing them in the mortar joints between block or brick. Also
use sleeve anchors when you suspect that the concrete may have voids
in it. Sleeve anchors have a larger bearing surface than wedge anchors.
- Use wedge anchors for maximum holding power in hard concrete.
- Hammer Anchors– For lightweight applications such as hanging
furring strips or conduit, a hammer anchor is an excellent alternative
to a plastic or fiber anchor. There are a number of styles (Fig. 8).
- The most common consists of a hardened steel ring-shank nail with
either a nylon or zinc sleeve over the shank. Like one-step expansion
anchors, hammer anchors require no hole-spotting.
- To install a sleeve-type hammer anchor, simply drill a hole through
the material you're anchoring, large enough to accept the sleeve but
small enough that the sleeve flange won't slip through. A newer type
of hammer anchor looks like a heavy nail with a short bend near the
end of the shank.
- To install either type of hammer anchor, set the material in position
and then drill the masonry behind it. Be sure to use the size drill
bit specified by the manufacturer. The hole can be any depth as long
as it is deeper than the length of the anchor.
- Insert the anchor through the material and into the hole, and drive
it down tight with a hammer. Hammer anchors obviously don't have the
strength of larger expansion anchors, but while they aren't meant to
be removed, you can pry them out if necessary.
- Concrete Screws– Concrete screws came onto the market in the
mid-1970s and have become a staple of lightweight applications. They
look like any other screw, except that they are made of hardened steel
that will cut its own thread in the masonry (Fig. 9).
- To install them, set the material in position and then drill the masonry
behind it. Be sure to use the size drill bit specified by the manufacturer–concrete
screws require a precise pilot hole with a slightly smaller diameter
than the screw. The hole can be any depth as long as it is deeper than
the length of the anchor.
- The big advantage of concrete screws over hammer anchors is that the
screw can be removed and then reinstalled. You will lose some holding
power if you do so, however.
- There are no hard and fast rules about which anchor to use in what
situation, but the following guidelines will help:
- Machinery to a concrete floor–As a rule, you'll want to use a
heavy expansion anchor such as a sleeve or wedge anchor.
- 2" x 4" sleeper over a concrete floor– Powder-actuated
fasteners (PAFs) are the most common because they are fast. If you're
not certified for PAFs and only laying a small area, use hammer anchors.
- 2" x 4" framing around a door or window opening–Use
hammer anchors.
- Furring strips on a foundation wall– Again, most builders use
powder-actuated fasteners for the speed. If you're not certified for
PAFs, use hammer anchors or concrete screws (Fig. 10).
- Shelf brackets on a foundation wall–Concrete screws are generally
the best choice because they can be removed if necessary.
- A deck ledger on a masonry wall–Use edge anchors on concrete
or sleeve anchors into the horizontal mortar joints of a brick or block
wall.
- Conduit to a foundation wall–Use either hammer anchors or concrete
screws.
- Mudsill to foundation–Use a sleeve anchor as a substitute for
an occasional missing anchor bolt. If you're starting from scratch and
there are no bolts, use either sleeve anchors or wedge anchors (Fig.
11).
|