A kitchen is the most complex and often-used workshop in most homes, and in order to make that workshop as efficient as possible, it's important to have the tools of the trade well organized and easily accessible. There are a wide variety of kitchen organizing accessories available–some are made for specific brands of cabinets and others are designed to be added to standard modular cabinets.

But you can make your own accessories, too, custom-designed to fit your needs. This document explains how to build common kitchen accessories that will add storage space and help you organize your kitchen better.

Before you begin to build more storage space into your kitchen, first you need to know what needs to be stored. Whether you're adding space for pots and pans, dishes and glassware, trays and serving bowls, spices or packaged foods, the first step is to measure the implements you'll be storing so you know how big to build your storage units.

In this document you will find information about:

  • Storing Pots and Pans
  • Trays and Serving Pans
  • Dishes and Glassware


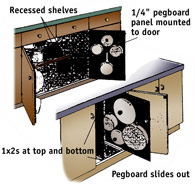
FIG. 1 - TOP: Recessed shelves and pegboard door panels.
BOTTOM: Sliding pegboard panels.


FIG. 2 - Using shelf standards and clips to secure shelves inside cabinets allows you to change the height of the shelves if you decide to reorganize.


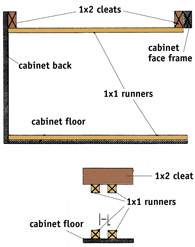
FIG. 3 - To build in pegboard dividers, attach 1x2 cleats to the front and back to of the cabinet, then hang 1x1 runners for the pegboard.

STORING POTS AND PANS

  • Pots and pans are among the most difficult "tools" to store because they come in a wide variety of shapes and sizes. One way to increase cabinet storage is by adding pegboard panels to the inside of the cabinet doors to hang the most commonly used pans, then maximize cabinet storage with recessed shelves (Fig. 1, top).

  • Use 1/4" pegboard for extra durability. If you have a choice between standard or tempered pegboard, choose the tempered–it's more water-resistant.

  • To build pegboard door panels, first measure both the doors and the opening; the pegboard panels will have to be smaller than the door so they don't keep it from closing. Cut the panels, then mount them to the back of the doors with wood screws and spacers. Premade spacers are available from retailers who stock pegboard hooks. The spacers hold the panel away from the door so you can insert pegboard hooks.

  • If your cabinet doors have magnetic or roller catches rather than self-closing hinges, you may want to replace the existing hinges with self-closing hinges. That way you can remove the catches altogether. If you decide not to replace the hinges, you'll need to remove the catches to install the pegboard panels. Then remount the catches on the bottom of the pegboard and on the floor of the cabinet.

  • Build your recessed shelves so they are deep enough to accommodate the widest pans that will be set on them but narrow enough that they won't interfere with the pans hanging on the insides of the doors. To build them, first mount four shelf standards (Fig. 2) on the sides of the cabinet. The standards should be placed 1/2" from the back wall of the cabinet and 1/2" from the front of the shelf. As you install them, check them with a level to make sure they are plumb and that the slots in each of the four standards are level with each other.

  • Then measure the distance from the face of the standard to the face of the opposite standard. Cut your shelves 1/4" shorter than this measurement. Install shelf clips on the standards, then set the shelves in place. Adjust them as necessary to provide about 1" clearance between the tops of the pans and the bottom of the next shelf.

  • A second strategy for storing pans is to build vertical pegboard panels that slide in and out of the cabinet and hang pots and pans on them (Fig. 1, bottom). Use 1x2s or 1x1s (actual size is 3/4" square) as runner at the top and bottom of the cabinet.

  • Be sure to space the panels so there is plenty of room for the pans you plan to store. Install the bottom runners first, gluing and screwing them to the floor of the cabinet so there is about a 3/8" gap between them. Then use the level to mark the position of the top runner directly above the bottom runners.

  • If necessary, fasten 1x2s horizontally at the front and back of the cabinet as cleats to attach the top runners (Fig. 3). The cleats should be level with the top of the door opening. Glue and screw the top runners in place as you did the bottom runners; the runners should project down into the door opening.

  • Measure the vertical distance from the cleats to the floor of the cabinet, then measure from the back of the cabinet to the front. Subtract 1/4" from each dimension and cut 1/4" pegboard panels to that dimension. Slide the panels in place and hang your pans.


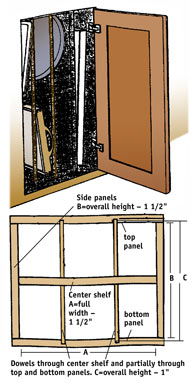
FIG. 4 - Wooden dowel dividers. Bottom illustration is the tray divider – cutaway front view.


FIG. 5 - A permanent wood divider unit is held in the tall dividers and finish nails are toenailed through the front edges of the dividers into the floor of the cabinet.


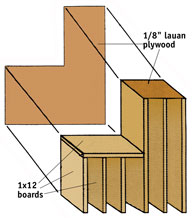
FIG. 6 - Use 1/8" lauan plywood on the back and top of the divider to add rigidity.

TRAYS AND SERVING PANS

  • Large trays are also difficult to store because they take up a lot of space and you can't stack them too high. One solution is to build vertical dividers (Fig. 4).

  • A freestanding divider made of 3/4" plywood with wooden dowel dividers is easy to make and can be moved later if you want. To build it, first measure the door opening. The overall dimensions of the divider will have to be about 1/4" smaller so it will fit into the cabinet.

  • Cut the top and bottom panels so they are as wide as the overall dimension of the divider, and about 1" shallower than the overall inside depth of the cabinet. If you'll have a center shelf, cut it 1-1/2" shorter than the top and bottom panels, to allow for the 3/4"-thick side panels. Cut the side panels 1-1/2" shorter than the overall height of the unit to allow for the top and bottom panels.

  • Mark the locations of four 3/8" dowels (two in the front and two in back) in the center shelf. Drill all the way through the center shelf with a 3/8" doweling bit.

  • Lay the center shelf over the top panel, centered so it is 3/4" from each edge of the top panel. Mark the locations of the holes, then drill the top panel 3/8" deep. Repeat the process with the bottom panel (Fig. 4).

  • Cut the dowels to length, 5/8" longer than the side panels. Drive the dowels through the holes in the center shelf, then fit the top and bottom panels in place. Glue and nail the top and bottom panels to the side panel, then glue and nail the side panels to the center shelf. If you want to cover the cut edges of the plywood, nail and glue 1/4" x 3/4" pine lattice or apply veneer tape over the edges.

  • You can also make a built-in tray divider with solid plywood panels. Again, measure the door opening first, then size the divider to fit. You'll need enough 1x12 pine to make the vertical dividers and the shelf, and a piece of 1/8" lauan plywood for a backing and a top (Fig. 5).

  • The spacing between your vertical panels and the height of the short dividers will depend on the sizes of the trays you'll be storing. Cut your panels, then glue and nail the short dividers to the shelf.

  • Glue and nail the tall dividers to a piece of 1/8" lauan plywood to hold them together at the top, then fasten the two divider sections together. Cut an "L"-shaped piece of 1/8" lauan for the back of the assembly, then square the unit and attach the back (Fig. 6).

  • Slip the unit into the cabinet and position it. Drill pilot holes at a 45-degree angle through the ends of the vertical dividers, down into the floor of the cabinet. Nail the front edges of the dividers into the cabinet.


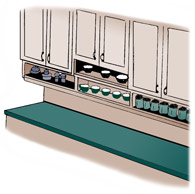
FIG. 7 - If you don't have enough cabinet storage, you can add shelves under your cabinets.


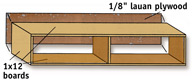
FIG. 8 - To build undercabinet shelves, make a box of 1x12 boards, then attach 1/8" lauan plywood to the back to give the assembly rigidity.

DISHES AND GLASSWARE

  • If you don't have enough cabinet space for dishes and glassware, you can add space either by adding onto your cabinets or by building a freestanding shelving unit.

  • The undercabinet shelves in Fig. 7 are made of 1x12s; the material you use–pine, mahogany or other hardwoods, for example–will depend on the material your cabinets are made of. To build the shelves, first decide what you want to store in them. Then measure those items: the height and width of a glass or bowl, or a stack of plates, etc. Typically, you'll have 18" to work with between the bottom of the cabinet and the countertop, so you'll want to limit the height of your shelves to about 6" to leave counter work space.

  • Cut the top and bottom of the unit to the full length of the cabinets it will fit under; cut the vertical dividers to the full height of the unit minus 1-1/2". Use 1/8" lauan plywood for the back (Fig. 8).

  • Assemble the shelf, then square it and fasten the 1/8" plywood back to make it rigid. Screw and glue all connections for maximum strength. Brace the shelf in place under the cabinets or have a couple of helpers hold it. Then drill and countersink 1/8" pilot holes 24" on center from the bottoms of the cabinets down into the top of the shelf, about 2" from the front of the cabinet. Take care not to drill all the way through the shelf.

  • Fasten the shelf to the underside of the cabinets with #10 flathead wood screws. The screws should be long enough to penetrate the top of the shelving unit about 5/8"–enough to get a good grip but not quite all the way through. Most cabinets have a lip around the lower edge, so you'll have to set the shelf in place, then measure to see how long the screws should be.

  • Finally, predrill and countersink screw holes in the back of the shelving unit, positioned 32" on center so they will go through the wall and into every other stud. Fasten the unit to the wall.

TOOL AND MATERIAL CHECKLIST
Steel Tape Measure Carpenter's Square
Circular Saw Level
Saw Blades Wood Screws
Screwdriver Wood Glue
Pencil Wood Filler
1x12 Boards 1/8" Lauan Plywood
1x2 Cleats 1x1 Runners
4d and 6d Finish Nails Stud Finder
Electric Drill 3/8" Doweling Bit
3/8" Dowels Paint, Stain and Accessories
Check your state and local codes before starting any project. Follow all safety precautions. Information in this document has been furnished by the National Retail Hardware Association (NRHA) and associated contributors. Every effort has been made to ensure accuracy and safety. Neither NRHA, any contributor nor the retailer can be held responsible for damages or injuries resulting from the use of the information in this document.