Here are tips and instructions on how to insulate your home. Take a few minutes to read them thoroughly. Following these instructions can save you time and effort. In this document you will find information about:

HOW INSULATING YOUR HOME
SAVES MONEY


  • Proper insulation in your home reduces operating costs both for heating and air conditioning. Even a small amount of insulation - if properly installed - can reduce energy costs dramatically.
  • You should insulate all areas of the house, including ceilings, walls, and windows. Any insulation will likely reduce energy costs and make your home more comfortable, but insulate all areas for maximum savings.
  • Fig. 1 illustrates the amount of savings you can expect from insulating, weather-stripping, and adding storm doors and windows. It's interesting to note that the greatest energy savings come from the first inch of insulation. You can add more insulation to increase your savings, but a small amount of insulation is almost a must for your home to be comfortable.
  • Savings from wall insulation are almost equal to those you'll get from ceiling insulation.
  • No insulation job is complete without weather-stripping and storm windows and doors. However, weather-stripping, storm doors, and storm windows alone cannot do the job - you must also have insulation.


TYPES OF INSULATION MATERIAL AVAILABLE

  • Most insulating materials are available in four common forms - loose-fill materials, blanket rolls, batts, and boards. Each form is ideal for specific insulating jobs.
  • The type of insulation material you select for any job depends on how you intend to use it, how much you want to spend, and how easy it is to install.
  • Fig. 2 provides a summary of the qualities and suggested uses for the three basic types of loose-fill materials: wood fiber, mineral wool, and vermiculite.
  • Study Fig. 2 carefully. Consider the advantages, disadvantages, and instructions for using each type of loose-fill material as outlined on this chart. This table should help you to select the correct loose-fill material for any insulation job.
  • Fig. 3 gives the advantages, disadvantages, and details for using insulation materials in blankets. These types of insulation materials are made of mineral wool, wood-fiber matt, cotton, or fibrous blankets.
  • Study Fig. 3 carefully for the advantages, disadvantages, and uses for each type of insulation material. This will help you to select the best blanket-type insulation.
  • Refer to Fig. 4 for details on insulation materials in rigid form, which is usually structural insulation or cellular glass. The chart gives the advantages and disadvantages of both types. Insulation in rigid form is widely used in new construction and on remodeling jobs.
  • Fig. 5 provides information on insulation materials available in batts. This type of insulation is usually mineral wool made of either glass, slag, or rock.

Figure 2 Loose-Fill Materials
DESCRIPTIONWOOD FIBER comes in bales MINERAL WOOL (rock, clag or glass) comes in sacks. VERMICULITE is expanded mica in bags.
SUGGESTED FOR ...spreading between studs in attics. ...pouring onto attic floors. May be packed into irregular spaces and around pipes. Mineral wool and vermiculite are excellent for insulating walls.
ADVANTAGES Can fill wall space completely. Provides extra insulation and fire protection. Usually least expensive and easiest to use Easy to pour. Excellent for filling hollows in masonry walls
DISADVANTAGES Creates no vapor barrier. Not widely available. May irritate skin and sinuses during use. Provides no vapor barrier. Provides no vapor barrier. Slightly more costly than some other loose fills.
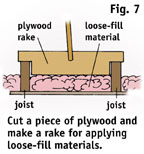
HOW TO USE Pack between joists or studs. Vapor barrier paper may be added For ceilings, pour insulation between joists. Rake it level with tops of joists, or to uniform lesser thickness.

Figure 3 Insulation Material in Blankets
DESCRIPTION MINERAL-WOOL blankets may be a slag, rock or glass wool. WOOD-FIBER MATT comes in rolls enclosed in paper. COTTON insulation comes as a flame-proof blanket. FIBROUS BLANKET sold as a compressed roll.
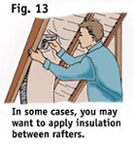
SUGGESTED FOR ...use on exposed framing. Blanket insulation may be used in ceilings, inside rafters on between studs in side walls. May be cut into any length and installed without joints, providing a solid barrier to heat and moisture. ...used on exposed framing. May be used over ceilings, inside rafters or between studs in side walls. May be cut to any length and installed in continuous lengths without joints, providing an unbroken barrier to heat and moisture.
ADVANTAGES Inexpensive and gives continuous vapor barrier. Efficient. Available in variety widths. Lightweight and highly efficient. Very clean to use. Compact to carry, non-irritating, easy to cut and handle, may cut to any width.
DISADVANTAGES Must be cut to size. May irritate skin or nose. Must cut - makes it less convenient for small jobs. More expensive than some insulation materials. May need added vapor barrier in cold climates (Reflective type has barrier.)
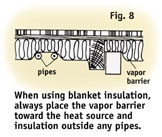
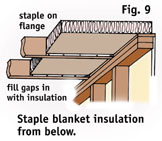
HOW TO USE Staple or tack between rafters or joists. Insulation should always bow-in enough to form an air space between blanket and wall on each side. First expand by pulling to full length. Cut and install like other blanket types.

Figure 4 Rigid Forms
DESCRIPTION Cellular GLASS or asphalt-impregnated fiber board. STRUCTURAL insulation of board, plank or tile.
SUGGESTED FOR ...use around foundations, under edges of slabs or under built up roofs. ...rooms where insulation is wanted at modest cost.
ADVANTAGES Stiffness and moisture resistance permit use where many insulations are not suitable. Inexpensive. Add a new wall or ceiling that gives some insulation.
DISADVANTAGES Often more expensive. Offers less insulating value. does not have enough insulating value alone in many climates.
HOW TO USE Interior: fasten to masonry wall with cement. Exterior: place against foundation before back-filling. Fasten with nails, staples or special clips. Board types call for battens at joints.

Figure 5 Insulation Material in Batts
DESCRIPTION MINERAL WOOL batts may be glass, rock or slag.
SUGGESTED FOR ...walls, ceilings and roofs where framing is spaced to fit standard batts.
ADVANTAGES Inexpensive, cut to size; vapor barrier is usually built in.
DISADVANTAGES Barrier not continuous. When not fully wrapped, may shed irritating particles.
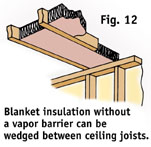
HOW TO USE Lay between joists of attic floor. Can also be nailed or stapled to studs


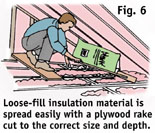
SPREADING LOOSE-FILL
INSULATING MATERIALS

  • Loose-fill insulating materials of wood fiber, mineral wool, or vermiculite are commonly used for insulating attics. It's best to install these materials with a plywood rake attached to an old rake handle, making spreading much easier.
  • To make this type of rake, cut a scrap piece of plywood to the length of the space between the attic joists plus 4" (Fig. 6). The extra 4" allows for an overhang on the 2 x 4s that form the joists.
  • Next, decide how deep you plan to install the loose-fill material. For example, suppose you are planning to lay the loose-fill material to a depth of 3" between attic joists (Fig. 7). Measure the depth in the space you plan to fill, then saw the plywood rake as illustrated in Fig. 7. The rake should ride on the joists on either side and level the material off evenly to a depth of 3". Attach a used rake or broom handle, making a handy tool that will save you hours of backbreaking labor and enable you to rake the material easily and evenly into otherwise unreachable corners (Fig. 6).


APPLYING INSULATION
IN BLANKET FORM

  • Always apply blanket-type insulation with the vapor barrier facing the interior of your home. The vapor barrier should always be toward the source of the heat in winter (Fig. 8). Lay the blanket as close to the joists and floor as possible. Fill any gaps with loose-fill insulation.
  • Always place insulation on the outside of pipes or ducts (Fig. 8). This means the insulation should always be toward the source of the cold air in winter.
  • Staple blanket insulation when laid between joists in the attic (Fig. 9). Most rolls of blanket insulation materials have flanges that can be stapled or tacked to the ceiling joists, as illustrated. Always keep the blanket as close to the joists and floor area as possible - fill any gaps with loose insulation.
  • Never allow blanket-type insulation to cut off the flow of air and stop proper ventilation in an attic (Fig. 10). Blanket insulation should never block air movement from eave vents into the attic.
  • Proper ventilation in the attic is very important in any insulation job. Make provisions for air to flow in and around the eave vents, and to flow out through a roof ventilator or through a ventilator on the end of the house (Fig. 11).
  • Blanket insulation without a vapor barrier can be wedged between the ceiling joists (Fig. 12). Make sure the insulation comes to the top of the plate to avoid heat loss from the penetration of wind under the insulation.
  • In some cases, it may be easier to apply the blanket insulation between the rafters on the ceiling (Fig. 13). In this case, staple the blanket insulation directly to the rafters.
  • Repair any major rips or tears in the vapor barrier and insulation by adding additional vapor barrier and insulation to build up to the level of the normal insulation run.
  • Whether you apply the insulation on the attic roof or the floor, always double it back at the end for maximum efficiency (Fig. 14). Illustration A shows how the blanket of insulation material can be rolled at the end between the attic joists. Illustration B shows how the same material can be doubled back between the rafters of the roof.


INSULATING WALLS

  • Lay blanket-type insulating material between the studs in a wall. If you're using insulation blankets without a vapor barrier, they should be forced into the area between the studs. Then, place a polyethylene vapor barrier on the inside face of the wall. Staple the polyethylene vapor barrier into place.
  • When building a new structure, insulate the full wall, including the openings for doors and windows.
  • Use drywall with a foil back as a vapor barrier instead of polyethylene if it is more practical.
  • Blanket insulation material with a vapor barrier attached can be stapled into position.
  • When the blanket has a vapor barrier, take time to staple or tack all sides, bottoms, and tops. This increases the efficiency of the insulation.
  • Use scraps of insulation material to insulate all the cracks and crevices around doors and windows (Fig. 15). Then, use scraps of vapor barrier to seal these areas. Staple the barrier into place.


INSULATING MASONRY WALLS

  • Masonry walls may be insulated by using either blanket insulation material or foil-backed drywall. This type of installation requires a protective finish, such as paneling or drywall.
  • Use 1x2 furring strips with foil-backed drywall.

TOOLS & MATERIAL CHECKLIST

Insulation Materials (Proper Type) Heavy-Duty Shears Staples
Tacks Furring Strips Hand Cleaner Weather-stripping
Sharp Knife Stapler Hammer Handsaw
Vapor Barrier Face Mask (if handling specific types of insulation materials)

Check your state and local codes before starting any project. Follow all safety precautions. Information in this brochure has been furnished by the National Retail Hardware Association (NRHA) and associated contributors. Every effort has been made to ensure accuracy and safety. Neither NRHA, any contributor, nor the retailer can be held responsible for damages or injuries resulting from the use of the information in this document.