|
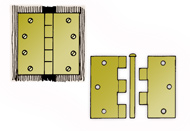
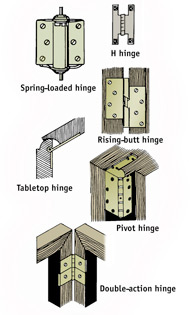
FIG. 3 - Butt and
loose-pin hinges are the most common types used.
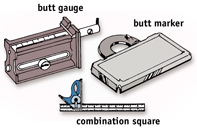
FIG. 4 - Use a combination
square, butt gauge or butt marker to lay out the area to be cut out for
recessed hinges.
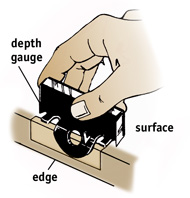
FIG. 5 - Place the
depth gauge on the butt marker against the face of the door or jamb to
mark the thickness of the hinge.
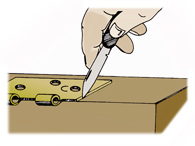
FIG. 6 - Mark the
length on the edge of the door with a pencil, knife or awl.
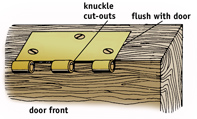
FIG. 7 - The knuckle
cut-outs on the hinge should be flush with the surface of the door.
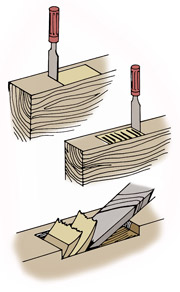
FIG. 8 - Making the
shallow cuts reduces the chances for splitting and makes the wood removal
much easier.
|

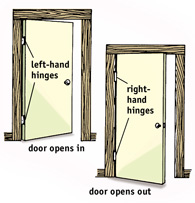
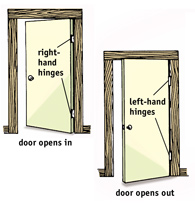
INSTALLING HINGES
- Generally speaking, hinges are either surface-mounted or recessed
(mortised). Surface-mounted hinges, as the name implies, are mounted
on the surface of the pieces being hinged. Recessed hinges require the
removal of wood to allow the hinge to be mortised into the wood. Some
hinges are a combination of hinge types. One leaf is surface-mounted
while othe other is mortised or recessed.
- Regardless of the type of hinge you are using, accurate measurements are
a must. Measure all dimensions carefully. If there is any doubt, remeasure.
- Equally important are clearances. Allow for proper clearances between
surfaces, such as the door or lids and frames. These clearances prevent
dragging, binding or a sloppy fit.
- Measurements and clearances make very little difference if you do not follow
through with accurate cutting and drilling. Use the proper tools and
techniques for cutting out recesses. Be sure any holes that are drilled
are accurately centered.
- Two of the most common recessed hinges are the butt hinge (full mortise,
Fig. 3) and the piano hinge. The process of installing all recessed
hinges is basically the same.
- First, determine where the hinges are to be located. For example, a door
hinge is usually 5" from the top and 10" from the bottom of
a door. If you are replacing a door, place the hinges so you can use
the recesses already on the frame, if possible. Or use the same measurements
as found on any other nearby doors.
- If you are doing a single pair of hinges, a combination square works well
for making the necessary layout. If you have more to do, a butt marker
or gauge helps simplify the process (Fig. 4). A different-sized butt
marker is needed for the different-sized hinges. They are not adjustable.
- A hinge is generally recessed by the thickness of the hinge leaf.
A butt marker has a depth gauge built into the handle. Just run it along
the edge of the door or jamb and it makes a cut mark at the proper depth.
The combination square or butt gauge must be adjusted to the proper
thickness. Then run them along the edge as with the marker. You can
use a pencil, but a penknife or scratch awl gives a much sharper line
to follow (Fig. 5).
- The length of the recess is determined by the size of the hinge you
are using. A 3" butt hinge requires a 3" recess. A 36"
piano hinge requires a 36" recess. The easiest way to mark the
length is to place the hinge on the edge of the door in its proper location.
Then mark its length with a pencil, penknife or scratch awl (Fig. 6).
Both the length and the width of a hinge are marked when a butt marker
is placed against the door or jamb and struck with a hammer.
- The width of the recess is also determined by the size of the hinge. A
hinge is generally recessed back far enough so the cutouts in the hinge
for the knuckles are flush with the door or jamb surface (Fig. 7).
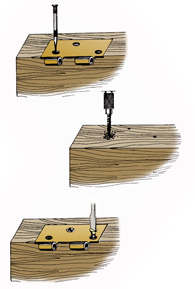
- Once these measurements have been transferred to the door, you are
ready to cut the recess. Use a chisel and a wood, plastic or rubber
mallet to score the marked area (Fig. 8). Be sure the chisel is sharp
and is the correct size.
- Next, make shallow cuts as deep as the hinge leaf is thick and about
1/4" apart in the marked area. Tap the chisel lightly for better
control of the cuts.
- Remove the wood you have cut away. A sharp chisel will make this job
go much faster, easier and a lot safer. After you have made the recess
to the proper depth and smoothed it with the chisel, you are ready to
mount the hinge.
- Check the alignment of the hinge in the recess. It must be straight in
order for the hinge to work properly. It must also be recessed deep
enough to allow it to work. If it is too deep, the hinge may pull loose
when it is closed.
- Put the hinge in place and trace the holes in the hinge onto the wood.
Remove the hinge. Use a center punch to mark the center of each hole.
Using a drill slightly smaller than the body of the screw you will be
using, drill the holes. Replace the hinge and install the screws. Tighten
each screw a little at a time until all the screws are completely tightened
(Fig. 9).
- If the hinge you are using can be taken apart, take it apart prior to assembly. Replace the hinge pin once you are finished. On a door, replace the top pin first. It will help hold the door in place as you replace the lower hinge pins.
|