One of the most common household plumbing projects is replacing a water heater. Many potential dangers can result from improper water heater installation. Be sure to check your local codes. Use only the procedures and materials your code allows. This booklet covers replacement of natural gas, LP gas, and electric water heaters, the most common types.


REMOVING YOUR OLD HEATER
  • The most common overhead-plumbed water heater hookup is shown in Fig. 1. Before your can connect the new heater, the old one must be removed.
  • First, turn off the gas or electricity to the heater.
  • Next, drain the heater (Fig. 2). Open a hot water faucet to allow air into the system.
  • On a gas heater, separate the vent pipe from the draft hood. The hood should lift off after you remove the sheet metal screw that holds it. After checking that the pilot light is out, disconnect the gas line at the heater and cap it.
  • Next, remove the heater from its water piping. If the pipes are connected with unions-removable threaded fittings-take them apart with a pair of pipe wrenches. Pipes without unions must be hack-sawed off (Fig. 3). A pipe/tubing cutter will also do the job. The old heater can now be removed and disposed of in an approved manner.


INSTALLING THE NEW HEATER
  • Move your new heater to its location by "walking" it or by using an appliance cart, dolly, or hand truck.
  • Position the new heater so your piping-particularly a gas vent pipe-will reach most easily.
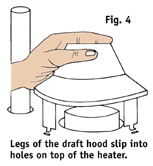
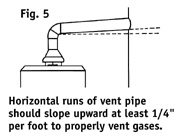
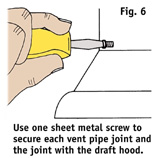
  • For a gas heater, install the heater's new draft hood. Many heaters have legs that insert into holes on the heater's top (Fig. 4). Every gas water heater needs proper venting that's no smaller than the draft hood collar of the new heater. It's a good idea to use new vent pipe elbows, since the old ones are probably corroded at their present angles. The vent should go straight up as far as possible. Any horizontal run in the vent should slope upward at least 1/4" per foot, as shown in Fig. 5. Connect the vent pipe with short sheet metal screws (Fig. 6). Be sure to check your local code.
  • Now you can make the hot and cold water connections. The type of materials you use will depend on your local code and the type of material used in the existing system. One of the easiest ways to make these connections is using flex-connectors. Flex-connectors are easy to bend to reach the connection.
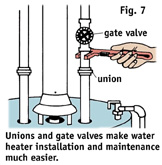
  • The water piping is handled depending on whether your house has threaded metal, sweat-soldered copper, or thermoplastic piping, and whether the piping is 3/4" or 1/2". Whatever the piping, the heater should be fitted with a cold water gate valve (Fig. 7). Place the valve in a vertical section of piping to keep it from becoming fouled with sediment.
  • For threaded pipe, you should have a union on both the hot and cold water lines. Old unions should be replaced. The two halves of a union are manufactured to fit together properly; replace the entire union. You will need new nipples for the top of the water heater. Their length will depend on the distance from the fittings on the top of the water heater to the unions. Allow for the distance the pipe threads into the fittings.
  • Unions are not necessary with flex-connectors. Use Teflon tape (but not pipe dope) on the male threads entering the flex-connectors. If your water heater has female-threaded tappings, you'll need a pair of 3/4" nipples to accept the flex-connectors at the bottom. If the heater comes with 3/4" male-threaded stubs, the nipples are not needed. At the top, the flex-connectors fit directly to the ends of the threaded pipes (or a male adapter for converting to copper or plastic). Some flex-connectors install to copper tubing without sweat-soldering. If you sweat-solder, be sure to do this before installing the flex-connectors to avoid damage to the connector gaskets. Your local code may not allow you to use flex connectors. Be sure and check to make sure.
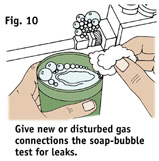
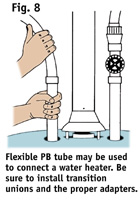
  • Thermoplastic pipe. Flex-connectors are not necessary with CPVC or PB plastic pipe. You'll need "transition unions" between the metal heater threads and the plastic piping. Some codes and some plastic fitting manufacturers also call for using steel nipples between the water heater and the transition unions to distance the unions from conducted burner heat. You can use rigid CPVC tubing, solvent welding the joints. Or you can use flexible PB pipe, joining the joints with mechanical couplings (Fig. 8). PB cannot be solvent welded. Don't try to hook up a water heater with PVC, PE, or ABS plastic piping, since these will not take hot water.


RELIEF SYSTEM
  • A vital part of your water heater installation is a temperature and pressure relief valve and relief line. The relief system lets off excess heat and pressure automatically (Fig. 9).
  • With all the plumbing connected, you can close the heater's drain valve and open the cold water inlet valve to fill the storage tank. Open a hot water faucet to release trapped air in the top of the tank. Close the faucet soon since water flows readily from it. Be sure to check for leaks.


ENERGY HOOKUPS
  • The last step in completing the installation is to connect the gas or electric lines to your heater.
  • Gas connections. If there was no shut-off valve on the gas line before, add one. A new union should be used to complete the gas line installation with threaded pipe. For flex-connectors, install a male flare adapter into the inlet opening of the heater's gas valve. Connect the gas flex-connector collar to the flare adapter (no dope or tape), and tighten it with an adjustable open-end wrench. If everything is ready, see that the thermostat is in the off position. Then you can turn the gas on. Check your local code to see what connectors are allowed in your area.
  • Electrical connections. The wires serving an electric water heater must be the right size, providing the proper voltage and amperage your heater is designed for. Hire a qualified electrician to wire the heater, unless you know how to work with such wiring. When you turn the heater circuit on, check the electric meter to see that it is spinning. This indicates that the heater is working.


WATER HEATER SAFETY TIPS
  • Water that's draining from a heater may be quite hot, so use care.
  • When sweat-soldering copper tubing, be careful not to start a fire. Wet any wood that is nearby. Use metal shielding. Make sure that no gas is leaking. Have a fire extinguisher on hand.
  • The cold water gate valve must be left open while a water heater is in use.
  • Check the relief valve periodically to make sure it opens and then closes again. Remember that water coming from the relief pipe may be very hot. The relief line shown in Fig. 1 is a safety feature. It directs any hot water the relief valve releases toward the floor. They are required by most local codes.


GAS HEATER SAFETY
  • Use stick pipe dope (not Teflon tape) on gas connection threads. Don't use oil-based compounds.
  • Double-check to see that the type of gas you have is suited to the new heater.
  • Allow the required clearances between the heater and combustible materials, according to the owner's manual for your new heater.
  • Verify that the heater's combustion air needs will be met.
  • For added safety, put a garage-based water heater up on an 18" high (minimum) platform, even though this calls for making plumbing changes. Some codes require a platform-even for electric heaters. Be sure and check your local code requirements.
  • Apply stick pipe dope sparingly to the male threads of the heater's flare adapter. Keep the dope away from the first two threads so it won't get into the gas line and foul the gas controls.
  • Check all new or disturbed gas connections for leaks with a dish detergent and water solution (Fig. 10). Never test for gas leaks with a flame. If you discover any leaks, immediately turn off the gas and fix them.
  • Read and carefully follow the manufacturer's lighting instructions.
  • It may take some time for air to be purged from the gas lines, and a flame should be kept at the pilot orifice until the pilot lights.
  • See that the main burner flame settles down and burns bluish rather than yellow. The flame shouldn't smoke. Some sizzling is normal with a cold storage tank. (That's caused by condensed water dripping onto the hot burner.) But if a puddle of water forms under the heater, there's a leak.


ELECTRICAL SAFETY
  • Don't assume that a switch or circuit breaker has cut off the electric power. Before you touch any bare wires, with your hands or tools, check the wires with a 240-volt neon test light. First, be sure the test light is working by inserting its probes into a receptacle. It should glow. Then open the access cover to the heater junction box and remove the wire nuts or tape from the heater's electrical connections carefully without touching them. Contact the test probes between the heater's green grounding screw or other reliable ground and each of the exposed wires in turn (Fig. 11). Then, touch the prods across the bare wires themselves. If the test light glows at any time, at least some of the wires are still "live," indicating that power to the heater is not off. Call in an electrician before proceeding with the heater replacement. This is critically important, because electricity, water, and plumbing create a potentially hazardous combination. It is safe to disconnect the electrical cable serving the heater and remove it only when you know the wires are dead.
  • Do not attach aluminum wires to copper ones inside the heater.
  • See that the heater is properly grounded electrically as in figure 12.
  • Keep out of the reset and thermostat section of the heater, since they contain exposed live wiring.

TOOL AND MATERIAL CHECKLIST

Water Heater T&P Relief Valve Vent Pipe Fittings Water Pipe Fittings Gate Valve Flex-Connectors-Water, Gas Unions/Transition Unions
1/2" Flare Adapter Teflon Plumber's Tape Stick Pipe Dope Hacksaw or Pipe Cutter Pipe Wrenches Screwdrivers Adjustable Open-End Wrench
Garden Hose Drill and 1/8" Bit Soldering Torch Sweat-Soldering Supplies 240-Volt Neon Test Light Appliance Cart, Dolly, or Hand Truck Hand Cleaner

Check your state and local codes before starting any project. Follow all safety precautions. Information in this brochure has been furnished by the National Retail Hardware Association. Every effort has been made to ensure accuracy and safety. Neither the NRHA nor the retailer can be held responsible for damages or injuries from the use of the information in this document.