Following these tips and instructions on how to remove and replace broken window glass can help save you time, money and effort. Inside this document you will find information about:
- Preparing for the New Window Glass
- Installing New Glass
- Adding the Finishing Touches
- Replacing Glass on Doors
|
|
|

|

PREPARING FOR THE NEW WINDOW GLASS
- Although removing and replacing windowpanes is not a difficult job, doing the job right requires a certain amount of attention and skill. There is a lot more to it than just inserting a new windowpane and adding a little putty.
- You can use the instructions here for a windowpane of almost any size. However, if the windowpane is a large one, you should remove the complete window frame and place it on a flat surface before attempting to remove the broken glass or to install the new glass.
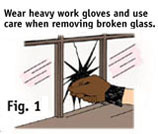
- The first step is removing the broken glass. Use care on this phase of the job–obviously, broken pieces of glass can be very dangerous. Wear work gloves to protect your hands while removing the broken pieces of glass from the frame.
- A shattered windowpane can be removed quite easily (Fig. 1). Pull one broken piece out at a time. Be sure to wear protective gloves while doing this. Don't take chances!
- If the glass is only cracked, you may need to remove most or all of the putty in order to take out the broken glass. Regardless of which way you do it, use extreme care to protect your arms from cuts.
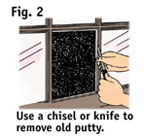
- Next, remove the old putty from the window frame. You can use a wood chisel, a putty knife or a jackknife (Fig. 2). Take time to remove every trace of the old putty.
- Break the old putty into little pieces as you remove it. If you try to remove too much putty at one time, you may split the wood frame on the window.
- Remove all the glazier's points as you remove the putty. Glazier's points are the small metal triangles driven into the frame underneath the putty that hold the glass in place.
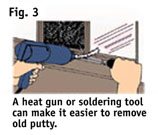
- Some putty may be extremely difficult to remove. If this is the case, you can use a heat source such as a heat gun or soldering tool to soften the old putty, which makes it much easier to remove.
- Run the heat source along the putty just ahead of your chisel (Fig. 3). The heat will soften the putty. This allows the putty to pull away from the wood frame much more easily.
- Take your time when removing old putty, since this is an important part of a glass replacement. By using heat, a good putty knife or chisel, and a little patience, you can remove even hardened putty that is well-set quite easily.
- After completely removing the old putty and the glazier's points, use the point of the chisel or the knife to smooth out any rough spots in the wood frame where the new glass will be inserted.
- If you are replacing glass in an old window, take a small paintbrush and apply a heavy coat of linseed oil to all sections of the wood around the frame (Fig. 4). Allow the oil to completely soak in.
- Linseed oil on the frame helps keep the oil in the putty from soaking out, which causes the putty to dry out quickly. If you saturate the wood with linseed oil before applying the putty, the new putty remains pliable and lasts much longer.
- While pure linseed oil works in most cases, check the label on the putty you are using. The manufacturer may have another recommendation.
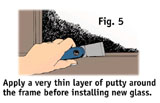
- After you have removed the old putty and applied the linseed oil to the frame, apply a very thin layer (about 1/16") of putty completely around the frame where the new glass will be set (Fig. 5). Make sure the base layer of putty is not too thick.
- This thin layer of putty on the window frame provides a cushion for the new glass to be inserted in. This cushion also stops the leakage of air around the glass and prevents it from resting directly against the wood.
|
|
|
|

INSTALLING NEW GLASS
- Now that you have removed the old putty and the frame is ready for the glass, you can insert the replacement glass in the frame.
- The replacement glass must be exactly the right size. If it is not, cut it to size with a good glass cutter. The new pane should be just a fraction of an inch smaller than the window area it is to fill.
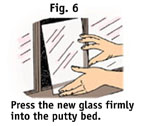
- Insert the new windowpane into the frame carefully (Fig. 6). Press it down firmly.
- Hold the new pane in position with one hand and insert a glazier's point on each side to secure the pane firmly in place. The glazier's points can be inserted with only a small amount of pressure.
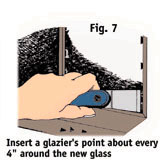
- Insert additional glazier's points about every 4" apart, completely around the new pane of glass (Fig. 7).
- Lay each glazier's point flat against the glass and start it into the wood with the point of the combination glazing tool or putty knife. Then, use the glazing tool to drive the glazier's points into the wood.
- Slide the glazing tool along the glass to eliminate the danger of breaking it. It takes only a light blow to drive the small glazier's point into the wood.
- Be sure to keep the glazier's points firmly against the glass wherever they are applied.
- Putty should be the consistency of rather dry, thick dough when it is applied. If it is too stiff, thin it down with the manufacturer's recommended thinner.
- You can use an old piece of glass as a kneading board for working the putty into the right shape and consistency.
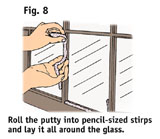
- Knead the putty until it is completely pliable and free of lumps. Then roll it into pencil-size strips.
- Take a roll of putty into your hands and start applying it in one corner of the window frame (Fig. 8). Lay the strip in the frame completely around the new piece of glass.
- When the putty is completely in place, smooth it out with a putty knife or scraper/glazer using long, even strokes.
- Hold the glazing tool at an angle and be sure it is clean. Any corrosion or rust on the knife will make it difficult to do a smooth, neat job.
- Your glazing tool will work better if you dip it into a can of linseed oil just before using it to spread putty.
- Use long, corner-to-corner strokes with the glazing tool Don't spread the putty so far out on the new windowpane that it is visible from the other side.
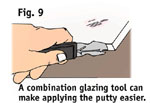
- A combination scraper and glazer tool makes the job of glazing windows even easier (Fig. 9). The angled blade rides along the front surface of the window as it forms the bevel on the putty. The other end of the tool is a scraper for removing old putty.
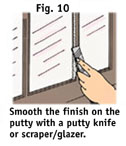
- Whether you use a putty knife or a scraper/glazer, it may be difficult at first. However, with a little practice, you can smooth out the putty completely around the windowpane (Fig. 10). Keep smoothing until the putty takes on a neat, finished appearance.
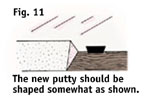
- Study Fig. 11 to see how to place the putty on the frame. It should cover the glazier's points, which are illustrated, and be set at an angle so it holds the glass firmly in place without showing from the opposite side of the window.
- Scrape completely around the area puttied, and remove any excess putty in corners or along the edges.
- A fine grade of sandpaper may be helpful in eliminating rough spots.
|
|
|
|

ADDING THE FINISHING TOUCHES
- Check the label on the putty you are using for painting instructions. You may be able to paint the putty right away or you may have to wait. This depends on the manufacturer's recommendations.
- Use at least two coats of outside paint for a good job.
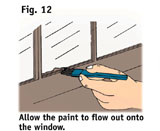
- One of the easiest ways to paint window frames is to allow the paint to cover not only the putty but also part of the glass. Don't worry about straight edges (Fig. 12).
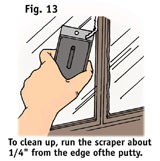
- Use a razorblade scraper for removing the extra paint from the glass. Run the scraper about 1/8" away from the edge of the putty (Fig. 13). Be careful not to gouge the putty.
- There are products that when applied to the glass before painting make removing the excess paint easier.
- Make sure the putty left over from your job is kept airtight–it will remain usable for many months.
|
|
|
|

REPLACING GLASS ON DOORS
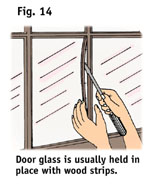
- Although most window glasses are held in position with putty, the glass on many doors is held in place with thin wood strips (Fig. 14). Building code in most areas requires safety glazing materials in entrance doors.
- If the pane of glass on a door is broken, you can remove and replace these wood strips without putty.
- First, pry out the strip on the long side using a screwdriver, a putty knife or some other prying instrument. Always remove the long side first. After removing one strip, the others will come out easily.
- After the strips are removed, use a pair of pliers to remove the small brad nails or to pull them through the wood strips.
|
|
|
TOOL AND MATERIAL CHECKLIST
|
| Glass Cutter |
Putty |
| Putty Knife or Scraper/Glazer |
Glass of Proper Size |
| Paint |
Window Scraper |
| Hand Cleaner |
Metal Shield |
| Work Gloves |
Linseed Oil |
| Chisel |
Heat Gun or Soldering Tool |
| Razorblade Scraper |
Paintbrush |
| Glazier's Points |
Pliers |
| Check your state and local codes before starting any project. Follow all safety precautions. Information in this brochure has been furnished by the National Retail Hardware Association (NRHA) and associated contributors. Every effort has been made to ensure accuracy and safety. Neither NRHA, any contributor, nor the retailer can be held responsible for damages or injuries resulting from the use of the information in this document. |