|
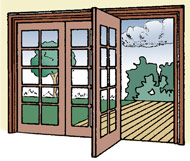
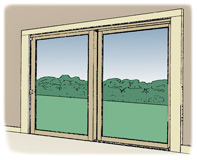
FIG.
2 - A swinging patio door.
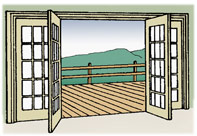
FIG. 3 - A French door pair.
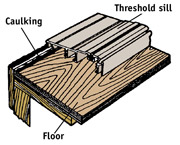
FIG. 4 - Before settling
the unit in the opening, run a series of heavy beads of caulking on the
floor to seal the threshold/sill.
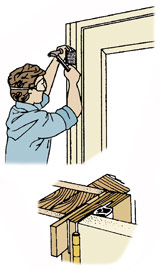
FIG. 5 - Shim directly behind the hinges on the hinge side. On the latch side, shim at the top, bottom, and both above and below the latch.
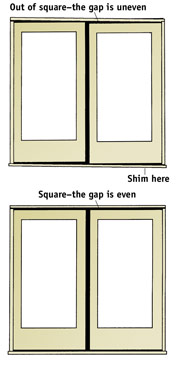
FIG. 6 - The width
of the gap at the top of the doors will tell you whether a French door
pair is square or not. |

INSTALLATION
- To install a prehung French or patio door, first unpack the new door unit. There may be skid boards or other framing attached to protect the system during transit. Remove any protective materials; if the unit has prehanging clips to keep the door aligned and closed, do not remove them.
- Swinging Patio Door (two-panel prehung unit, center hinged)–Run beads of caulking along the floor where the threshold/sill will rest. From the outside, center the bottom of the unit in the opening and tilt it up into place.
- Adjust the unit so the face is plumb, then secure the inactive-side jamb to the wall framing temporarily with two 3"-long drywall screws, placed about 6" below the head jamb and above the sill.
- Go inside the house and shim and check the gap along the top of the active door. It should be even along the entire width of the door from the hinge jamb to the latch jamb. If the gap is too wide above the latch jamb, drive a shim under the sill directly beneath the latch jamb until the gap is even. If the gap is too narrow above the latch jamb, drive the shim directly beneath the hinge jamb.
- Once the gap is even, recheck to make sure the unit
is plumb. Then shim the latch jamb, checking it with a straightedge
as you work to make sure you don't drive the shims too far and bow
the jamb. Shim about 6" below the top of the unit, 6" above
the sill and both above and below the lock.
- Be careful not to allow the unit to be twisted; the inside edge of the jamb should be flush with the interior wall surface at all points. DO NOT SHIM ABOVE THE HEAD JAMB.
- Place the carpenter's square at the corners to make sure the unit is square; if not, add shims below the sill. Shim the inactive-side jamb in four locations evenly spaced along the jamb. Drive the shims snug but not too tight. Then go back outside and secure the inactive-side jamb with two 3" drywall screws through each pair of shims. You may want to countersink the screw holes to fill with wood putty later on.
- From inside, check again to make sure the face of
the unit is plumb and that the gap between the door and jamb is even
along the top and down the latch-side jamb. Drive 3" drywall
screws through the latch jamb into the wall framing at each pair of
shims.
- Check the bottom of the door to make sure the door sweep makes even contact with the threshold across the entire width of the door. Adjust the threshold as needed.
- Inside the house, stuff fiberglass insulation into
the gap between the door jamb and the wall framing. Make it snug,
but don't stuff it in too tightly. Nail the brick mold 16" on
center outside and install the interior casing.
- On the outside, caulk around the outside of the brick mold where it meets the siding. Finish the door according to the manufacturer's instructions.
- French Doors (two-panel prehung unit)–Run heavy beads of caulking along the floor where the sill will rest. From the outside, center the bottom of the unit in the opening and tilt it up into place.
- Adjust the unit so the face is plumb, then secure one hinge jamb temporarily with a 3" drywall screw placed about 6" below the head jamb. Leave a small gap between the jamb and the wall stud.
- Use a level and a straightedge to make sure the head jamb is level and straight across the entire width of the unit. Shim under the sill directly below either hinge jamb if necessary. Insert shims directly behind the top hinges on both sides, taking care not to drive the shims in too hard (you don't want to bow the jamb). Drive two 3" drywall screws just above the top hinges on both sides.
- Check the gap between the doors and the head jamb to make sure it is even across the entire width of the unit. If not, the unit is out of square. Adjust it as shown in Fig. 6.
- Once the unit is square and level, shim behind the center and bottom hinges on both hinge jambs. Secure the hinge jamb with two 3" drywall screws just above the center and bottom hinges. Remove any prehanging clips or braces and test both doors to make sure they operate properly.
- From inside the house, stuff fiberglass insulation into the gap between the door jamb and the wall framing. Make it snug, but don't stuff it in too tightly. Nail the brick mold 16" on center outside, and install the interior casing.
- On the outside, caulk around the outside of the brick mold where it meets the siding. Finish the door according to the manufacturer's instructions.
- Sliding Patio Doors–Installing a sliding patio door is a little different because the unit generally doesn't come prehung. Consequently, the first step is to assemble the frame.
- Once the frame is assembled, run heavy beads of caulking along the floor where the sill will rest. From the outside, center the bottom of the frame in the opening and tilt it up into place.
- Adjust the frame so the face is plumb, then shim behind one hinge jamb near the top. Secure it temporarily.
- Use a level and a straightedge to make sure the head jamb is level across the entire width of the frame. Shim under the sill directly below either side jamb if necessary. Shim the other side jamb near the top and secure it with a screw.
- Use a level to plumb one side jamb, and shim at three more points along the jamb, spaced evenly from the top to the bottom. Secure that jamb, then repeat the process on the other side.
- Once the frame is square and level, set the stationary panel in place in the outside channel (on whichever side you want the stationary panel). Push the panel snugly against the side jamb, then secure it with the brackets provided by the manufacturer.
- Set the active panel in the inside channel, and test it to make sure it rolls smoothly and fits snugly all along the side jamb. If not, adjust the rollers to plumb the door or make it operate properly. Install the latch according to the manufacturer's instructions.
- From inside the house, stuff fiberglass insulation into the gap between the door jamb and the wall framing. Make it snug, but don't stuff it in too tightly. Install the outside trim, then the interior casing.
- On the outside, caulk around the outside trim where it meets the siding. If necessary, finish the door according to the manufacturer's instructions.
|