These tips and suggestions on how to install wall and ceiling fixtures can help you complete a better installation in less time and with less effort.


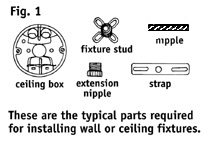
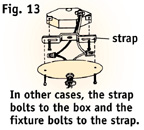
PARTS NEEDED FOR TYPICAL FIXTURE MOUNTING

  • Most wall and ceiling fixtures-other than recessed fixtures-fit into standard electrical outlet boxes and are usually easy to mount.
  • Most fixtures are mounted by a fixture stud or a fixture strap (Fig. 1). Occasionally you need an extension nipple or a plain nipple for mounting certain fixtures.
  • Any additional mounting devices required for special types of fixtures are usually included in the materials furnished by the manufacturer. Read and follow the manufacturer's instructions carefully for a neat installation.


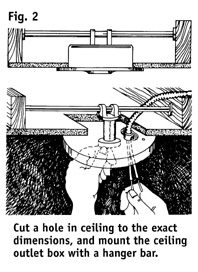
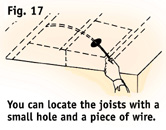
INSTALLING A CEILING OUTLET BOX

  • Occasionally you may need to install a ceiling outlet box before you can mount a new ceiling fixture. Such an installation requires some time and effort but is not too difficult.
  • The first step is to mark the position on the ceiling where the new outlet box is to be located. Determine the exact dimensions of the box and cut a hole in the ceiling where it will be located. Use extreme care and cut the hole to the exact size and dimensions.
  • There are a number of different types of boxes and mounting devices available. The boxes with the expanding devices on the sides are generally recommended for use with lightweight lighting fixtures only. This is because of the relatively small area to which they anchor. Madison hangers also fall into this category.
  • There are boxes designed to be nailed to ceiling joists. Angled nailing holes are provided. They make it possible to position and nail the box into a hole cut into the ceiling. The hole for this type of box needs to be cut next to a ceiling joist.
  • Most of the better mounting bars have an expanding feature that allows them to tighten between the joints. These bars must be inserted through a hole cut in the ceiling. Depending on the type of mounting bracket, some will lay almost flat against the surrounding drywall above the ceiling. Others will require enough clearance to attach an electrical box to the bar. You will usually want the bottom of the box to be flush with the ceiling surface.
  • Next, insert a hanger bar through the hole to rest firmly on the back of the supporting ceiling (Fig. 2). Position the hanger bar carefully so it is firmly supported.
  • Connect the feed cable to the ceiling outlet box, as illustrated. If the feed cable is connected to a power source, turn off all power at the main switch before connecting it. Secure the electrical wire to the ceiling outlet box with a cable clamp.
  • Now, mount the ceiling outlet box with the wire attached on the hanger bar with the attached nipple and locknut. Be sure the current is off at the main switch. Connect the feed cable to a power source at an outlet box. Now you are ready to hang the ceiling fixture.


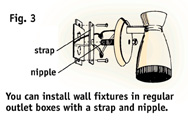
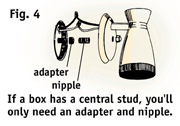
INSTALLING WALL FIXTURES

  • As a rule, you can install wall fixtures in regular outlet boxes with an ordinary strap and nipple (Fig. 3).
  • Of course, different types of wall fixtures have different connecting arrangements, but you can usually attach the strap right to the fixture outlet box with screws. Then you can attach the wall fixture to the strap with a nipple and knurled cap.
  • If the box has a central stud, you will need only an adapter and a nipple to attach the fixture (Fig. 4). An adapter is screwed onto the stud, the nipple is attached to the adapter, and the fixture is attached to the nipple.
  • Wall fixtures are usually quite simple to install. Manufacturers of wall fixtures design different mounting arrangements. The manufacturer will usually include complete installation instructions with the fixture.
  • Read and follow the manufacturer's instructions carefully. Always turn off the current before installing any fixture.


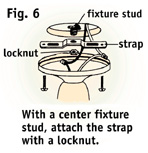
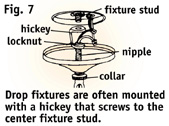
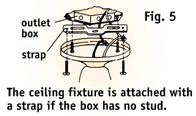
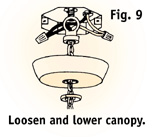
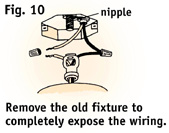
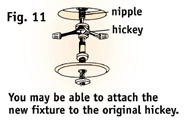
INSTALLING CEILING FIXTURES

  • Some ceiling outlet boxes have no stud in the center. In such cases, the ceiling fixture is usually installed with a strap that is screwed directly to the threads in the ceiling outlet box (Fig. 5). The ceiling fixture is then attached to the strap with screws.
  • The mounting arrangement illustrated in Fig. 5 will support most lightweight ceiling fixtures. Such an installation is simple, fast, and meets most wiring codes. Solderless connectors speed up the job.
  • If the ceiling outlet box has a center fixture stud, mount the fixture by attaching the strap to the center stud with a locknut (Fig. 6).
  • Once the fixture strap is firmly attached to the fixture stud with the locknut, screw the fixture canopy to the strap with two screws.
  • If solderless connections are code approved in your area, use them to connect the wires. If not, use whatever is specified by your local code. Any wires that are joined should be completely insulated. Also, use extreme care when connecting the wires. Black wires generally are attached to black wires, white to white, and green or copper to green or copper. Follow any supplied wiring diagrams carefully.
  • Heavier drop fixtures are often mounted with a hickey (Fig. 7). This hickey screws to the center fixture stud.
  • Attach a nipple to the lower section of the hickey with a locknut. Then mount the fixture canopy to the nipple with a collar.
  • Hickey use in mounting drop fixtures varies according to the design and weight of the ceiling fixture. Almost all heavier drop fixtures require a hickey.
  • Remember: Be sure the current is shut off at the main switch before attempting any mounting.


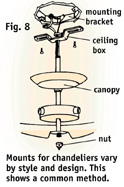
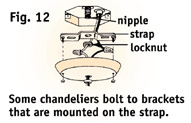
INSTALLING CHANDELIERS

  • You can mount chandeliers right into ceiling boxes as replacements for ordinary ceiling or drop fixtures. However, the mounting style varies according to the style, weight, and design of the chandelier.
  • When installing heavy chandeliers, it is a good idea to check the existing box. It must be mounted firmly enough to carry the weight of the new fixture.
  • Fig. 8 illustrates a common mounting method for lighter-weight chandeliers. If the manufacturer recommends a different mounting, complete instructions will be provided. Read these instructions carefully and follow them in detail.
  • In Fig. 8, the mounting bracket is attached to the ceiling box with screws. The main rod of the chandelier is then screwed into the strap to provide adequate support.
  • When replacing an ordinary light fixture with a chandelier, the first step is to turn off the current and loosen and lower the canopy of the old fixture (Fig. 9). Fig. 9 assumes that you are replacing a drop ceiling fixture mounted with a hickey. Regardless of how it is mounted, the fixture should be totally removed, leaving the wires for the new fixture completely exposed and ready for mounting (Fig. 10).
  • In many cases, you can mount the chandelier right into the hickey used for the old fixture (Fig. 11). If a different type of hickey mounting is required, the manufacturer should provide it.
  • Some chandeliers are designed to bolt to brackets that are mounted right onto the mounting strap (Fig. 12). In this case, the mounting bracket is attached to the nipple which is placed in a firm position with the locknut.
  • Then, mount the fixture to the brackets that are affixed firmly to the mounting strap. Use nice, decorative nuts to give a neat appearance to the canopy of the chandelier.
  • Other chandeliers must be mounted to the outlet box by a regular fixture strap (Fig. 13). The strap is mounted to the threaded section of the outlet box, and the canopy is then mounted directly to the mounting strap.


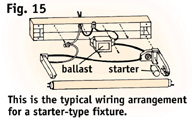
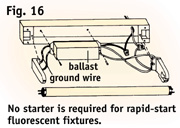
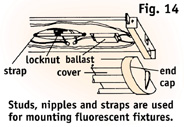
MOUNTING FLUORESCENT FIXTURES

  • Fluorescent fixtures are usually mounted to an ordinary outlet box by studs, nipples, or straps (Fig. 14).
    A fluorescent ceiling fixture may be easier to mount than an ordinary drop or ceiling fixture.
  • Two types of fluorescent fixtures are available. Mounting either type is basically the same, but the wiring arrangement is totally different. Follow the manufacturer's instructions carefully for mounting fluorescent fixtures.
  • Fig. 15 shows the wiring arrangement for a starter-type fluorescent fixture. Of course, manufacturers offer fluorescent fixtures that vary slightly from this design, but the wiring arrangement is basically the same as the kind illustrated.
  • Fig. 16 illustrates how to wire rapid-start fluorescent fixtures. No starter is required, but the wiring arrangement and the ballast location are considerably different.
  • Some manufacturers may provide slightly different wiring arrangements. If so, study the manufacturer's diagrams carefully and follow them in detail.
  • Be sure current is off before attempting to install fixture.


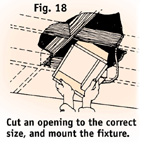
INSTALLING RECESSED CEILING FIXTURES

  • You should mount all recessed ceiling fixtures to joists. Your first step in mounting a ceiling fixture, then, is to locate the joists.
  • Joists in ceilings are usually located exactly 16" apart. Use a magnetic or electronic stud finder to locate these joists. If you are using a nail-on box, the joist location is very important. Even with the bar, if the hole is too close to the joist, it will make installation difficult, if not impossible.
  • If you do not have a stud finder, you can tap on the ceiling. As you get closer to the joists the sound becomes more deadened. Another way is to drill a small hole and use a piece of wire to help locate the joist (Fig. 17).
  • Once you've located the joist, saw out a hole in the ceiling to the correct size and in a location which permits the recessed fixture to be mounted where it can be screwed or bolted to the ceiling joist (Fig. 18).
  • Turn off the current at the main switch. Attach the electrical wiring to the ceiling fixture, then mount the fixture in the proper location.

TOOL AND MATERIAL CHECKLIST

Lighting Fixtures Parts for Fixture Connections Outlet Boxes Hanger Bars #14-2 Wiring Keyhole Saw
Saber Saw Pliers Knife or Stripping Tool Fluorescent Starters Fluorescent Tubes Screws
Hand Drill Marking Pencil Folding Rule Folding Rule Screwdriver Stud Finder

Check your state and local codes before starting any project. Follow all safety precautions. Information in this brochure has been furnished by the National Retail Hardware Association. Every effort has been made to ensure accuracy and safety. Neither the NRHA nor the retailer can be held responsible for damages or injuries from the use of the information in this document.