|
Create New Account
Millard Lumber Newsletter
Register to receive newsletters and notices by email. Register Now
|
How To Install Drywall
Read these tips and instructions on how to install drywall.
Following these instructions can help you to save time and effort and end up with a neater
job.
1. ESTIMATING MATERIALS NEEDED
Fig. 1 provides a chart for estimating the number of 4x8 sheets of drywall required for
paneling rooms of various sizes. If wallboards of any other size are used, make the
necessary adjustments.
- After estimating the number of sheets of drywall required, add another 5% of waste.
- Fig. 2 provides tables for estimating the number of nails, the amount of joint compound
and the quantity of wallboard tape required for installations of different sizes. (These
tables are figured based on the adhesive and nail-on method of applying drywall.)
- For applying the adhesive to framing members from a caulking gun with a 3/8"
diameter bead, plan on using eight quart-size tubes of adhesive for each 1,000 square feet
of wallboard used.
| Fig. 1 |
| How to Figure a Room for Drywall |
| Determine the perimeter. This is merely the total of the widths of each
wall in the room. Use this conversion table to figure out the number of wallboards needed. |
 |
| Perimeter |
No. of 4x8 Wallboards Needed |
| 36' |
9 |
| 40' |
10 |
| 44' |
11 |
| 48' |
12 |
| 52' |
13 |
| 56' |
14 |
| 60' |
15 |
| 64' |
16 |
| 68' |
17 |
| 72' |
18 |
| 92' |
23 |
| For example, if your room walls measure 14'x14'x16'x16', this equals 60'
or 15 wallboards required. To allow for areas such as windows, doors, fireplaces, etc.,
use the deductions listed below: |
| door = 1/3 wallboard(A) |
| window = 1/4 wallboard (B) |
| fireplace = 1/2 wallboard (C) |
| Thus, the actual number of wallboards for this room would be 13 pieces (15
pieces minus 2 total deductions). Always use the nexy highest number of wallboards when
the perimeter total is between ranges shown in the table. These figures are for rooms with
8' ceiling heights or less. |
2. ADVANCE PLANNING FOR DRYWALL
INSTALLATION
Always start by making a sketch of the wall and ceiling areas to be covered before
applying the drywall.
- A sketch enables you to detect errors on paper - not on the job.
- Always install the wallboards perpendicular to (across) the joists on ceilings.
- You should apply drywall to the ceiling first, then to the walls.
- Use a special water-resistant drywall where excessive moisture may be a problem. In most
cases, water-resistant drywall is covered with a green finish paper.
- Install a special fire-rated (Type X) drywall where building codes require the use of a
fire-rated material.
- If a vapor barrier is needed, use a special insulating, foil-backed wallboard, or create
a vapor barrier with sheets of plastic material.
| Fig. 2 |
| ESTIMATING NAILS |
| drywall thickness |
type of nail |
approx. lbs. per
1,000 sq. ft. of
drywall |
| 3/8", 1/2" |
1 5/8" coated type drywall nail |
5 1/4 lbs. |
| 5/8" |
1 7/8" coated type drywall nail |
5 1/4 lbs. |
| ESTIMATING JOINT COMPOUND AND TAPE |
| drywall (square feet) |
estimated amount
of joint compound |
estimated amount
of wallboard tape |
| 100-200 sq. ft. |
1 gal. |
2 - 60' rolls |
| 300-400 sq. ft. |
2 gals. |
3 - 60' rolls |
| 500-600 sq. ft. |
3 gals. |
1 - 250' roll |
| 700-800 sq. ft. |
4 gals. |
1 - 250' 1 - 60' roll |
| 900-1,000 sq. ft. |
1 -5 gal. pail |
1 - 250' 2 - 60' rolls or 1 - 500' roll |
| *A powder joint compound is also available. Estimate 60 lbs. per 1,000 sq.
ft. of wallboard. |
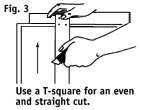
|
3. CUTTING DRYWALL
- You can easily cut wallboard with a scoring or trimming knife and a 4' straightedge. You
may prefer to use a T-square for an even and straight cut (Fig. 3).
- Measure accurately and make marks before cutting the wallboard.
- Use a straightedge for accuracy, and score along your marks. Be sure to cut through the
paper and into the inner core.
- Hold the knife at a right angle to the board and score completely through the face
paper.
- The board will break easily at the point where it is scored. After it is snapped, trim
the paper on the uncut side with a pair of shears or a sharp knife.
- Make circular cuts and irregular angles with a keyhole or sabre saw.
- To cut holes in the wallboard for electrical outlets, light receptacles, switches, etc.,
carefully measure and mark the location of the opening of the face of the wallboard.
Outline the opening in pencil and cut it out with a keyhole saw or circle cutter. The hole
must be accurately located and cut to size, or the electrical coverplate may not cover the
hole.
|
|
4. SINGLE- OR DOUBLE-LAYER INSTALLATIONS
- A single layer wall of 1/2" or 5/8" drywall is the simplest, fastest and most
economical type of wall construction.
- Use a double-layer installation where extra fire protection or sound deadening is
important.
- A double-layer installation also reduces the possibility of cracking and the nuisance of
nails popping out if the wallboard warps or strains.
- In a double-layer installation, a 3/8" finish wallboard is usually laid over a
3/8" backing board.
|
|
5. VERTICAL OR HORIZONTAL INSTALLATIONS
- Apply drywall to leave the fewest possible joints. If the ceiling is less than 8'2"
in height, use a horizontal application for 25% fewer joints than a vertical one (Fig. 4).
- If the ceiling is higher than 8'2", install the drywall vertically (Fig. 4). On a
two-layer installation, lay the base boards either vertically or horizontally - whichever
requires the fewest cuts.
- Lay the top or finish layer over the base boards according to the preceding
instructions. Any seams in the finish layer should be offset at least 10" from the
seams in the base layer, or set at right angles from seams.
|
|
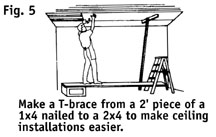
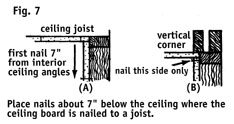
6. APPLYING DRYWALL TO THE CEILING
- Apply drywall to the ceiling at right angles to the joists.
- If two layers are installed, set the bottom layer at right angles to the joists and the
finish layer the way that leaves a minimum of seams.
- Holding the ceiling board in position can be difficult. If you are working alone, solve
this problem by making a "T" brace from a 2' piece of a 1x4 nailed to the end of
a 2x4 of sufficient length to reach from the floor to the ceiling (Fig. 5).
- The supporting 2x4 should be about 1" longer than the floor-to-floor ceiling
height.
- If you are using only nails, nail the board to the ceiling with the proper length of
nails and space them about 7" apart. Ceilings should be double nailed.
- When using the nail-on and adhesive method, use three nails across each wallboard at
each joist. Drive one nail firmly into place at each edge and one into the center of the
board.
- Drive the nails in just enough to tighten the wallboard to the framing. Then set the
nail with a blow just hard enough to dimple the wallboard (Fig. 6). Do not drive the nails
hard enough to break the coating paper.
|
|
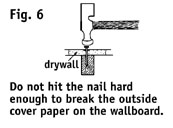
7. WALL APPLICATION OF DRYWALL
- If the drywall is being applied horizontally, (Fig. 4), install all top boards first.
Push it up firmly against the ceiling, do not force it, and nail lightly into place.
- In areas where ceiling boards are nailed to ceiling joists, start the first run of nails
on the wallboards about 7" below the ceiling (A, Fig. 7).
- If you're applying the wall board with nails only, place all nails about 7" apart
to all studs (Fig. 4). If you're using the adhesive and nail-on method, apply nails only
at the edges of the board with adhesive on the back to hold the boards to the studs in the
center.
- If a board tends to bow out in the center, secure it with a temporary nail until the
adhesive sets. Remove the holding nail after adhesive sets.
- If wallboards are applied vertically, place the long edges of the wallboard parallel to
the framing members (Fig. 4). Use a vertical application if your wall height is greater
than 8'2". Use the same nailing procedures as previously described.
- Special metal corner strips are available for outside corners (Fig. 8). Insert a nail in
these metal corner strips about every 5". Nail first through the edge of the strip,
then through the drywall and into the wood framing.
- Use a good grade of joint compound to finish all joints, nail heads and corners. In most
cases, you'll need two or three coats of compound at all taped joints. The number of coats
depends on whether you are using regular drywall tape or drywall tape that has adhesive on
the back.
- If you are using adhesive back tape, center the tape over the joint and press it into
place with your knife. Apply two finish coats over the tape. If you are using regular
tape, use an embedding coal to bond the tape at each joint (Fig. 9). When the embedding
coat has set, apply two finish coats over the tape.
- Allow each coat of joint compound to dry about 24 hours before applying the next coat.
|
|
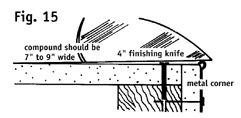
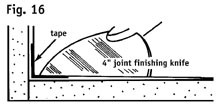
8. PUTTING THE FINISHING TOUCHES ON A DRYWALL INSTALLATION
- Use a 4" joint finishing knife to smooth out each coat of joint compound (Fig. 10).
Fill in the slightly recessed area created by the adjoining tapered edges of the
wallboards, and smooth it off with the 4" joint finishing knife.
- Center the wallboard tape over the joint and press it into place if you are using the
adhesive back tape. For the regular tape press it into the first layer of compound firmly,
but not too hard (Fig. 11). Hold the 4" knife at a 45 degree angle. Press just hard
enough to squeeze out some of the compound from under the tape, but be sure you leave
enough compound for a good bond.
- With adhesive back tape you can apply the fill coat right away. With regular drywall
tape, allow the tape to dry in position for at least 24 hours and then apply a fill coat,
extending it a few inches beyond the edge of the tape. Feather the edges of the compound
for a smooth finish.
- After the fill coat has dried, use a 10" joint finishing knife to apply still
another coat of joint compound. Feather this coat about 1 1/2" beyond the edge of the
first coat.
- When the final coat is dry, sand it lightly to a smooth finish (Fig. 12). Wipe off the
dust with a clean rag to prepare the surface for the final coating of paint, paper, etc.
- The total width of the compound at each joint should be about 12" to 14" (Fig.
12).
- All nails should be dimpled just below the surface of the board as shown in Fig. 6.
Conceal these dimpled ares by applying a first coat of joint compound with even pressure
so the compound is level with the surface of the board (Fig. 13). Press evenly, but not
too hard - too much pressure on the knife may scoop the compound from the dimpled area.
- When the compound has thoroughly dried, apply a second coat. Let it dry thoroughly, then
sand it lightly and apply a third coat.
- In areas where humidity is extremely high, apply a fourth coat of compound over the nail
heads.
- The end or butt joints on wallboards are not tapered. Where these untapered butt joints
come together, be sure not to build up too much compound (Fig. 14). Compound built too
high will create ridges in the wall, and may cause shadowing when the area is lighted.
- Feather the joint compound out on each side of the butt joints from 7" to 9"
(Fig. 14). The final application of joint compound should create a joint approximately
14" to 18" wide where the butt joints come together.
- After attaching the metal corner strips as previously described (Fig. 8), nail them
securely into position, and use a 4" finish knife to spread compound mix 3" to
4" out from the nose of the bead (Fig. 15).
- When the first layer is completely dry, sand it lightly and apply a second coat of
compound mix., feathering the edges about 2" to 3" beyomd the first coat.
- If a third coat is needed, feather it 2" to 3" beyond the preceding coat. This
cretaes a tapered finish of joint compound approximately 7" to 9" wide at each
metal corner.
- To finish off an inside corner with regular tape, apply joint compound with a 4"
knife. Spread it evenly about 1 1/2" on each side of the angle (Fig 16).
- For both types of tape, cut the joint tape the exact length of the corner to be
finished. Fold the tape lengthwise in the center and press it firmly into the corner.
|
Tool and Material Checklist
| Wallboard |
T-Square |
Keyhole Saw/Circle Cutter |
Crown-head Hammer/Drywall Hammer |
| Reinforcing Tape |
Joint Compound |
Screws |
Adhesive |
| Drop Cloth |
Metal Corner Strips |
Sandpaper Block |
Steel Rule |
| Sandpaper 80-100 grit |
Trimming Knife |
8"-10" Drywall Knife |
Adhesive Gun |
| Trowel |
Nails |
1x4's & 2x4's for "T" Brace |
4" Joint Knife |
|