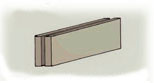
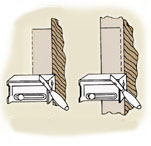
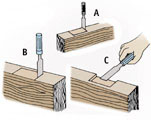
Follow these tips and instructions on how to frame and hang doors. Following these instructions can save you time and effort, while helping you to end up with a neater, more satisfactory installation. In this document you will find information about:
  • Framing a Door
  • Hanging a Door
  • Mortising the Door for Hinges
  • How to Install a Cylinder Lock


FIG. 1 - Decide the location of the door when you're installing the studs, plates and shoes.

FIG. 2 - Add a single stud on each side to make an opening the width of the door, plus 6".

FIG. 3 - Add 2x4 studs–cut to the height of the door plus 1"–on both sides of the door.

FIG. 4 - Cut two 2x4s to a length equal to the width of the original opening. Inset to form a header above the door.

FIG. 5 - Add three cripple studs in the area above the header space.

FIG. 6 - Make a double header from two 2x4s. The thickness of the 2x10s and the 1/2" spacers equals the width of a 2x4.

FIG. 7 - Set the 2x10 header on edge.

FIG. 8 - The door jamb is usually ready-cut for installation.

FIG. 9 - Follow these details for installing the door jamb.


FRAMING A DOOR

  • Framing a door is a simple task when you follow a few simple instructions. Decide where each door is to be located when you are installing studs, plates and shoes for a new wall (Fig. 1). Follow these same basic instructions when you're cutting a door through an existing stud wall. Use metal lumber connector brackets to make nailing your door frame together easier.
  • The 2x3 or 2x4 that is nailed to the floor to provide a base for the studs is referred to as a "shoe." The 2x4s placed in an upright position to support the wall are referred to as "studs." The 2x4 laid on top of the studs is referred to as a "plate."
  • The size of this opening will vary depending on the size of the door you plan to install. A typical door opening is about 2'8". Measure the door carefully and cut the opening to fit.
  • Next, cut and insert studs on each side of the door area (Fig. 2). Make this opening the width of the door plus 6". The extra 6" allows for the width of the door facing on both sides.
  • Now, measure the height of the door to be installed. Cut 2x4s to the height of the door plus 1". Install these studs on either side of the door as illustrated in Fig. 3.
  • There are two ways to finish the header area over the door frame. The first is to cut two 2x4s to a length equal to the width of the original opening and insert them to form a header above the door (Fig. 4). Nail these header pieces together securely when they are placed in position.
  • Next, measure the distance from the top of the header plate to the ceiling plate and cut "cripple studs" to this length (Fig. 5). Insert three cripple studs in the space above the door header as illustrated. Toenail these cripple studs to the header above the door and to the plate at the top of the studs.
  • The other method is to cut two 2x10s to a width of the original opening. Place 1/2" plywood spacers between the pieces of 2x10 and nail them together (Fig. 6). Insert them to form the header above the door (Fig. 7).
  • Insert the door jamb in the space you have now created (Fig. 8). This door jamb is normally purchased ready-cut for installation.
  • Fig. 9 shows the details on installing a door jamb and casing. Study this drawing carefully before attempting to install the door jamb. These same parts of the jamb are installed whether the jamb is purchased ready-cut or is cut on the job.
  • In some cases, the casing on an outside door frame is nailed directly to the studs. In other cases, the casing is nailed over the sheathing. The thickness of the interior wallboard and the sub-sheathing determines how the door jamb is installed.
  • Insert a filler strip to make the door jamb fit the installation, if needed.
  • Add finish framing to the door after applying the paneling, drywall or other wall material (Fig. 9). Head and side casings finish off the opening for the door.


FIG. 10 - A butt gauge is a handy tool for hanging doors.
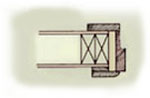
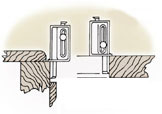
FIG. 11 - Use the butt gauge on either doors or jambs.
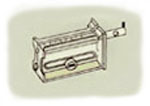
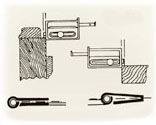
FIG. 12 - Use the butt gauge to make measurements.
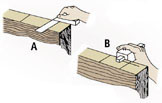
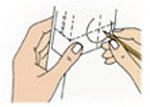
FIG.13 - Allow space for swaged hinges.
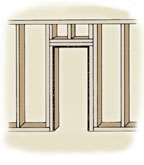
 

HANGING A DOOR

  • The first step in hanging a door is determining whether it is to be hung right-hand or left-hand. A right-hand door means the hinge is added to the right side, while a left-hand door means the hinge is on the left side.

  • The hand of a door is always determined from the outside. For an entrance way, this means the street side.

  • The "outside" of an interior door is the side from which the hinges are not available, and the door opens away from you.

  • Although you can hang doors accurately without a butt gauge, you may want to acquire this handy tool if you plan to hang many doors. It makes the job much easier (Fig. 10).

  • Place the flange of the butt gauge against the jamb or the side of the door as you would a regular T-square (Fig. 11). Mark the position where the hinge is to be attached with a scratch awl or a pen knife. This will give you square lines where the hinge is to be attached.

  • Determine the width of the hinge to be applied, and set the butt gauge to the correct width (Fig. 12). The setback of the hinge is illustrated, too. This is usually about 1/4". This setback hides the hinge when it is recessed into the door.

  • Next, apply the butt gauge to the jamb of the door and mark this same measurement on the jamb.

  • The small extension piece on the opposite end of the butt gauge measures the offset for swaged hinges (Fig. 13). This space between the leaves of the hinges allows for clearance at the butt edge of the door. If a hinge is not swaged, set the gauge for slightly less than half the thickness of the barrel of the hinge.

  • Fig. 14 provides a table for determining the size and type of hinge to use on doors of different types.

  • Obviously, heavy doors require heavier hinges than light doors, and doors taller than 5' should have three hinges.

    Fig. 14 - Loose pin butt hinge specifications for wood doors.
    Doors larger than 5' should have three butt hinges, one for ea. 2-1/2 ' of height.
    Door
    Butt Hinge Size
    Type
    Size
    Width
    Cupboard
    3/4", 7/8"
    Up to 24"
    2-1/2"
    Screen
    7/8" to 1-1/8"
    Up to 36"
    3"
    Doors
    1-1/8" to 1-3/8"
    Up to 32"
    3-1/2"
     
    1-1/8" to 1-3/8"
    32" to 37"
    4"
     
    1-9/16", 1-3/4", 1-1/8"
    Up to 32"
    4-1/2"
     
    1-9/16", 1-3/4", 1-1/8"
    32" to 37"
    5"
     
    1-9/16", 1-3/4", 1-1/8"
    37" to 43"
    5" Ex Heavy
     
    1-9/16", 1-3/4", 1-1/8"
    43" to 50"
    6" Ex Heavy
     
    2", 2-1/4", 2-1/4"
    Up to 43"
    5" Ex Heavy
     
    2", 2-1/4", 2-1/4"
    43" to 50"
    6" Ex Heavy


FIG.15 - Use a small square or butt gauge to mark the location of the hinge on the door.

FIG.16 - Cut and chisel out the wood as shown.

FIG.17 - Top view of a 3-1/2" x 3-1/2" butt hinge, mounted.


MORTISING THE DOOR FOR HINGES

  • Use a small square or a butt gauge to mark the location of the hinge on the door (A, Fig. 15).


  • Use a marking gauge to indicate the area of the door that the hinge will not cover (B, Fig. 15). This area is referred to as the gain or setback.

  • Next, use a chisel and a rubber or plastic hammer to score the marked area (A, Fig. 16). Be sure the chisel is sharp and the correct size.

  • Using the same chisel, make shallow cuts about 1/4" apart in the marked area (B, Fig. 16). Tap the chisel lightly with the rubber or plastic hammer to make these cuts.

  • Use the chisel to remove the surplus wood you have cut away to the depth needed to conceal the hinge in the area (C, Fig. 16).

  • Fig. 17 illustrates a cutaway top view of a 3-1/2" x 3-1/2" butt hinge mounted on the door and the side jamb. Follow this same arrangement when installing hinges of any size.

  • Use a nail punch or a drill to start the screw holes, both in the door and the door jamb. Pull the leaf of the hinge tightly into place on both the door and the jamb with a good screwdriver.

  • Put the door into the correct position, and insert the hinge pins. Tap the pins into place with a rubber or plastic hammer.

  • After the door is hung, swing it a few times to check for alignment. Make any adjustments necessary to the door and the hinges for proper positioning. In some cases, a door may need light planing or sanding in a few spots. In other cases, the hinges may need slight adjustments for proper alignment.


FIG.18 - Use the template provided to position the lock on the door for drilling.


HOW TO INSTALL A CYLINDER LOCK

  • Instructions for installing a cylinder lock usually accompany the lock you purchase. Follow these mounting instructions carefully, using the template provided with the lock for drilling the holes in the door (Fig. 18).

  • Instructions on mounting a cylinder lock vary from one manufacturer to another. The hole for any lock is usually drilled at a point 38" from the floor.
  • You can use special adjustable drill bits for drilling holes for the lock, or you may prefer to use a cylinder-type hole drill that works with your power drill. The hole for a cylinder lock is usually about 2-1/8" in diameter.


TOOL AND MATERIAL CHECKLIST
2x3s (Various Lengths) Hand Saw
Nails (Various Sizes) Sawhorses
Door Jamb Door
T-Square Expansive Bit
Butt Gauge Hinges (three per door)
Marking Gauge Sharp Knife
Rubber or Plastic Hammer Brace and Bit
Marking Pencil Lock
Wood Chisel Cylinder-Type Drill Bit
2x4s (Various Lengths) Power Saw
1/4" Paneling Hammer
Metal Lumber Connectors  

Check your state and local codes before starting any project. Follow all safety precautions. Information in this document has been furnished by the National Retail Hardware Association (NRHA) and associated contributors. Every effort has been made to ensure accuracy and safety. Neither NRHA, any contributor nor the retailer can be held responsible for damages or injuries resulting from the use of the information in this document.