Here are tips and suggestions on how to work with copper pipe. Read them carefully–they can help you save time, money and effort. Inside this document you will find information about:


TYPES OF COPPER PIPE

  • There are two basic types of copper pipe or tubing: rigid and flexible.

  • Rigid pipe, usually installed in new homes, makes a neater installation, but it is much more difficult to install than soft, flexible copper pipe.

  • Flexible copper pipe is best for repair work since it can be run around obstacles without connections or cuts.

  • Copper pipe is available in three basic types: Type M is thin-walled, Type L is medium-walled and Type K is thick-walled. In most cases, Type L is good for home use. Check your city code to determine which type of pipe is required for the work you're planning.

  • Fig. 1 shows the inside and outside dimensions of medium-weight, Type L copper pipe.
  • FIGURE 1
    The chart shows the dimensions of medium-weight, Type L copper pipe.
    Nominal Size Outside Diameter Inside Diameter
    1/4" .375" .315"
    3/8" .500" .430"
    1/2" .625" .545"
    5/8" .750" .667"
    3/4" .875" .785"
    1" 1.125" 1.025"
    1 1/4" 1.375" 1.265"
    1 1/2" 1.625" 1.505"
    2" 2.125" 1.985"


FIG. 2 - Cat. 1: copper pipe fittings for making blends and turns; Cat. 2: fittings for joining or branching pipes; Cat. 3: other copper fittings.


COPPER PIPE FITTINGS

  • Fig. 2 illustrates the three basic categories of copper pipe fittings. The first category includes fittings designed for making bends and turns in the pipe. The second category has fittings made for joining or branching copper pipe.

  • The final category includes couplings, slip couplings, cast iron pipe adapters, etc. You can use any of these fittings on either rigid or flexible pipe.

  • The fittings illustrated are by no means the complete array of copper pipe fittings. Other fittings are available to help solve special piping problems.


FIG. 3 - Use a hacksaw or tube cutter to cut copper pipe.


CUTTING COPPER PIPE

  • You can cut copper pipe with a regular hacksaw or a copper tube cutter (Fig. 3). Although both will make a satisfactory cut, the tube cutter ensures a square cut every time.

  • Use a jig or miter box when you're cutting copper pipe with a hacksaw. This helps to ensure a square cut in the pipe.

  • You can make a jig from a wooden board or block with a vee notch sawed out to hold the pipe in place.

  • A slot in the jig will guide the saw at right angles to the vee notch, making it easy to hold the pipe while cutting and helping ensure a square cut.

  • When using a pipe cutter, hold the copper tubing in place with a pipe vise or some other holding device.

  • After making the cut, remove the burrs inside the pipe with a half-round file. A pipe cutter usually leaves more burrs in the pipe than a hacksaw.

  • When cutting pipe for a specific run, be sure to make allowances for the distance of pipe that fits into the fittings. Also, remember to add the extra length the fittings will give the entire run of pipe. Figure about 1/2" for each fitting.


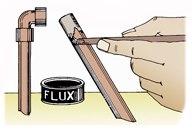
FIG. 4 - Spread flux evenly on the cleaned end of the copper pipe.
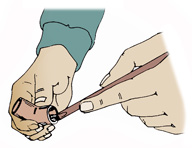

FIG. 5 - Rub flux into the cleaned fittings.
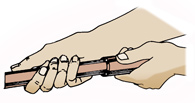

FIG. 6 - Place the fitting on the pipe in its final position, rotating the joint several times.


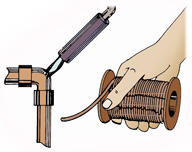
FIG. 7 - Use a propane torch to apply heat for soldering.


SWEATING A JOINT IN COPPER PIPE

  • After you've cut the copper pipe to the proper length, clean the end of the pipe with a 4-in-1 tool. Clean the area to be inserted in the fitting until it is bright all around. You can also use a separate brush, fine sandpaper or steel wool.

  • If you're using the 4-in-1 brush, slide the pipe inside the brush. The standard 4-in-1 tool will clean both 1/2" and 3/4" pipe and fittings. Be sure you are using the right size. Turn the tool back and forth until the pipe is bright. You can also hold sandpaper or steel wool around the pipe with light pressure. Then turn the tube back and forth several times.

  • You must also clean the inside of all fittings. You can use the 4-in-1 tool, brush, steel wool or sandpaper. Take the time to clean them thoroughly. Debris or foreign matter left in the pipe causes a poor seal.

  • Next, apply a light coat of soldering paste or flux to the cleaned end of the copper pipe (Fig. 4). Use a flux brush, an old toothbrush or a wooden paddle for spreading the flux.

  • Flux or soldering paste ensures a firm bond between the copper and the solder.

  • Also apply flux to the inside of the cleaned fittings (Fig. 5). Use a flux brush, wooden paddle or toothbrush to apply the soldering paste.

  • The flux or soldering paste will keep the copper from oxidizing when heated.

  • Never use acid core solder for sweating copper pipe.

  • Place the copper fitting on the pipe only after it is thoroughly cleaned and coated with soldering paste (Fig. 6). When the fitting is firmly in place, rotate both the pipe and the fitting several times to spread the flux evenly.

  • A propane torch is an ideal tool for sweating copper pipe. If you look at the flame of a propane torch you will notice there is a lighter blue, well-defined flame in the middle of a darker blue flame. The tip of this light blue flame is the hottest part of the flame (Fig. 7).

  • Play the flame along the fittings and the pipe to bring them up to soldering heat. Then concentrate the heat in the middle of the fitting. The light blue flame should be just touching the fitting. You can do both ends of the fitting at the same time by heating in the middle like this.

  • Do not apply the heat directly to the solder or the area that has been fluxed. Do not overheat the copper pipe. If you look at the flame on the side of the pipe away from the torch, you may notice a green flame develop. This means the fitting is ready to solder. Another way to tell is to touch the solder to the hot pipe. If the solder melts and begins to run, the pipe is at soldering temperature.

  • Remove the flame from the pipe and apply the solder to the pipe where it joins the fitting. The solder will flow into the fit. Keep melting the solder until it appears completely around the fitting. The old saying, "If a little is good, then a lot is better," does not apply here. Excess solder can run down inside the pipe, causing a restriction or even a blockage.

  • Many codes now require lead-free or nearly lead-free solder to be used for water supply lines. Check with your local code to be sure. Never use acid core solder for sweating copper pipes. Use either lead-free or 95/5 solid-core solder.

  • If you are soldering both sides of a coupling or elbow or three sides of a tee, do it all at the same time. Heat the fitting and then quickly apply solder to all the joints. If you have to reheat a joint on a fitting, place a wet cloth on any nearby joints that have already been made. This can avoid damaging these nearby joints.

  • You can experiment with different tips on your propane torch until you find the one that spreads the heat evenly along the pipe you are using.


FIG. 8 - A standard coupling has a center ridge–the slip coupling is smooth inside.


FIG. 9 - Cut the pipe at the leak and mend with a slip coupling.


FIG. 10 - Completely cut out and remove the section of damaged pipe.


FIG. 11 - Remove the old pipe and replace it with a section of new pipe.


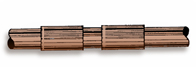
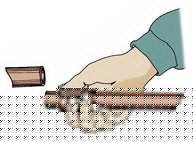
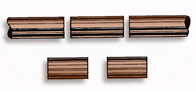
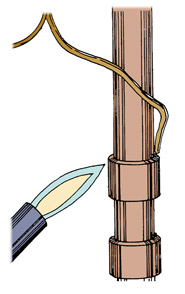
  FIG. 12 - Solder the slip couplings into place.


MENDING COPPER PIPE

  • At some point, you may need to repair a leak in copper pipe or replace a damaged section with a new piece.

  • You can use either a standard copper coupling of the proper size or a slip coupling for making repairs or inserting a new section in copper pipe (Fig. 8).

  • The basic difference in a slip coupling and a standard coupling is the center ridge built into a standard coupling. Both fittings can be used for the same mending purposes, but the center ridge in the standard coupling makes it easier to center the fitting on a repair job.

  • The ridge in the standard coupling automatically centers it when the coupling is used for making a splice in pipe. The slip coupling can be slid along the tube, but it must be centered by measuring at each joint.
  • Small leaks in copper pipes can usually be corrected by sawing the pipe directly at the point of the leak (Fig. 9).

  • First, drain all the water from the pipe. Spread the pipes apart and insert a slip coupling or a standard coupling of the proper size over the pipe.

  • If you use a slip coupling, insert it on the pipe and slide it to the desired position. The center ridge in the standard coupling makes slipping impossible.

  • Clean the two ends by brushing, sanding or rubbing as previously described.

  • Clean the ends of the pipe. Apply the flux to the pipe and fitting. Solder the slip coupling into position as shown in Fig. 9.

  • In some cases, a section of pipe must be totally cut away and removed (Fig. 10). You need to saw away the section of damaged pipe and cut a new piece of pipe of the same size and length.

  • Remove the damaged pipe and replace it with a new section of pipe that is exactly the same size (Fig. 11). Clean the ends and the inside of the couplings.

  • After applying flux, put the two slip couplings into position and prepare for the sweating process.


  • Solder the slip couplings into place (Fig. 12). Use lead-free or 95/5 solid-core solder only. Never use acid-core solder for sweating copper pipe.

  • Many older homes were originally plumbed with galvanized pipe. However, you can still use copper pipe when repairing the plumbing system.


Lead Warning

  • Many older homes have lead pipe water systems. Many newer homes have copper pipe water systems that have been soldered together with solder containing lead.
  • Lead can leak into the drinking water system from the corrosion of materials in plumbing and distribution systems that contain lead. Exposure to lead may cause brain and nervous disorders, anemia, high blood pressure, kidney and reproductive problems, decreased red blood cells, slower reflexes and even death. The lead collects in the kidneys, liver and brain. Unlike many other chemicals, once lead enters a person's system it cannot be removed. Exposure to even small amounts over a period of years can cause irreversible damage.
  • When working on a plumbing project, use lead-free solder.
  • In normal use, if it has been six hours since the water system was used, turn on the water and let it run for a few minutes before drawing water to use for drinking or cooking. However, there is no need to waste this water. It may be used for such things as watering plants.
  • Additional information is available from the Environmental Protection Agency's Safe Drinking Water hotline at 1-800-426-4791. It can also provide information about certified laboratories that test for lead in drinking water.
  • Contact the National Lead Information Center Hotline at 1-800-LEAD-FYI for more information and lead poisoning prevention.


TOOL AND MATERIAL CHECKLIST
Copper Pipe Pipe Fittings & Connectors
Hacksaw Pipe Vise
Pipe Cutter Half-Round File
Sandpaper Steel Wool
Stiff Brush for Flux Flux or Soldering Paste
4-in-1 Cleaning Brush Lead-Free or 95/5 Solid-Core Solder
Propane Torch Extra Propane Tank
Hand Cleaner  


Check your state and local codes before starting any project. Follow all safety precautions. Information in this document has been furnished by the National Retail Hardware Association (NRHA) and associated contributors. Every effort has been made to ensure accuracy and safety. Neither NRHA, any contributor nor the retailer can be held responsible for damages or injuries resulting from the use of the information in this document.