|
Create New Account
Millard Lumber Newsletter
Register to receive newsletters and notices by email. Register Now
|
Repairing & Patching Concrete
Here are tips and suggestions on how to patch and repair concrete.
Take the time to read these directions thoroughly to save time, money and effort.
This will also help you end up with a neater, more satisfactory jobwith
far less waste. In this document you will find information about:
- Repairing Hairline Cracks
- Repairing Cracks in Sidewalks
- Repairing Concrete Driveways
- Repairing Cracks and Holes in Concrete Walls
- Patching Holes in Walks or Driveways
- Repairing Broken Corners on Concrete
|
|

REPAIRING HAIRLINE CRACKS
- You can repair hairline cracks in concrete with a grout made of Portland
cement and water. Add just enough water to the cement to form a thick
paste.
- Moisten the old concrete along the hairline crack with water for several
hours before adding the grout. Moistening the concrete prevents it from
drawing the water from the grout, which will dry out the mixture. Although
the old concrete should be moist, no water should be standing on the
surface when the grout is applied.
- After the hairline crack has been moistened and thoroughly cleaned, apply the grout with a putty knife or pointing trowel. Force the grout into the crack as much as possible. Then smooth it off so it is level with the original concrete.
- Allow the patched area to dry about two hours. Then, cover the area
with a piece of plastic sheeting or a board.
- Keep the area covered for about five days. Lift the covering once
each day and sprinkle the area with water.
|
|
FIG. 1 - Enlarge the
crack with a cold chisel and a hammer before attempting to repair it.
FIG. 2 - WRONG - Don't
just pour new concrete into the old crack.
RIGHT - Undercut the crack
to give holding power to the new patching mix.
FIG. 3 - Moisten the
area to be repaired with cement adhesive or water. |

REPAIRING CRACKS IN SIDEWALKS
- Cracks in sidewalks that are larger than hairline cracks must be enlarged before they can be satisfactorily repaired. Enlarge the crack along its entire length with a cold chisel and hammer (Fig. 1).
- Make the crack wider at the bottom than at the top (Fig. 2). This
is known as undercutting. It helps to bond the new concrete with the
older concrete.
- Undercut the crack to a minimum depth of 1". The depth of the undercutting
depends on the size and depth of the crack to be repaired.
- After the crack has been thoroughly undercut, remove all loose material
and brush the area with a wire brush.
- Use a garden hose or a tire pump to blow or wash away the dust in the crack.
- The new concrete patch will hold better if a concrete adhesive is used
first. There are many types of concrete adhesives. Acrylic resina
milky fluidis one common type. Brush the adhesive into the undercut
area and allow it to dry until it becomes tacky (Fig. 3).
- If you do not use a cement adhesive, thoroughly brush and soak the area
to be patched. Moistening the area prevents the old concrete from absorbing
all the moisture in the concrete patch. Although it should be moist,
no water should be standing on the area where the patch is to be applied.
- For small patching jobs, use a pre-mixed concrete patch. If you use
ready-mix concrete patch, all you need to add is water.
- If you mix your own concrete patch, use one part Portland cement to
two-and-a-half parts of fine, clean sand. Heavier concrete patch jobs
call for one part of Portland cement to two parts of sand to three parts
of gravel.
- Tamp the concrete patch mix tightly into the undercut area. Be sure to
fill all areas completely.
- When the mixture begins to set, smooth it down with either a metal trowel
or a wooden float (Fig. 4). Use a metal trowel for a smooth finish.
For a rough surface, use a wood float for the finishing job.
- After the patch is completed, allow it to dry for about two hours.
Then cover the patched area completely with plastic sheeting or boards.
- Keep the area covered for about five days. Lift the cover once each
day to wet down the repaired area, permitting the new concrete to cure
correctly.
|
|
FIG. 4 - Smooth off
the repair job with a metal trowel or wooden float, depending on the finish
desired.
|

REPAIRING CONCRETE DRIVEWAYS
- You can repair a crack in a concrete driveway in basically the same way
as a crack in a concrete sidewalk. However, since the driveway must
carry heavier weight loads, the repaired area must withstand much greater
pressure.
- Use a gravel mix, rather than a sand mix, for repairing concrete driveways.
This mix is one part Portland cement, two parts sand and three parts
gravel.
- Thoroughly clean and then undercut the crack. Brush cement adhesive into
the undercut area.
- Undercut the cracked area to a greater depth and make the cracks considerably
wider than when repairing a sidewalk. This extra depth and width increases
the strength of the repair job.
- Follow all of the steps outlined previously in repairing a crack in a sidewalk
to repair a crack in a concrete driveway.
- After the gravel mix has been applied, level the new patch mix off with
a trowel or float, as you would do when repairing a sidewalk (Fig. 4).
- Cover the patched area for five days, wetting it down once each day.
- Do not drive an automobile over the patched area for at least five
days. This gives the newly patched section time to dry thoroughly before
it must carry the heavy load of an automobile or truck.
|
|
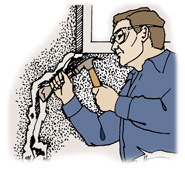
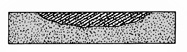
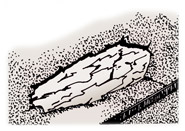
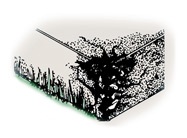
FIG. 5 - Enlarge and
undercut a concrete wall crack with a cold chisel and hammer.
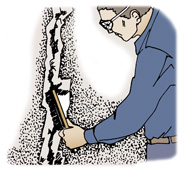
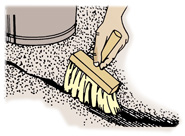
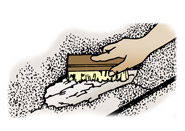
FIG. 6 - Clean the
undercut area with a stiff wire brush, but leave a rough surface.
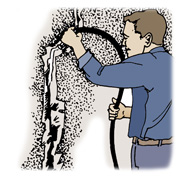
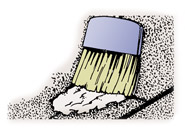
FIG. 7 - Moistening
the area to be repaired prevents the newly applied patch from drying out.
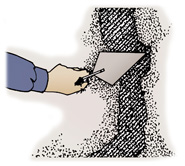
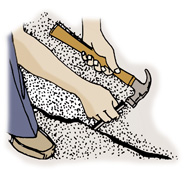
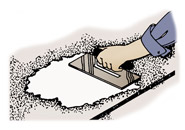
FIG. 8 - Force the
concrete patch mix into the area with a pointing trowel.
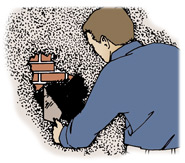
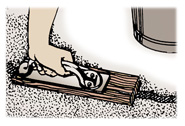
FIG. 9 - Repair holes
in concrete walls the same way you repair cracks.
|

REPAIRING CRACKS AND HOLES
IN CONCRETE WALLS
- Repairing a crack in a concrete wall requires basically the same steps
as repairing a crack in a sidewalk or driveway.
- The cracked area must first be undercut and widened in basically the same
way as previously described for a sidewalk (Fig. 2).
- The widening and undercutting can be done with a cold chisel and hammer
(Fig. 5). The width and depth of the undercutting depends on the size
and length of the crack.
- After all loose material has been chipped away, thoroughly clean the undercut
area around the crack with a stiff wire brush (Fig. 6). Do not brush
the area enough to smooth off the edges. The rough surface created by
the chiseling provides a good bond for the new concrete you'll apply.
- When the enlarged area has been thoroughly cleaned, apply cement adhesive
with a brush. This is the same cement adhesive used when repairing sidewalks.
If you do not have a cement adhesive, prime the area with a thin, creamy
mixture of Portland cement and water.
- In some cases, you can make the patch by simply moistening the area thoroughly
before filling the crack with concrete (Fig. 7). Although the moistening
is important, a concrete adhesive or the mixture of Portland cement
and water is much more desirable than moistening with water only.
- You can use a ready-mix concrete patch for small cracks in cement walls.
Force the mixture into the cutaway area with a pointing trowel (Fig.
8). Be sure to use enough pressure to force the patch mix into all the
cutaway areas in the crack.
- It may be difficult to conceal the patch, since the finish on the old concrete
is difficult to duplicate. To conceal the patch, simply experiment with
matching the original finish by roughing up the patched area while it
is still workable. Try using an old broom, a float, or any other tool
to create the desired rough finish.
- You can patch holes and broken areas in concrete walls by simply clearing
out the hole in the same basic way you would undercut a crack.
- After the hole has been thoroughly cleaned and cut away, apply the cement
adhesive and insert the patch mix into the hole with a pointing trowel
(Fig. 9).
- Moisten the area and cure it after the patch is applied in the same way cracks in cement driveways or sidewalks are moistened and cured.
|
|
FIG. 10 - Small holes
in concrete can be repaired with latex cement.
FIG. 11 - Brush away
all loose particles before applying the latex cement.
FIG. 12 - Brush the
area to be repaired with a light brush and wash it out with a garden hose.
FIG. 13 - Finish the
latex cement with a trowel.
|

PATCHING HOLES IN WALKS
OR DRIVEWAYS
- How you patch holes in sidewalks and driveways depends on the depth
and the size of the hole. If the hole is extremely deep and large, you
must undercut it as previously described and fill the area with a gravel
mix.
- Small, shallow holes in flat-surfaced concretesuch as driveways,
patios or sidewalkscan easily be repaired with latex cement (Fig.
10). If the hole is small and shallow, no chipping away is required.
- Small, shallow holes need only to be cleaned thoroughly before adding the
latex cement.
- This cleaning can usually be done with a wire brush, which removes all the small pieces of loose concrete when you rub the area thoroughly (Fig. 11).
- After using the wire brush on the damaged area, use a lighter brush to
remove the loose particles that were dislodged by the wire brush. Then,
wash the area to be repaired with a garden hose (Fig. 12).
- After the cleaning is done, you are ready to apply the latex cement. This usually comes in 5-lb. cans, with the liquid latex in a smaller can inside a larger can.
- Pour the liquid latex into the larger can and thoroughly mix it with
the latex cement to form a heavy paste. Apply this paste to the area
to be patched in approximately 1/4" layers. Smooth each layer with
a trowel and allow to partially dry before applying the next layer.
- Build up the latex cement 1/4" at a time until it reaches the same level as the original concrete. Then, smooth out the area with a trowel or float as you would finish regular
concrete (Fig. 13).
|
|
FIG. 14 - Broken corners
on concrete can be repaired with latex cement.
|

REPAIRING BROKEN CORNERS ON CONCRETE
- You can repair broken corners on concrete with latex or epoxy cement (Fig.
14). A broken corner should be thoroughly cleaned and moistened before
the mixture is applied.
- After the corner has been thoroughly brushed and washed, build up the latex or epoxy cement mix 1/4" at a time, as previously described. If the area to be repaired is quite large, you may need to build a small form to hold the mix while it is drying.
|
Check your state and local codes before starting any project. Follow all safety precautions. Information in this document has been furnished by the National Retail Hardware Association (NRHA) and associated contributors. Every effort has been made to ensure accuracy and safety. Neither NRHA, any contributor, nor the retailer can be held responsible for damages or injuries resulting from the use of the information in this document.
|