No matter how much closet storage you have, chances are you could probably always use more space. But while building new closets may not be a practical option, you may be able to use the space you have more efficiently. In this document you will find information about:
- Planning Closet Storage
- Building Closet Storage
|
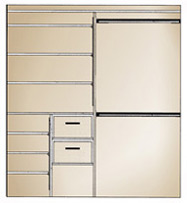
FIG. 1 - A sample
closet design. You may want to vary the dimensions to suit your needs.
|

PLANNING CLOSET STORAGE
- To make the most of your closet space, you first need to know the sizes of the things you want to store. The following general clothing dimensions will help you plan your closet storage efficiently:
| Five men's suit coats: |
12"
wide, 38" long |
| Six men's shirts (on hangers) |
12"
wide, 38" long |
| Man's shirt (folded) |
8"
wide, 14" long |
| Man's pants (on straight hangers) |
44"
long |
| Man's pants (folded on hangers) |
27"
long |
| Man's dress hat: |
6"
x 11" |
| Man's shoes: |
9"
wide, 12" long |
| Woman's dress: |
68"
long |
| Woman's robe: |
52"
long |
| Woman's dress: |
50"
long |
| Woman's jacket: |
36"
long |
| Woman's blouse (on hanger) |
34"
long |
| Woman's blouse (folded) |
10"
wide, 13" long |
| Woman's skirt: |
36"
long |
| Woman's shoes: |
6"
wide, 9-1/2" long |
| Sweater (folded): |
10"
wide, 14" long |
| Boots: |
9"
wide, 12" deep, 14" high |
- You may not want to design your closet around an exact inventory of all
your clothing (what if you buy another shirt?), but a general inventory
can help you add up the space you'll need.
- One of the problems with building any kind of storage space is that your
needs may change. The closet layout in Fig. 1 is an easy project to
build, but it offers enough flexibility that you can change the design
to suit your changing needs.
- This design is based on the size of a common 6-foot closet–about 6-1/2
feet wide, 7-1/2 feet tall, and 24" deep, with a 6-foot-wide, 80"-high
door opening.
- It provides nearly the same space for hanging clothes by stacking two 3-foot
closet rods rather than using one rod the entire length of the closet.
- One of the most wasted areas in a closet is the space between the top shelf
and the ceiling. The top shelf in this design is placed as high as possible–only
3" below the top of the door opening–but it is only 10"
wide, so you can maneuver items in and out.
- The rest of the shelves are 22" deep, almost as deep as the closet.
The top shelf and the shelf just above the optional drawers are both
permanent. They rest on 1x2 cleats fastened to the wall.
- The two uprights are also fastened in place permanently. They provide support
for the permanent shelves, and anchor one end of the closet rods.
- The remaining shelves rest on shelf clips that are hung from metal shelf
standards. They can be moved up and down as needed to accommodate shoes,
sweaters, shirts, hats, etc.
- The drawers are simple boxes built to slide into two shelves, although
they may also be hung from drawer slides. The cubbyhole below the drawers
will hold boots or other tall items.
- The shelves are cut from 3/4" plywood, and the drawers are made from 1/2" plywood, with 1/4" hardboard for the bottoms.
|
|
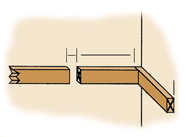
FIG. 2 - Leave a gap
between the cleats on the back wall for the center upright.
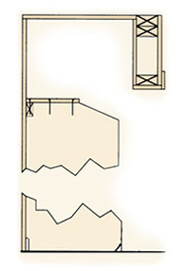
FIG. 3 - Side View–Cut
the front edge of the center upright at an angle so it won't get in the
way when you put items on the narrow top shelf.
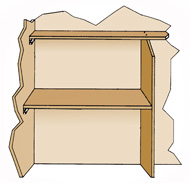
FIG. 4 - Nail the
lower permanent shelf to a 1x2 cleat on the wall, then level it and nail
through the center upright into the shelf on the other side.
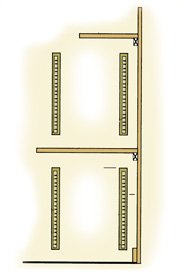
FIG. 5 - Side View–Mount
the shelf standards on 1x2s on the side wall, fastened with hollow wall
anchors.
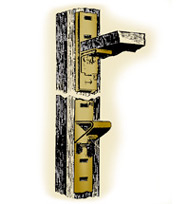
FIG. 6 - Shelf standards
can be mounted on the surface of the 1x2s, or inset with a 3/4" router
bit.
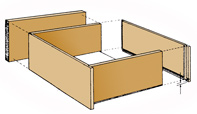
FIG. 7 |

BUILDING CLOSET STORAGE
- To build this closet storage unit, first remove the existing shelves, closet rod, and doors. Measure 3" down from the top of the door opening and make a pencil mark on the wall just inside the door. Use a level to draw a level line from this mark all around the inside of the closet.
- Cut two 10" 1x2 cleats and fasten them to the side walls, upper edges
flush with your pencil line. You should be able to nail the cleat to
the wall framing in the back corner, but you may need to use a toggle
bolt or hollow wall anchor at the front of each cleat.
- Measure along the back wall to the location of the center upright. Make a mark, then make a second mark 3/4" farther. Install two more 1x2 cleats on the back wall, leaving a 3/4" gap between them at the point where the center upright will be placed (Fig. 2).
- Cut the top shelf and place it on the cleats. Fasten it in place with 6d
finish nails. Measure from the bottom of the shelf to the floor, then
cut the center upright to fit. Set the upright under the top shelf and
nail through the shelf into the upright with 6d finish nails. Use the
level to plumb the upright, then use a carpenter's square to make sure
it is at a 90-degree angle to the back wall. Toenail through the lower
edge of the upright into the floor with an 8d finish nail to secure
it in place (Fig. 3).
- Next, install the lower permanent shelf (from Fig. 1, left side). Fasten 1x2 cleats on the back and side walls as you did for the top shelf. Cut the shelf and set it in place, fastening it to the 1x2 cleats on one side, and nailing through the center upright into the edge of the shelf on the other (Fig. 4).
- Then cut the lower upright (the one that divides the lower shelves and
the drawers in Fig. 1). Install the small upright as you did the center
upright.
- Measure from the center upright to the side wall for the closet rods. Cut the closet rods 1/2" shorter than that dimension. Install the closet rod sockets on the wall, centered between the back wall and the front of the closet. Set each closet rod in the socket, level it, and mark the location of the opposite socket. Install the other two sockets, then set the closet rods in place.
- On the shelving side of the closet, measure the vertical distance from
the underside of the top shelf to the top of the lower permanent shelf.
Subtract 6", then cut two 1x2s to this length to provide backing
for adjustable shelf standards. Mount each 1x2 vertically on the side
wall with four hollow wall anchors. The 1x2s should be positioned about
2" from the back and front walls of the closet (Fig. 5).
- Cut four shelf standards to the same length as the 1x2s (Fig. 6). Mount the shelf standards on the 1x2s and on the center upright. To make sure the slots in the shelf standards are level with each other, insert one shelf clip in each standard and use your level (and a cut 1x2, if needed) to check each standard before fastening it. Repeat the process on the wall between the lower permanent shelf and the floor.
- Cut the adjustable shelves about 1/4" shorter than the distance between
the standards. Insert shelf clips in the standards and install the shelves.
- Cut the permanent shelves that will go between the center upright and the lower upright, then install them by nailing through the two uprights into the ends of the shelves. Use your level to make sure they are installed level.
- Build the drawers from 1/2" Baltic birch plywood. First, measure the
cubbyhole where the drawer will be placed. Cut the sides so the width
is 1" less than the height of the hole, and the length is 1"
less than the depth. Cut the back and front the same width as the sides,
but 1/2" shorter than the width of the hole.
- Rout a 1/4" x 1/4" groove in all four pieces, 1/4" above
the bottom of each piece. Assemble the front and sides by gluing and
screwing through the front into the edges of the sides. Cut the bottom
from a piece of 1/4" hardboard, 1/2" larger in each direction
than the interior dimension of the drawer (Fig. 7).
- Slip the drawer into the groove, then fasten the back to the assembly. Attach the handle.
|
Check your state and local codes before starting any project.
Follow all safety precautions. Information in this document has been furnished
by the National Retail Hardware Association (NRHA) and associated contributors.
Every effort has been made to ensure accuracy and safety. Neither NRHA, any contributor
nor the retailer can be held responsible for damages or injuries resulting from
the use of the information in this document.