Here are tips and instructions on how to lay concrete blocks. Take the time to read the directions thoroughly–they can save you time and effort. They also help you end up with a neater, more satisfactory installation–with far less waste. In this document you will find information about:


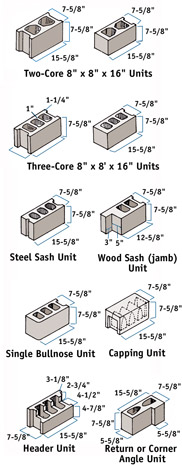
FIG. 1 - Select the correct blocks before beginning the job.

SELECT THE RIGHT BLOCKS FOR THE JOB

  • Fig. 1 shows a few of the many types of concrete blocks available for modern construction. Select the correct block for your job before starting the project.Your retailer will be glad to help you select the correct blocks if you need further direction.

  • All 8" blocks–the standard unit–are actually 7-5/8" in width. This allows for the thickness of the mortar on the finished job.

  • The standard unit is suitable for most projects. Half-blocks with square or rounded corners are often necessary at the end of a run.

  • Both single and double corner units provide a block that gives a smooth finish at the corner.

  • Jamb joist blocks are used around doorways.

  • Sash units provide an opening for casement windows, while header blocks are designed to provide a space for wooden supports or other structures at the top of a wall.

  • Other special blocks are available for almost any building requirement.


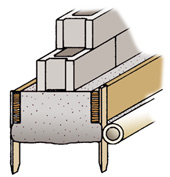
FIG. 2 - Pour a footing of concrete for any block wall.


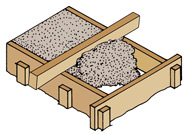
FIG. 3 - Use a 2x4 or other straightedge to level the concrete.

POURING THE FOOTING FOR A BLOCK WALL

  • Every block wall–regardless of height or length–should be placed on a secure footing of poured concrete (Fig. 2). A block barbecue grill or outdoor fireplace requires a large concrete pad as a footing.

  • The footing should always be poured deep enough so that the base is below the frost line.

  • Always make the footing at least twice as deep as the thickness of the wall and twice as wide (Fig. 2). For example, if you are using 8" blocks, the footing should be at least 8" deep and about 16" wide. This footing will provide a 4" rim on each side of the block when laid.

  • The form for such footings can be made from rough 2x4s, held in place by wooden stakes driven into the ground about every 3' to 4' (Fig. 2).

  • For a footing poured in an area where drainage is a problem, lay a drain line along the outer edge of the form (Fig. 2). Allow for a drop of about 1" for each 20' of drain line. Backfill over the drain line with about 12" of crushed stone or gravel.

  • Before you pour the footing, be sure it will not prevent the natural run-off of water and will not divert the flow of water onto any neighboring property.

  • If gas, electric or water supply lines must pass through the footing, you must make an opening. Do this by nailing together four pieces of 2x8 and laying them in the proper position before the footing is poured. In many cases, a 4" piece of drain tile will serve the same purpose. Mark the depth and location of the utility opening on your foundation plan or with a stake so you can find it easily later on.

  • For large concrete foundation jobs that cannot be finished with one pouring, divide the forms into sections you can handle. Complete one before proceeding to the next.

  • Make sure your footing is level by placing a level across the footings about every 8'. Adjust the height of the 2x4s by raising or lowering the stakes to make the 2x4s level on each side at all points around the footing.

  • Fill the form to the top edge, then level the freshly poured concrete by pulling a 2x4 or some other straightedge along the top of the form (Fig. 3).

  • Work the straightedge back and forth–in a sawing motion–until the concrete is level. Fill in any low spots with additional concrete. Wipe away surplus concrete in the high spots.

  • Allow ample time for the concrete to dry fully. If the footing is to carry an extremely heavy load, drying may require up to three days.


ESTIMATING BLOCKS AND MORTAR NEEDED

  • Fig. 4 provides a table that will help you estimate the number of blocks and the amount of mortar you'll need for your job.

    FIG. 4
    Use this table to help you estimate the number of blocks and mortar needed for your project.
    Number of Concrete Blocks Required for Each Sq. Ft. of Wall
    Based on 3/8" Mortar Joint
    BLOCK SIZE BLOCKS PER 100 SQ. FT. OF WALL AREA
    4 X 4 X 16 225
    6 X 4 X 16 225
    8 X 4 X 16 225
    4 X 8 X 16 112-1/2
    6 X 8 X 16 112-1/2
    8 X 8 X 16 112-1/2
    12 X 8 X 16 112-1/2
    Mortar Needed for Concrete Blocks
    BLOCK SIZE PER 100 SQ. FT. OF WALL AREA PER 100 BLOCKS
    4" Blocks 13-1/2 Cu. Ft 6 Cu. Ft.
    8" Blocks 8-1/2 Cu. Ft. 7-1/2 Cu. Ft.


  • Select the block size you will be using in the left-hand column. The right-hand column will show you the number of blocks and the amount of mortar required for the job.

  • You can also estimate for the number of blocks required by allowing three 8" blocks for every 4' on each course of blocks.


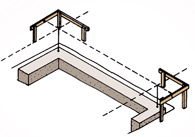
FIG. 5 - Locate the exact corner by stretching lines from one corner form to the other. The two lines cross at the exact center.


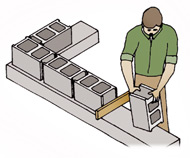
FIG. 6 - Lay out a dry test run to determine the number of concrete blocks needed. Use 3/8" plywood pieces between blocks to fill in the mortar.

PREPARING TO LAY THE CONCRETE BLOCKS

  • Before starting to lay the blocks, drive stakes into the ground and build a form at each corner (Fig. 5). These stakes and forms can be made from scrap pieces of wood used on the job.

  • Locate the exact corner by stretching lines from one corner form to the other as illustrated in Fig. 5. The exact corner will be the point at which the two lines cross.

  • Drop a plumb bob down from each line, both at the corner point where the lines cross and at positions about 2' out in each direction.

  • Determine the exact number of blocks required for the first course by laying out a course of block on the dry concrete (Fig. 6). Do not use mortar for this test run–you are merely determining the number of blocks required for the job.

  • Be sure to use the corner blocks where needed, and cut blocks as required.

  • Use scrap pieces of 3/8" plywood to fill in the mortar joint between each block. This is the thickness of the mortar when applied.

  • After this test run, remove the blocks and prepare for the actual laying of the first course.


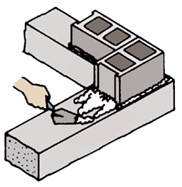
FIG. 7 - Spread the mortar about 1" deep and 8" wide, using a furrow in the center to force the mortar to the edge.


FIG. 8 - After spreading the mortar on the footing, apply mortar to the ends of the blocks.


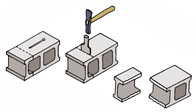
FIG. 9 - To cut blocks, use a wide chisel and bricklayer's hammer.


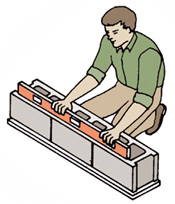
FIG. 10 - Check the alignment with a long mason's level after a few blocks are laid. Check the tops and the outside edge.


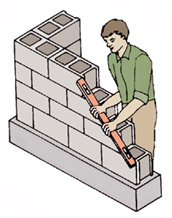
FIG. 11 - The block corners should strike evenly along a level held diagonally.


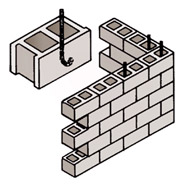
FIG. 12 - Set anchor bolts every 3' to 4' in the top run if wood framing is to be applied.


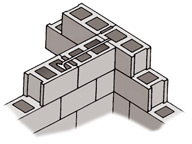
FIG. 13 - Load-bearing walls should be anchored with metal tie bars.

LAYING THE CONCRETE BLOCKS

  • Drop plumb bobs down from the corner string and at positions about 3' out from the corner (Fig. 5). Mark the location of the corner block on the footing base as shown.

  • Spread the mortar out about 1" deep and 8" wide in the marked area (Fig 7). Extend this mortar out for a distance of about three or four blocks in one direction.

  • Put a furrow in the center of the mortar with a trowel. This furrow will force the mortar to the edge of the block when it is laid (Fig. 7).

  • Set the corner block first. Be sure you are using the correct block (finished end).

  • Check the starting corner block, both horizontally and vertically, and take time to get it positioned correctly. All other blocks will align with this starter block, so it's very important to set it exactly.

  • Follow this same procedure as you reach the other corners, laying the first course out about two or three blocks in each direction.

  • Tie a line between two bricks and stretch it between the two corner blocks on the first course.

  • Continue to lay the base mortar on the footing as the course continues. Apply mortar to the ends of the blocks with a trowel and place the block in position (Fig. 8).

  • Keep all mortar joints at about 3/8". If necessary to make spacing adjustments, fill some mortar joints 1/2" to 3/4".

  • If you must cut a block to fill a course, use a masonry chisel as illustrated in Fig. 9. Draw a line on both sides of the block where the cut is to be made. Strike the chisel with a bricklayer's hammer. You will soon learn to make such cuts easily.

  • After you've laid four or five blocks, use a long mason's level or some type of straightedge to check the alignment of the blocks (Fig. 10). Check both the tops of the blocks and the outside edge for correct alignment.

  • Tap the blocks into position to make any alignment corrections while the mortar is still wet. Never attempt to move a block after the concrete begins to set.

  • Build up the corners first. Always keep the corners about a block or two higher than other runs until you finish the job.

  • Keep the guidelines between the corners at all times. They will help you keep the blocks level at all points in each course. Be careful not to knock the lines out of alignment.

  • Always keep the guidelines tight. If one side gets bumped out of position, take a minute to level it.

  • Use a trowel to cut away any surplus mortar. Throw the surplus mortar back onto the mortarboard. Keep turning the mortar with your trowel throughout the project so small portions will not harden.

  • Use a piece of 3/4" plyboard or the bed of a wheelbarrow as a mortarboard. Always wet the board or the wheelbarrow bed before placing the mortar in it.

  • Never mix more mortar than you can use in about an hour and a half or two hours. On a hot day, keep the mortar covered with a piece of plastic to hold in moisture.

  • Use as much water as the mortar will take and still remain elastic.

  • Continue to stagger the blocks–working from the corners–and build the wall to the desired height.

  • Take time to level each course. Use a level that is at least 3' long.

  • Lay all blocks with the thicker end of the face shell up.

  • Keep a leveling string at the top of each course on each run of block.

  • Measure both the length and the height of the wall after every two or three runs. Also, hold your level diagonally along the block corners to check for accuracy (Fig. 11). If the blocks are being laid accurately, the corners will strike evenly along a level held in this position.

  • After all the blocks are laid and while the mortar can still be pressed with the fingers, take a jointer and finish the mortar joints to the appearance desired. Keep the jointer wet during this part of the job.

  • You may need to add reinforcing rods to walls built extremely high or in areas where ground pressures may vary.

  • Lay 1/4" reinforcing rods as illustrated, with the ends overlapped 2" to 3". Mortar can be placed directly over the rods.

  • If wood framing will be attached to the top run, set an anchor bolt every 3' to 4' in the last run (Fig. 12).

  • If a load-bearing wall intersects with the outside wall, it should be tied to the main wall with metal tie bars (Fig. 13). Bars as shown should be set in place on at least every other run.

  • Nonload-bearing walls connecting to main walls can be tied in by laying a 16" strip of 1/2" mesh galvanized hardware cloth directly on top of the block.

  • A strip of this cloth should be used for every other course at the tie-in point.

  • If the concrete blocks are being laid as a fence or barrier, the top course can be finished off by filling in the holes with fresh concrete mix and a trowel.

  • For a neater and more enduring finish, use patio blocks for an attractive and weatherproof finish.

TOOL AND MATERIAL CHECKLIST
Concrete Blocks Level
Trowel Wheelbarrow
Garden Hose 100' of Cord
3/8" Plywood Anchor Bolts
Drain Tile 1/2" Galvanized Hardware Cloth
5/8" Plywood Mortar
Carpenter's Square Masonry Chisel
Work Gloves Mortar Hoe
Galvanized or Plastic Pail 2x4s for Framing
Plumb Bob Tie-in Bars
Jointer Mortar Board

Check your state and local codes before starting any project. Follow all safety precautions. Information in this document has been furnished by the National Retail Hardware Association (NRHA) and associated contributors. Every effort has been made to ensure accuracy and safety. Neither NRHA, any contributor nor the retailer can be held responsible for damages or injuries resulting from the use of the information in this document.