|
|
 |
|
 |
|
|
|
|
|
 |
 BASIC CONSIDERATIONS Probably the greatest challenge in remodeling a bathroom is figuring out how to achieve the style and build in the features you want within the limits of what is probably the smallest room in the house. A second limiting factor is the location of existing plumbing pipes and electrical wiring. Remodeling a bathroom is relatively easy if you don't have to move them. If you make radical changes in the existing layout, you'll need to investigate whether or not you can build what you want without making structural changes. Keep in mind that you may need a building permit, depending on the scope of your project. If so, you'll probably have to submit a detailed plan of your proposed project. Before you begin planning your new bathroom, always check with your local building department and find out what codes, and requirements you'll have to meet. There are a number of general issues you should consider before you begin designing your new bathroom. They include |
Are towel racks and tissue holders located conveniently? Is there enough storage space for everyone who uses the bathroom? Do vanity doors or drawers interfere with opening and closing the bathroom door?
If your current layout is livable, leaving the mechanical systems as that are will mean that much more in the budget for upgraded fixtures, and may make the difference between doing the project and waiting to save more money.
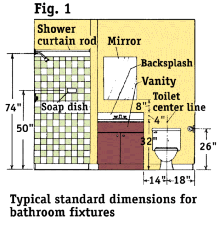
Don't neglect lighting when you redesign your bathroom. You'll need strong lighting over the mirror - a strip of eight 60-watt bulbs is not necessarily too much - but you may also want to consider pinpoint task lighting and soft ambient lights. If you plan to install a whirlpool built for two, indirect mood lighting may fit well. With incandescent lighting, you'll need at least 3-1/2 to 4 watts per square foot (e.g., 280 watts minimum in an 80-square foot bathroom). If you use fluorescent lighting, figure 1-1/2 to 2 watts per square foot.
|
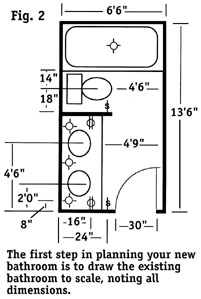
 PLANNING A NEW BATHROOM The first step in planning your new design is to make a detailed sketch of your existing design (Fig. 2). Use a sheet of graph paper with four squares per inch, and draw a floor plan (in other words, a bird's eye view) to scale. Make each square represent 3" - i.e., 1" equals 1', and draw in:
As you make your sketch, use an architect's scale to precisely locate any components that do not fall on exact 3" increments. FIXTURES AND COMPONENTS - It is beyond the scope of this document to provide extensive style ideas or discuss specific fixtures. We suggest that you visit your local home center's show room, contact a designer or architect, and consult how-to books such as Sunset's Bathroom Remodeling Handbook. Once you have a general idea of the style you want to incorporate into your new bathroom, the next step is to decide on the fixtures. The first place is to start is the bathtub. A standard builder's bathtub is 30" wide, 60" long, and typically about 15" deep. But you can go up from there, to soaking tubs 36" deep, square or sunken tubs, whirlpools, or even free-standing clawfoot tubs. Tub surrounds range from one-piece folding fiberglass units to five-piece assemblies, and doors may swing, slide or fold. The simplest sinks are wall-hung; they are also the least expensive. Vanity sinks may be deck-mounted - in other words, set into a hole cut in the countertop - or part of an integral bowl and countertop (typically a cultured marble top). There are three types of deck-mounted sinks (Fig. 3):
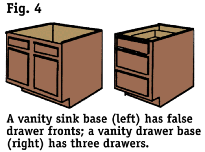
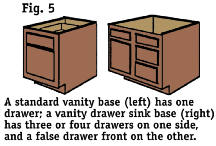
You may or may not have room for a small storage closet in the bathroom; if so, it can be used for towels and other accessories. Your vanity cabinets will provide the bulk of the storage, however, so it's important to choose them carefully. There are three basic types of base cabinets. A modular (as opposed to custom-built) sink base (Fig. 4) is typically 24" to 36" wide, with false drawer fronts and doors below. A drawer base (Fig. 4) may range from 12" wide to 18" wide; it generally makes the most of the space, with three or four drawers. A standard vanity base (Fig. 5) has one drawer, with a door below, and also comes in 12" to 18" widths. Combination units are also available (Fig. 5), with drawers on one side and a false drawer front and door on the other, to accommodate a sink. All modular vanities are about 30" high and either 19" deep or 21" deep. The most common type of toilet is a two-piece unit - a bowl and a tank. One-piece toilets are also available, in both a standard configuration and a low-profile model. What differentiates toilets (aside from color and style) is the flush design. The most common design is called a reverse trap. A siphon jet design is more efficient - and, of course, more expensive. |
|
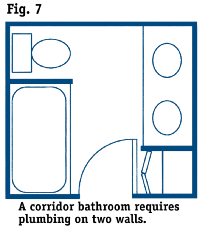
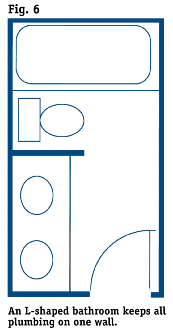
 DETERMINING THE FINAL DESIGN Once you have a rough idea of what fixtures you want, go to your supplier and measure them to get their outside dimensions. When you begin sketching out your new bathroom, cut out cardboard templates of each fixture, to the same scale as your sketch. Lay tracing paper over the sketch of your existing bathroom, and trace the walls and the locations of any components you know you will not move. Then begin planning your changes. LAYOUT - Minimum clearances vary by local building codes, so you'll need to check with the building department before you design. There are four common types of bathroom layouts:
Begin your layout by positioning the bathtub. Make sure you have easy access, room to maneuver if you'll be bathing small children, and nearby wall space for a towel rack. The bathtub is often placed against the back wall to keep it away from the bathroom door. Next, locate the sink and vanity cabinet. Plan for at least 30" clear space in front of the sink, so there is room to bend down and get into the cabinet. If the sink is placed along a side wall near the door, make sure the door swings away from the sink - not into it. Then locate the toilet, away from the door if possible. Most building codes require at least 20" clearance in front of the bowl. On each side, you'll probably need 18" to the nearest wall or 14" to the nearest cabinet (measured from the center of the bowl). If you have space for extra storage, naturally you'll want to use it; the most important consideration in designing storage space is putting everything you need within easy reach. You'll certainly need some shelf space, but you can also make efficient use of space with wire racks, bins, and drawers. If you use modular units, you'll be able to adjust your storage space later for changing needs. |

DOING TRIM AND FINISH WORK
Use the following checklist to guide you through the preparation, design, and construction process.
DESIGN PREPARATION
DESIGN
CONSTRUCTION PREPARATION
CONSTRUCTION
TOOLS AND MATERIAL CHECKLIST
| Graph Paper | Tracing Paper | Masking Tape | Pencils and Eraser |
| Ruler | Compass | Architect's Scale | Steel Tape Measure |
Check your state and local codes before starting any project. Follow all safety precautions. Information in this brochure has been furnished by the National Retail Hardware Association. Every effort has been made to ensure accuracy and safety. Neither the NRHA nor the retailer can be held responsible for damages or injuries from the use of the information in this document.