Before tackling any maintenance or repair, check your driveway for these conditions:
Impressions left by car tires after the car has been parked on the drive overnight.
This is an indication of poor construction.
Heaving or tilting during cold weather, or buckling or cracking with the spring thaw.
These are signs of poor drainage.
To repair these troubles, you'll need a new driveway. Fortunately, such problems are
not common. More likely problems are minor cracks, crumbling and chuckholes, which are
relatively easy to repair.
The procedure and materials used depends on whether you're repairing cracks, filling
low spots, patching or seal-coating your driveway. Your local retailer can help you select
the products you need for making repairs.
 |
 REPAIRING
CRACKS REPAIRING
CRACKS
- You should fill any cracks in a blacktop drive as soon as possible to keep water from
getting under the slab and causing more serious problems. Cracks that are 1/2" and
wider are filled with asphalt cold-patch, sold in bags and cans. Narrow cracks are treated
with crack-filler, which is available in cans, plastic pour bottles and handy caulking
cartridges.
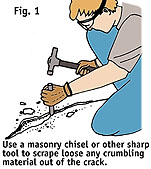
- Use a masonry chisel, wire brush or similar tool to dig away chunks of loose and broken
material from the crack (Fig. 1).
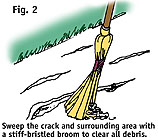
- Sweep out the crack with a stiff-bristled broom (Fig. 2). Your shop vacuum will
also work well.
- Use a garden hose with a pressure nozzle to clean off all dust. If the area is badly
soiled or covered with oil or grease drippings, scrub it with a strong commercial driveway
cleaning agent. For a patch to adhere, the crack must be free of all such things. After
using a cleaner, rinse the area with water.
- For a deep crack, fill it to within 1/4" of the top with closed-cell plastic backer
rod or sand before applying a patching compound.
- Apply the crack-filler (Fig. 3).
|
|
 FILLING
DEPRESSED AREAS FILLING
DEPRESSED AREAS
- Depressed areas, sometimes called "birdbaths," cause water puddles on the
driveway. If not too deep - less than an inch - these areas can be filled so they're even
with the surrounding surface. Sweep away all dirt, hose down the area, and remove any oil
or grease by washing with a detergent or cleaner.
- The surface may be slightly damp when applying the patching material, but make sure
there is no standing water.
- To help the new material adhere to the old, prime the area with emulsified liquid
asphalt, which is often simply called "driveway coating."
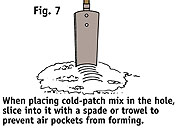
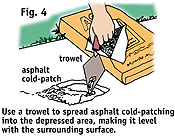
- Then, use a trowel to spread asphalt cold-patching material into the depression, filling
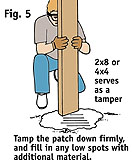
it level with the surrounding surface (Fig. 4). Smooth the patch, then tamp it with
a metal tamper or a 5' to 6' length of 2x8 or 4x4 lumber. Used vertically (Fig. 5),
the lumber has the surface area and weight for successful tamping.
- Allow your blacktop patch to dry for 24 hours before seal-coating the entire driveway.
|
|
 SEALING THE
DRIVE SEALING THE
DRIVE
- Use a sealant to coat blacktop surfaces every few years. The ideal time to seal your
drive is after you have completed any repairs. Sealer gives a fresh, new look to a
driveway. And it does more than that - it provides protection from sun and moisture and
from grease, oil and gasoline drips and spills, as well as other damaging substances.
Sealer guards against everyday wear and tear. It also fills hairline cracks that aren't
serious enough to require individual patching.
- The blacktop surface must be clean before you apply sealer. This includes dust, dirt,
grease, oil, and debris. Sweep it clean. Remove grease and oil spots with detergent or
cleaner. End the cleaning by rinsing the area thoroughly with water. Squeegee water from
any puddled spots. It is not necessary that the surface be thoroughly dry before applying
the sealer, but don't do the job when rain is forecast.
- Stir the sealer to make sure its ingredients are well-blended.
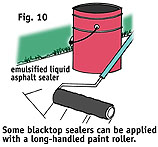
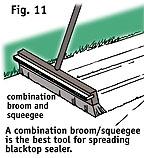
- Some sealers can be applied with a long-handled paint roller (Fig. 10). However,
the best tool for this is a combination squeegee/broom made for the purpose and available
from your retailer (Fig.11). Apply the sealer only to a small area of the driveway
at a time. Pour it out and spread it around evenly with the squeegee, brush or roller.
Don't spread the sealer too thin - one good coat stands up for a long time. Allow small
cracks and weathered areas to drink in the sealer.
- Be very careful to avoid splashing sealer onto walls, garage doors and yourself.
Moreover, plan the project so you will not have to walk across the treated areas. Use care
- this material can make a mess of house floors.
- Improve traction on sloped areas by adding sand to the sealer mix. Stir it in thoroughly
before applying, and keep the mix stirred during application.
- You can sprinkle sand over a sealer surface that's still wet. Excess sand not captured
by the sealer can be swept up later.
- Allow the sealer to cure for 24 hours before using the driveway (products vary in the
setting times, so check to see what's required by the one you use.) Erect string barriers
at the street end of the drive to remind family members to keep off and to discourage
casual traffic from spoiling your efforts.
|
| ASPHALT SAFETY CHECKLIST |
| When working with any asphaltic material, avoid
prolonged contact of the material with your skin. |
| Excessive breathing of asphalt materials should be
avoided, too. |
| Wear heavy work gloves, old clothing and old shoes if
you want to be protected from asphalt spatters. |
| When chipping or chiseling old blacktop, wear eye
protection. Also, don't chisel with a carpenter's hammer, because it isn't designed for
this type of job and its face may chip. Instead, use a hand-drilling hammer or machinist's
hammer. |
| Keep all asphalt materials away from high heat. Keep
solvent-thinned materials away from open flames. |
| Close containers after each use. |
| Always follow the manufacturer's instructions for the
product you are using. |
TOOLS AND MATERIAL CHECKLIST
| Asphalt Crack Filler |
Shop Vacuum |
Asphalt Cold-Patch |
Trowel |
| Emulsified Liquid Asphalt |
Stirring Stick |
Driveway Cleaner |
Tamper |
| Detergent |
Garden Roller |
Squeegee/Broom |
Long-Handled Paint Roller |
| Masonry Chisel |
Long-Nap Roller Cover |
Hand-Drilling or Machinist's Hammer |
Closed-Cell Backer Rod |
| Shovel, Spade |
Rope Oakum |
Stiff-Bristled Broom |
Sand |
| Garden Hose |
Gravel |
Pressure Nozzle |
Wire Brush |


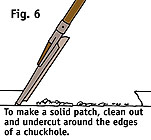
 PATCHING
CHUCKHOLES
PATCHING
CHUCKHOLES